Ошибка 016-910 на принтерах Xerox Versalink различных модификаций возникает по причине того, что в лотке отсутствует бумага, совместимая с заданными спецификациями печати.
Параметры используемой бумаги под определенные задачи настраиваются в программе Print Driver PostScript.
Кастомизация включает следующие возможности:
- выбор существующих форматов бумаги;
- настройка собственного формата (89-320 мм в ширину / 98-1321 мм в высоту);
- выбор цвета, типа листа и прочего.

Таким образом, бумага загруженная в лоток подачи должна соответствовать выбранным настройкам. Если принтер определит несоответствие, ошибка 016-910 появится вновь.
Проблема чтения PDF-файла
Аппараты Xerox Versalink часто приостанавливают работу, столкнувшись с проблемой чтения некоторых шрифтов и символов у PDF-файлов. При этом на дисплее высвечивается та же ошибка — 016-910.
Чтобы обойти данную уязвимость, распечатайте документ .pdf как изображение.
Слипшиеся листы
Бумага, предназначенная для печати, может слипнуться, если она определенное время находилась во влажной среде. По этой причине листы не захватываются механизмом принтера, провоцируя возникновение ошибки 016-910.
 Выньте бумагу из лотка, оставьте в проветриваемом помещении на несколько часов с целью сушки. Затем возьмите стопку с одной стороны и несколько раз потрясите. Обсохнувшие носители верните в лоток, правильно отрегулировав направляющие длины и ширины.
Остались вопросы? Комментируйте рекомендации или пишите на электронный ящик сервисного центра ТонерДруг!
Dear all, I need your help regarding error on WC7428, I’ll try to explain what happened, The device is reset for a moment by himself and no longer wanted to boot a system erro
Задайте свой вопрос
Чтобы задать вопрос, Вам необходимо
авторизоваться
Источник: http://alteh.ru/faq/6698/14052/
Originally Posted by
dradisic

Dear all,
I need your help regarding error on WC7428, I’ll try to explain what happened,
The device is reset for a moment by himself and no longer wanted to boot a system error 116-324 occurs and it stuck. I suspect the problem with the hard drive.
My question is whether the system can be cloned from another of the same device and put it on a new hard disk, whether it will work or what other steps.Thank you in advance and best regards,
Darkofrom WC 123 manual. Usually the error code shows the same information.
116-324 System Detected An Error RAP
Unusual CPU processing occurred.
Initial Actions
Refer to BSD 16.1.
Power OFF/ON
Procedure
Pull out and insert or replace the DIMM (PL 9.2).
Replace the ESS PWB (PL 9.2).I guess you can try cleaning the DIMM (RAM) using contact cleaner.
If you think it is HDD problem, try swap the HDD.
Hope it helps
Источник: http://copytechnet.com/forums/xerox/113378-workcentre-7428-fault-error-116-324-a.html
Xerox WC 5225 – DDR DIMM
Решение возникающих проблем.
Правила форума
Просьба ознакомиться с
Правилами форума.
Также большая просьба, картинки выкладывать или в
Галерею
, или прикрепляйте их к своим сообщениям.
Ссылки в темах на сторонние фотохостинги (кроме вконтакте)
заблокированы.
- Xerox Phaser 6600 “Invalid Yellow” / “Неверный желтый”
kotya-potya в форуме Принтеры, МФУ, факсы, копиры формата A4 5 2287 3100
Пн ноя 18, 2019 8:24 pm
- Xerox WC 3119: “Замятие 1”
kokubenko в форуме Принтеры, МФУ, факсы, копиры формата A4 22 31621 kokubenko
Ср ноя 23, 2011 4:47 pm
- Xerox WC3220 – Ложное замятие бумаги, Замятие 0
Romeo в форуме Принтеры, МФУ, факсы, копиры формата A4 25 3166 Romeo
Пн окт 12, 2020 7:13 pm
- Xerox WC 3119 без признаков “жизни”
MorZ в форуме Принтеры, МФУ, факсы, копиры формата A4 5 4599 Goldwater
Чт окт 08, 2020 11:34 pm
- Xerox 3315 “слетела” FIX прошивка
tekknik в форуме Принтеры, МФУ, факсы, копиры формата A4 7 3843 tekknik
Пн июн 10, 2019 4:22 am
Вернуться в Принтеры, МФУ, копиры формата A3
Кто сейчас на форуме
Сейчас этот форум просматривают: нет зарегистрированных пользователей и гости: 11
Источник: http://testcopy.ru/forum/viewtopic.php?f=4&t=7473
Xerox Phaser 5335N
FAZER 5335. Пишет: “ПЕРЕЗАПУСТИТЕ ПРИНТЕР”. Ошибка “116-324”. Что это и что делать? Спасибо.
Ответы 1
Это проблемы с оперативной памятью устройства. Попробуйте перезагрузить. А так может потребоваться замена платы внутренней памяти
- Автор: Мария Сухоруких
- Распечатать
Оцените статью:
(0 голосов, среднее: 0 из 5)
Источник: http://4apple.org/116-324-oshibka-xerox/
Fixed- Xerox Error 116 324

My printer shows a Xerox error 116 324. I know it is a fault code 116 324. But how can I solve this problem? How can I solve this problem?
- Answer Accepted: No
- Question Category: Others
- Question Tags: Printer
![]()
Источник: http://techyv.com/questions/fixed-xerox-error-116-324/
Error 016-311 Xerox Fixes & Solutions
We are confident that the above descriptions of Error 016-311 Xerox and how to fix it will be useful to you. If you have another solution to Error 016-311 Xerox or some notes on the existing ways to solve it, then please drop us an email.
Источник: http://errorsbase.com/e-errors/error-016-311-xerox.html
Проблема чтения PDF-файла
Аппараты Xerox Versalink часто приостанавливают работу, столкнувшись с проблемой чтения некоторых шрифтов и символов у PDF-файлов. При этом на дисплее высвечивается та же ошибка — 016-910.
Чтобы обойти данную уязвимость, распечатайте документ .pdf как изображение.
Источник: http://tonerdrug.ru/oshibka-016-910-na-printerach-xerox-versalink/
Слипшиеся листы
Бумага, предназначенная для печати, может слипнуться, если она определенное время находилась во влажной среде. По этой причине листы не захватываются механизмом принтера, провоцируя возникновение ошибки 016-910.
Выньте бумагу из лотка, оставьте в проветриваемом помещении на несколько часов с целью сушки. Затем возьмите стопку с одной стороны и несколько раз потрясите. Обсохнувшие носители верните в лоток, правильно отрегулировав направляющие длины и ширины.
Остались вопросы? Комментируйте рекомендации или пишите на электронный ящик сервисного центра ТонерДруг!
Источник: http://tonerdrug.ru/oshibka-016-910-na-printerach-xerox-versalink/
016-910, 016-911 Required Resource Not Ready RAP
016-910 The paper and staples requested by the selected print parameters are not installed.
016-911 The paper and staples requested by the print specification are not loaded or different sizes and/or types of paper switching are requested from the same tray.
Procedure
Perform the steps that follow:
1. Advise the customer to correctly load paper or install the staples.
2. If the fault persists, reload the software, GP 4.
**This RAP is from Xerox Service Manual. All brand names and trademarks are their respective owner’s property.**
You may be also interested in below toner and drum chip (CRUM) for Xerox VersaLink C7020, C7025, C7030, C7000.
Toner Chip (For North America and West Europe Region):
• 106R03741 106R03744 106R03743 106R03742
• 106R03757 106R03760 106R03759 106R03758
• 106R03737 106R03740 106R03739 106R03738
Toner Chip (For South America and East Europe Region):
• 106R03749 106R03752 106R03751 106R03750
• 106R03745 106R03748 106R03747 106R03746
• 106R03765 106R03768 106R03767 106R03766
Toner Chip (For Metered Machine):
• 106R03733 106R03736 106R03735 106R03734
Drum Chip:
• 113R00780 113R00782
016-910 The paper requested by the selected print parameters are not installed.
016-911 The paper requested by the print specification are not loaded or different sizes and/or types of paper switching are requested from the same tray.
Verify the Paper Types Set in the Control Panel and the Print Driver Match the Paper Loaded in the Tray.
Check that Staples are correctly loaded.
Step 1: Load the Required Resources in Tray 1 or 2
Step 2: Modify the Paper Tray Settings
Step 3: Print a PDF as an Image File
Materials Required:
- None
Step 1: Load the Required Resources in Tray 1 or 2
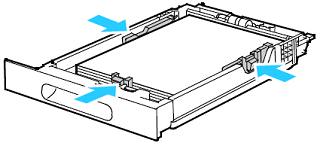
- Remove the appropriate tray from the printer. Pull out the tray until it stops, lift the front of the tray slightly, then pull it out.
NOTE: This image is provided for demonstration purposes only. Your printer may vary slightly from the image provided.

- Remove all paper from the tray.
- At the back of the paper tray, press the paper lift tray down until it locks.
- Adjust the paper length and width guides to the correct paper size.
- Flex the sheets back and forth and fan them, then align the edges of the stack on a level surface. This procedure separates any sheets that are stuck together and reduces the possibility of jams.
- Load paper into the tray as follows:
- Load hole-punched paper with the holes to the left.
- For 1-sided printing, load letterhead or pre-printed paper face-down with the top of the paper toward the back of the tray.
- For 2-sided printing, load letterhead or pre-printed paper face-down with the top of the paper toward the back of the tray.
NOTE: Do not load paper above the maximum fill line. Overfilling the tray can cause the printer to jam. If necessary, update the paper type via the User Interface for Letterhead. See steps below.
- Adjust the length and width guides to fit the paper.
- Slide the tray back into the printer.
- Push the tray in all the way.
NOTES:
- If the tray does not go in all the way, make sure that the paper lift plate at the back of the tray is locked down.
- If the tray is extended for legal size paper, the tray protrudes when it is inserted into the printer.
- To protect the paper when the tray is extended, place the paper cover over the extended section of the paper tray.
- If the control panel prompts you, verify the size and type on the screen.
- To confirm the same paper size, type, or color, touch OK.
- To select a new paper size, type or color, touch the current setting, then select a new setting. When you are finished, touch OK.
- Try your job again. If the problem persists, continue with the next step.
Return to Top
Step 2: Modify the Paper Tray Settings
- At the printer control panel, press the Home button.
- Touch Device > Paper Trays.
- In the Paper Trays menu, touch the required tray.
- To set the level of restrictions on the paper tray, touch Tray Mode and select an option.
- Touch Dedicated to dedicate the tray for a paper size, type, or color.
- To select a paper or envelope size, touch the current size setting. From the list, select the size.
- To select a paper type, touch the current paper type. From the list, select the paper type.
- To select a paper color, touch the current paper color. From the list, select the paper color.
- To allow the printer to select which paper tray to use, for Auto Select, click the enable toggle button.
- To select a priority level for this paper tray, for Priority, touch the + or — to increment or decrement the number.
- To save the setting, touch OK.
- To return to the Home screen, press the Home button.
- Try your job again. If the problem persists, continue with the next step.
Return to Top
Step 3: Print a PDF as an Image File
Problems can occur when you print a PDF file. For example, a PDF file can contains damaged content such as images or fonts that Acrobat cannot process during printing. Printing a PDF file as an image bypasses that processing by sending the printer a simple image of the document instead. Please note, this process can cause images and fonts to look slightly rougher, especially at the edges. If necessary, test print a different file.
- Ensure that your printer is powered on and connected.
- Within the PDF file, choose File > Print.
- Click Advanced, and then select Print as Image.
Note: The location of the Advanced button and the Print as Image option depends on the version of Reader or Acrobat.
- Click OK to close the Advanced Print Setup dialog box, and then click OK to print.
- Try you job again. If the problem persists, contact Support for additional assistance.
Return to Top
Ошибка 016-910 на принтерах Xerox Versalink различных модификаций возникает по причине того, что в лотке отсутствует бумага, совместимая с заданными спецификациями печати.
Параметры используемой бумаги под определенные задачи настраиваются в программе Print Driver PostScript.
Кастомизация включает следующие возможности:
- выбор существующих форматов бумаги;
- настройка собственного формата (89-320 мм в ширину / 98-1321 мм в высоту);
- выбор цвета, типа листа и прочего.
Таким образом, бумага загруженная в лоток подачи должна соответствовать выбранным настройкам. Если принтер определит несоответствие, ошибка 016-910 появится вновь.
Проблема чтения PDF-файла
Аппараты Xerox Versalink часто приостанавливают работу, столкнувшись с проблемой чтения некоторых шрифтов и символов у PDF-файлов. При этом на дисплее высвечивается та же ошибка — 016-910.
Чтобы обойти данную уязвимость, распечатайте документ .pdf как изображение.
Слипшиеся листы
Бумага, предназначенная для печати, может слипнуться, если она определенное время находилась во влажной среде. По этой причине листы не захватываются механизмом принтера, провоцируя возникновение ошибки 016-910.
Выньте бумагу из лотка, оставьте в проветриваемом помещении на несколько часов с целью сушки. Затем возьмите стопку с одной стороны и несколько раз потрясите. Обсохнувшие носители верните в лоток, правильно отрегулировав направляющие длины и ширины.
Остались вопросы? Комментируйте рекомендации или пишите на электронный ящик сервисного центра ТонерДруг!
016-910 The paper requested by the selected print parameters are not installed.
016-911 The paper requested by the print specification are not loaded or different sizes and/or types of paper switching are requested from the same tray.
Verify the Paper Types Set in the Control Panel and the Print Driver Match the Paper Loaded in the Tray.
Check that Staples are correctly loaded.
Step 1: Load the Required Resources in Tray 1 or 2
Step 2: Modify the Paper Tray Settings
Step 3: Print a PDF as an Image File
Materials Required:
- None
Step 1: Load the Required Resources in Tray 1 or 2
- Remove the appropriate tray from the printer. Pull out the tray until it stops, lift the front of the tray slightly, then pull it out.
NOTE: This image is provided for demonstration purposes only. Your printer may vary slightly from the image provided.
- Remove all paper from the tray.
- At the back of the paper tray, press the paper lift tray down until it locks.
- Adjust the paper length and width guides to the correct paper size.
- Flex the sheets back and forth and fan them, then align the edges of the stack on a level surface. This procedure separates any sheets that are stuck together and reduces the possibility of jams.
- Load paper into the tray as follows:
- Load hole-punched paper with the holes to the left.
- For 1-sided printing, load letterhead or pre-printed paper face-down with the top of the paper toward the back of the tray.
- For 2-sided printing, load letterhead or pre-printed paper face-down with the top of the paper toward the back of the tray.
NOTE: Do not load paper above the maximum fill line. Overfilling the tray can cause the printer to jam. If necessary, update the paper type via the User Interface for Letterhead. See steps below.
- Adjust the length and width guides to fit the paper.
- Slide the tray back into the printer.
- Push the tray in all the way.
NOTES:
- If the tray does not go in all the way, make sure that the paper lift plate at the back of the tray is locked down.
- If the tray is extended for legal size paper, the tray protrudes when it is inserted into the printer.
- To protect the paper when the tray is extended, place the paper cover over the extended section of the paper tray.
- If the control panel prompts you, verify the size and type on the screen.
- To confirm the same paper size, type, or color, touch OK.
- To select a new paper size, type or color, touch the current setting, then select a new setting. When you are finished, touch OK.
- Try your job again. If the problem persists, continue with the next step.
Return to Top
Step 2: Modify the Paper Tray Settings
- At the printer control panel, press the Home button.
- Touch Device > Paper Trays.
- In the Paper Trays menu, touch the required tray.
- To set the level of restrictions on the paper tray, touch Tray Mode and select an option.
- Touch Dedicated to dedicate the tray for a paper size, type, or color.
- To select a paper or envelope size, touch the current size setting. From the list, select the size.
- To select a paper type, touch the current paper type. From the list, select the paper type.
- To select a paper color, touch the current paper color. From the list, select the paper color.
- To allow the printer to select which paper tray to use, for Auto Select, click the enable toggle button.
- To select a priority level for this paper tray, for Priority, touch the + or — to increment or decrement the number.
- To save the setting, touch OK.
- To return to the Home screen, press the Home button.
- Try your job again. If the problem persists, continue with the next step.
Return to Top
Step 3: Print a PDF as an Image File
Problems can occur when you print a PDF file. For example, a PDF file can contains damaged content such as images or fonts that Acrobat cannot process during printing. Printing a PDF file as an image bypasses that processing by sending the printer a simple image of the document instead. Please note, this process can cause images and fonts to look slightly rougher, especially at the edges. If necessary, test print a different file.
- Ensure that your printer is powered on and connected.
- Within the PDF file, choose File > Print.
- Click Advanced, and then select Print as Image.
Note: The location of the Advanced button and the Print as Image option depends on the version of Reader or Acrobat.
- Click OK to close the Advanced Print Setup dialog box, and then click OK to print.
- Try you job again. If the problem persists, contact Support for additional assistance.
Return to Top
016-910, 016-911 Required Resource Not Ready RAP
016-910 The paper and staples requested by the selected print parameters are not installed.
016-911 The paper and staples requested by the print specification are not loaded or different sizes and/or types of paper switching are requested from the same tray.
Procedure
Perform the steps that follow:
1. Advise the customer to correctly load paper or install the staples.
2. If the fault persists, reload the software, GP 4.
**This RAP is from Xerox Service Manual. All brand names and trademarks are their respective owner’s property.**
You may be also interested in below toner and drum chip (CRUM) for Xerox VersaLink C7020, C7025, C7030, C7000.
Toner Chip (For North America and West Europe Region):
• 106R03741 106R03744 106R03743 106R03742
• 106R03757 106R03760 106R03759 106R03758
• 106R03737 106R03740 106R03739 106R03738
Toner Chip (For South America and East Europe Region):
• 106R03749 106R03752 106R03751 106R03750
• 106R03745 106R03748 106R03747 106R03746
• 106R03765 106R03768 106R03767 106R03766
Toner Chip (For Metered Machine):
• 106R03733 106R03736 106R03735 106R03734
Drum Chip:
• 113R00780 113R00782
Go to printers
r/printers
Inkjets, lasers, thermal, commercial and industrial printers.
We make printers suck less by promoting printer maintenance, troubleshooting and providing accurate recommendations.
Online
•
Xerox error code 016-910. New to this office and the printer (versalink 7030) giving me this error code, saying I’m lacking the resources. But I’m using completely default settings. No staples or punches, regular 8.5×11 paper. Any ideas?
More posts you may like
Print Instruction Fail. A print parameter was incorrect.
Procedure
•
Perform the job again.
•
Disconnect then reconnect the ESS, MCU all PWBs connected to them (RAM, Firmware
module, EEPROM)
•
Check the sw version of the controller sw — update if required
Initial Issue
WorkCentre 5335 Family Service Documentation
016-910 Required Resource Not Ready (IOTsc detect) RAP
Requested paper or staple is not ready to perform a job.
Procedure
•
Perform the job again.
•
Disconnect then reconnect the ESS, MCU all PWBs connected to them (RAM, Firmware
module, EEPROM)
(GP
16)
•
Check the sw version of the controller sw — update if required
07/2011
2-279
BUS Updated 12/2011
(GP
16)
Status Indicator RAPs
016-799, 016-910