-
#1
Hi,
I’ve followed the below article to add a COMODO certificate to Proxmox:
https://pve.proxmox.com/wiki/HTTPS_…4.x_and_newer)#CAs_other_than_Let.27s_Encrypt
So basically, I updated the 2 files related to my only node:
/etc/pve/nodes/<node>/pveproxy-ssl.pem
/etc/pve/nodes/<node>/pveproxy-ssl.key
I’ve then restarted pve-proxy:
systemctl restart pveproxy
Then it’s great, when accessing PVE, I can see that my connection is using a valid certificate.
Nevertheless, when I want to start a KVM host (or create one), I receive the below error:
promxox 4.4 Connection error 401: Permission denied — invalid csrf token
What’s wrong?
Shall I also touch the below files?
- /etc/pve/pve-root-ca.pem
- /etc/pve/priv/pve-root-ca.key
I’ve also tried to remove all files as described here
https://pve.proxmox.com/wiki/HTTPS_….x_and_newer)#Revert_to_default_configuration
But I keep running into the issue — for example when I try to connect via Spice…
Thanks for your help.
Last edited: May 30, 2017
-
#2
I found this post: https://forum.proxmox.com/threads/continuing-issues-with-pveproxy-and-pve-ssl-key.29886/
Then I tried the below (after following «Revert to default configuration» https://pve.proxmox.com/wiki/HTTPS_….x_and_newer)#Revert_to_default_configuration) :
These 4 match (note /etc/pve/local/ is an alias of /etc/pve/nodes/<node>/):
openssl x509 -in /etc/pve/local/pve-ssl.pem -noout -modulus
openssl rsa -in /etc/pve/local/pve-ssl.key -noout -modulus
openssl x509 -in /etc/pve/nodes/<node>/pve-ssl.pem -noout -modulus
openssl rsa -in /etc/pve/nodes/<node>/pve-ssl.key -noout -modulus
These 2 DO NOT match (neither with the other 4 files, neither between each other):
openssl x509 -in /etc/pve/pve-root-ca.pem -noout -modulus
openssl rsa -in /etc/pve/pve-www.key -noout -modulus
Is the problem related to /etc/pve/ files? Shall they be replaced?
Looking forward to hearing from anyone on this pretty dramatic issue — as I only did follow the guideline provided by Proxmox, and even with the «Revert to default configuration» I can’t get it working.
Last edited: May 31, 2017
![]()
-
#3
the CSRF token has nothing to do with the certificate and key used for TLS. either you modified the wrong files, or you have some outdated tokens cached on the client side.
-
#4
Hi Fabian,
Thx for the feedback — it’s definitely not an issue on the client side as it doesn’t work as well from other browsers and computers, via VPN or not.
Then could you point out which wrong files could have been modified that would bring this error?
As explained, these are the modified files:
/etc/pve/nodes/<node>/pveproxy-ssl.pem
/etc/pve/nodes/<node>/pveproxy-ssl.key
And the I’ve used
pvecm updatecerts -f
Even if I understand that this error is not related to the TLS keys, I wonder why it has appeared after changing these specific files — and moreover, it would be good to know from what this error can come.
Moreover, I’ve seen this post:
https://forum.proxmox.com/threads/permission-denied-invalid-csrf-token-401.9233/
And here the problem is related to /etc/pve/pve-www.key …
So if there’s only one node — to which other file the md5sum should be equivalent?
Looking forward to getting your feedback.
![]()
-
#5
the pve-www.key is used to generate the token, but has no relation to pveproxy-ssl.pem/.key or pve-ssl.pem/.key. «pvecem updatecerts» does not touch the pve-www.key file (it will regenerate it if it was deleted though). if the CSRF token is rejected, it was either generated with a different key than the server currently has, or it is too old.
I suggest restarting pvedaemon and pveproxy on the server side, and clearing the cache and logging out and in again on the client side.
-
#6
Fabian, thanks again for your help! Much appreciated.
Restarting pvedaemon solved the issue!
-
#7
I know this is an old thread, but i want to give the full solution for this, so people dont need to search at all places for the pieces given in several threads.
Delete or move the following files:
/etc/pve/pve-root-ca.pem
/etc/pve/priv/pve-root-ca.key
/etc/pve/nodes/<node>/pve-ssl.pem
/etc/pve/nodes/<node>/pve-ssl.key
Then do ‘pvecm updatecerts -f’ and after that ‘systemctl restart pvedaemon’. The error should be gone now after clearing cache of the browser.
-
#8
I know this is an old thread, but i want to give the full solution for this, so people dont need to search at all places for the pieces given in several threads.
Delete or move the following files:
/etc/pve/pve-root-ca.pem
/etc/pve/priv/pve-root-ca.key
/etc/pve/nodes/<node>/pve-ssl.pem
/etc/pve/nodes/<node>/pve-ssl.keyThen do ‘pvecm updatecerts -f’ and after that ‘systemctl restart pvedaemon’. The error should be gone now after clearing cache of the browser.
Not work for me…… error still exists
I am using proxmox 5.2
using cert from lat’s encrypt to replace all 4 files.
Works fine except SPICE. cert error on SPICE client.
I want to restore default cert, so I removed these 4 files. Error occured.
i.imgur.com/SpCnpmt.png
i.imgur.com/UmFRhJJ.png
![]()
tom
Proxmox Staff Member
-
#9
i.imgur.com/SpCnpmt.png
i.imgur.com/UmFRhJJ.png
please post log files or error message as text directly into the forum. MUCH better than third party services showing text as pictures …
![]()
oguz
Proxmox Retired Staff
-
#10
I want to restore default cert, so I removed these 4 files. Error occured.
Did you clear the cache of your browser after doing this?
-
#11
Did you clear the cache of your browser after doing this?
I use incognito mode to check it. But I found the problem is not the browser.
This problem solved after I reboot the server.
It seems «systemctl restsrt pveproxy» is not enougth.
-
#12
for me restarting pvedaemon fixed the issue.
Страница с ошибкой при обращении к WordPress-сайту всегда вызывает неудобства, вне зависимости от того, ваш это сайт или чужой. Как и в случае со многими другими кодами ответов HTTP, ошибка 401 не содержит детальных данных для диагностики и решения проблемы.
Ошибка 401 может появиться в любом браузере. В большинстве случаев ее легко решить.
В этой статье мы расскажем, что означает 401 ошибка, почему она происходит, и какие методы ее устранения существуют.
Итак, приступим!
Содержание
- Код ошибки 401 – что это?
- Что вызывает ошибку 401
- Как исправить ошибку 401 (5 методов)
Код ошибки 401 – что это?
Коды состояния HTTP 400 возникают в случае проблем с выполнением запросов. В частности, ошибка 401 появляется, когда браузер отказывает вам в доступе к странице, которую вы хотите посетить.
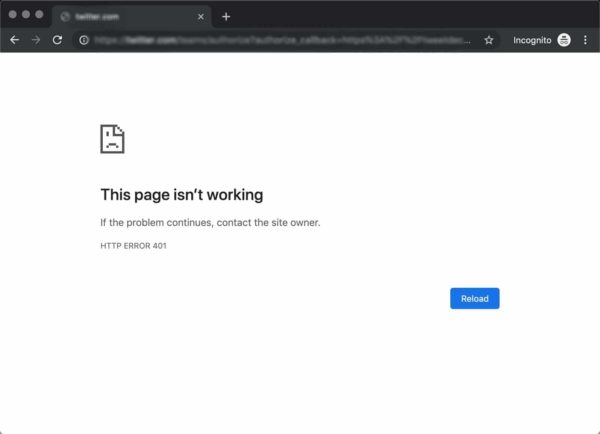
В результате вместо загрузки страниц браузер выведет сообщение об ошибке. Ошибки 401 могут возникать в любом браузере, потому отображаемое сообщение может варьироваться.
К примеру, в Chrome и Edge вы, скорее всего, увидите иконку бумаги с простым сообщением о том, что запрашиваемая страница не отвечает. Вы увидите фразу «HTTP Error 401». Вам будет предложено связаться с владельцем сайта, если ошибка не пропадет:
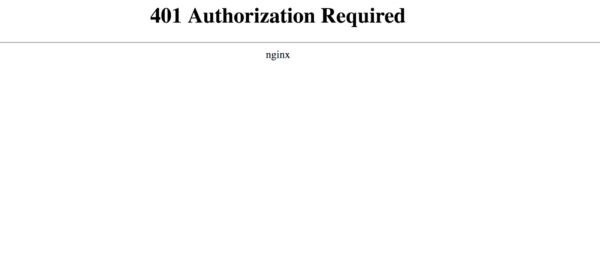
В иных случаях и в других браузерах вы можете получить менее дружелюбное предупреждение. К примеру, может выводиться пустая страница с сообщением «401 Authorization Required»:
Другие вариации текста:
- HTTP 401 Error – Unauthorized
- 401 Unauthorized
- Access Denied
Эти ошибки часто появляются на сайтах, где требуется вводить данные для входа. В большинстве случаев это означает, что что-то не так с учетными данными. Возможно, браузер перестал считать их действительными.
Эта ошибка похожа на HTTP 403 Forbidden Error, когда доступ к сайту для пользователя запрещен. Однако, в отличие от ошибки 403, сообщение об ошибке 401 указывает, что процесс аутентификации завершился неудачно.
Код ошибки передается через заголовок WWW-Authenticate, который отвечает за определение метода аутентификации, используемого для предоставления доступа к веб-странице или ресурсу.
Что вызывает ошибку 401
Если вы столкнулись с кодом ошибки в кодах 400, вы должны знать, что проблема произошла на стороне клиента (либо на стороне браузера). Случается, что виновником проблемы является браузер, но так бывает не всегда. Об этом мы еще расскажем позже.
Ошибки 401 возникают на ресурсах с ограниченным доступом – к примеру, на страницах, защищенных паролем. Потому можно предположить, что причина проблемы связана с данными аутентификации.
Устаревшие Cookie и кэш браузера
Одной из наиболее распространенных причин возникновения ошибки 401 является то, что кэш и файлы cookie вашего браузера устарели, что не позволяет выполнить авторизацию. Если ваш браузер использует недействительные данные для авторизации (либо вообще их не использует их), сервер отклонит запрос.
Несовместимые плагины
Также бывают ситуации, когда ошибка вызвана несовместимостью плагинов или какими-либо сбоями в них. К примеру, плагин безопасности может ошибочно принять вашу попытку входа за вредоносную активность, а потому будет возвращена ошибка 401 для защиты страницы.
Неверный URL или устаревшая ссылка
Бывает, что источником проблемы является незначительная оплошность. К примеру, был неверно введен URL, ссылка была устаревшей и т.д.
Как исправить ошибку 401 (5 методов)
Теперь, когда мы разобрались с причинами ошибки 401, пришло время обсудить, как ее устранить.
Давайте рассмотрим 5 методов, которые вы можете использовать.
- Проверьте ваш URL.
Начнем с самого простого потенциального решения: убедитесь, что вы использовали верный URL. Это может выглядеть банально, но 401 ошибки нередко появляются, если URL-адрес был введен неправильно.
Еще один вариант: ссылка, которую вы использовали для перехода на запрашиваемую страницу, указывает на неправильный URL. К примеру, ссылка устарела, ведет на страницу, которой больше нет (и редиректов не задано).
Стоит тщательно перепроверить URL-адрес, который вы использовали. Если вы набирали адрес самостоятельно, убедитесь, что все написано безошибочно. Если вы переходили по ссылке, убедитесь в том, что она ведет на страницу, к которой вы хотите получить доступ (либо попробуйте перейти на эту страницу непосредственно через сайт).
- Почистите кэш браузера.
Кэш браузера предназначен для улучшения процесса взаимодействия с сайтами в сети за счет сокращения времени загрузки страниц. К сожалению, иногда это может вести к нежелательным последствиям.
Как мы уже говорили выше, одной из распространенных причин появления ошибки 401 являются устаревшие или неправильные данные кэша или cookies. Потому, если URL введен верно, следующий шаг – чистка кэша браузера.
В итоге вы удалите любую недействительную информацию, которая хранится локально в вашем браузере и может приводить к прерываниям процесса аутентификации. Аналогично, файлы cookie вашего браузера могут содержать аутентификационные данные, которые нужно обновить.
Если вы пользуетесь Chrome, вам нужно щелкнуть по иконке с меню в правом верхнем углу браузера и выбрать пункт Settings. В разделе «Privacy and security» нажмите «Clear browsing data:»
![]()
Далее вводим URL требуемого сайта и очищаем для него данные.
![]()
В других браузерах процесс очистки кэша и cookie может отличаться. К примеру, в Firefox нужно щелкать по иконке с библиотекой и выбирать History > Clear Recent History:
![]()
Информацию по остальным браузерам вы можете найти в поисковиках.
- Очистка DNS.
Еще один метод, который вы можете попробовать для устранения ошибки 401 – это очистка DNS. Эта причина встречается относительно редко, но стоит попробовать и такой подход, особенно если первые два ничего не дали.
Чтобы очистить DNS, перейдите в Windows к меню «Пуск» и там уже введите в строку поиска cmd. Нажмите Enter. Откроется командная строка. Далее вставьте команду ipconfig/flushdns, после чего снова нажмите Enter.

Если вы пользуетесь Mac, вы можете открыть командную строку следующим образом: Finder > Applications > Utilities > Terminal.
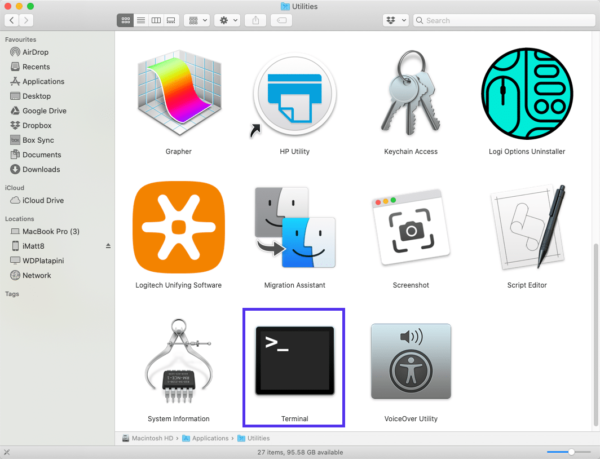
Введите команду sudo killall -HUP mDNSResponder и нажмите Enter. Затем вы можете обновить страницу, чтобы посмотреть, пропала ли ошибка 401 или нет.
- Деактивируйте ваши плагины
Проблема может возникать и по вине плагинов.
Некоторые плагины, особенно связанные с безопасностью, могут выдавать ошибку 401 при подозрении на вредоносную активность. Также у них могут быть проблемы с совместимостью. Потому лучше всего деактивировать все плагины и посмотреть, будет ли страница работать.
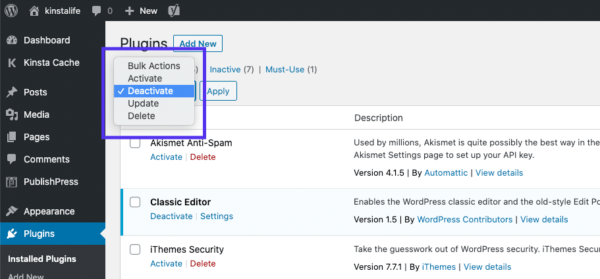
Вы можете деактивировать все плагины разом, перейдя в раздел Plugins > Installed Plugins в консоли WordPress. Выберите все плагины и в меню Bulk Actions задайте Deactivate, после чего щелкните по кнопке Apply:
После этого попробуйте перезагрузить страницу с ошибкой. Если ошибка пропала, вы можете вручную по одному активировать плагины заново, чтобы выявить виновника всех бед.
Далее вы уже можете либо удалить плагин, либо написать его разработчикам, чтобы они предоставили рабочее решение.
- Проверьте заголовок WWW-Authenticate
Если проблема все еще остается, то в таком случае она может быть связана с ошибками на сервере. А значит, исправить ее будет чуть сложнее.
Как мы уже писали ранее, ответ 401 передается через заголовок WWW-Authenticate, который отображается как “WWW-Authenticate: <type> realm=<realm>”. Он включает в себя строки данных, указывающие на то, какой тип аутентификации требуется для предоставления доступа.
Вам нужно посмотреть, был ли отправлен ответ в WWW-Authenticate, а точнее какая схема аутентификации была использована. По крайней мере, это позволит вам приблизиться на один шаг к решению.
Перейдите на страницу с ошибкой 401 и откройте консоль разработчика в Chrome. Вы можете щелкнуть правой кнопкой мыши на странице и выбрать Inspect (Ctrl+Shift+J).
Далее перейдите на вкладку Network и перезагрузите страницу. Это позволит сгенерировать список ресурсов. Выберите заголовок Status, чтобы отсортировать таблицу, и найдите код 401:
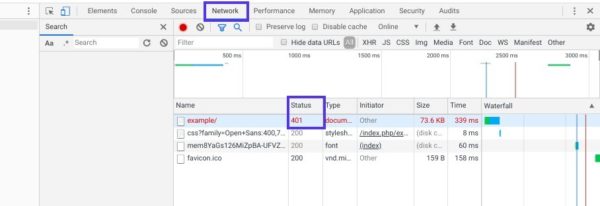
Выберите данную запись, после чего перейдите на вкладку Headers. В Response Headers найдите заголовок WWW-Authenticate:
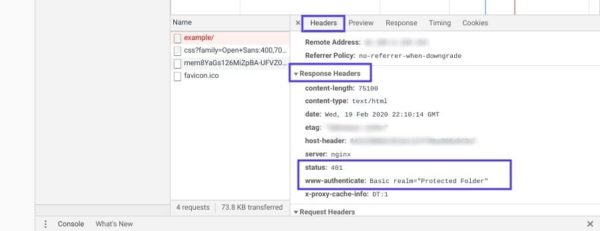
Информация, представленная в заголовке ответа, в частности, в схеме аутентификации, даст вам больше сведений о том, что произошло, и укажет на решение. Это позволит вам понять, какой тип аутентификации требуется серверу.
К примеру, в приведенном выше примере мы видим, что схема аутентификации задана как «Basic». Это означает, что запрос аутентификации требует только ID и password. Для получения более подробной информации и инструкций мы рекомендуем обратиться к HTTP Authentication Scheme Registry.
Источник: kinsta.com

One day I was working on a feature at work. I had many branches created in JIRA tickets, so I wanted to open a bunch of PRs (Pull Requests) all at once in different tabs.
This is how I usually work – I have a lot of tabs open and this speeds things up, because I don’t need to wait for the next page to load.
But after I’d created the first PR in BitBucket and tried to go on to the next page, I was welcomed with an error message about an invalid CSRF token. This is a common problem with web applications that have CSRF protection.
So in this article you’ll learn what CSRF is and how to fix this error.
Table of contents:
- What is CSRF?
- Standard CSRF protection
- The Problem with Tokens
- Cross-tab Communication Solution
- Sysend library
- Broadcast Channel
- Conclusion
What is CSRF?
CSRF is an acronym for Cross-Site Request Forgery. It is a vector of attack that attackers commonly use to get into your system.
The way you usually protect against CSRF is to send a unique token generated by each HTTP request. If the token that is on the server doesn’t match with the one from the request, you show an error to the user.
Standard CSRF protection
This is one way you can protect against CSRF with a token:
const inital_token = '...';

const secure_fetch = (token => {
    const CSRF_HEADER = 'X-CSRF-TOKEN';
    return (url) => {
        const response = await fetch(url, {
            method: 'POST',
            headers: {
              [CSRF_HEADER]: token
            }
        });
        response.then(res => {
           token = res.headers[CSRF_HEADER]
        });
        return response;
    };
})(inital_token);
This code uses the fetch API to send and receive a secure token in HTTP headers. On the backed, you should generate the first initial token when the page loads. On the server, on each AJAX request, you should check to see if the token is valid.
The Problem with Tokens
This works fine unless you have more than one tab open. Each tab can send requests to the server, which will break this solution. And power users may not be able to use your application the way they want.
But there is a simple solution to this problem which is cross-tab communication.
Cross-tab Communication Solution
Sysend library
You can use the Sysend library, an open source solution that I’ve created specifically for this purpose. It simplifies cross-tabs communication.
If you want, you can use a native browser API like Broadcast Channel to do the same. More on how to do that later in this article.
But the Sysend library will work for browsers that don’t support Broadcast Channel. It also works in IE (it has some bugs, which is not a surprise). You may also need to support some old mobile browsers. It also has a much simpler API.
This is the simplest example:
let token;
sysend.on('token', new_token => {
    token = new_token;
});

// ...

sysend.broadcast('token', token);And this is how you would use this library to fix CSRF protection:
const inital_token = '...';

const secure_fetch = (token => {
    const CSRF_HEADER = 'X-CSRF-TOKEN';
    const EVENT_NAME = 'csrf';
    sysend.on(EVENT_NAME, new_token => {
        // get new toke from different tab
        token = new_token;
    });
    return (url) => {
        const response = await fetch(url, {
            method: 'POST',
            headers: {
              [CSRF_HEADER]: token
            }
        });
        response.then(res => {
           token = res.headers[CSRF_HEADER];
           // send new toke to other tabs
           sysend.broadcast(EVENT_NAME, token);
        });
        return response;
    };
})(inital_token);
All you have to do is to send and receive a single message from other tabs when sending the request. And your CSRF protected app will work on many tabs.
And that’s it. This will let advanced users use your app that has CSRF protection when they want to open many tabs.
Broadcast Channel
Here is the simplest possible example of using Broadcast Channel:
const channel = new BroadcastChannel('my-connection');
channel.addEventListener('message', (e) => {
    console.log(e.data); // 'some message'
});
channel.postMessage('some message');So with this simple API you can do the same thing that we did before:
const inital_token = '...';

const secure_fetch = (token => {
    const CSRF_HEADER = 'X-CSRF-TOKEN';
    const channel = new BroadcastChannel('csrf-protection');
    channel.addEventListener('message', (e) => {
        // get new toke from different tab
    	token = e.data;
    });
    return (url) => {
        const response = await fetch(url, {
            method: 'POST',
            headers: {
              [CSRF_HEADER]: token
            }
        });
        response.then(res => {
           token = res.headers[CSRF_HEADER];
           // send new token to other tabs
           channel.postMessage(token);
        });
        return response;
    };
})(inital_token);As you can see from the above example, Broadcast Channel doesn’t have any namespace for events. So if you want to send more than one type of event you need to create types of events.
Here is an example of using Broadcast Channel to do more than the CSRF protection fix we’ve discussed so far.
You can synchronize login and logout for your application. If you login into one tab, your other tabs will also sign you in. In the same way, you can synchronize the shopping cart in some e-commerce websites.
const channel = new BroadcastChannel('my-connection');
const CSRF = 'app/csrf';
const LOGIN = 'app/login';
const LOGOUT = 'app/logout';
let token;
channel.addEventListener('message', (e) => {
    switch (e.data.type) {
        case CSRF:
            token = e.data.payload;
            break;
        case LOGIN:
            const { user } = e.data.payload;
            autologin(user);
            break;
        case LOGOUT:
            logout();
            break;
    }
});

channel.postMessage({type: 'login', payload: { user } });Conclusion
It’s great if you protect your app against attackers. But keep in mind how people will be using your application, too so you don’t make it unnecessarily hard to use. This applies not only to this particular problem.
The Sysend library is a simple way to communicate between open tabs in the same browser. And it can fix major issues with CSRF protection. The library has more features, and you can check its GitHub repo for more details.
Broadcast Channel is also not that complicated. If you don’t need to support old browsers or some older mobile devices, you can use this API. But if you need to support older browsers, or want to make your code simpler, you use can the sysend library.
If you want to see browser support for Broadcast Channel, you can see Can I Use.
Learn to code for free. freeCodeCamp’s open source curriculum has helped more than 40,000 people get jobs as developers. Get started
I’ve tried to get csurf to work but seem to have stumbled upon something. The code so far looks like this:
index.ejs
<form method="post" action="/">
            <input type="hidden" name="_csrf" value="{{csrfToken}}">
            .
            .
</form>
Where you insert password and username in the form.
app.js
   var express = require('express');
var helmet = require('helmet');
var csrf = require('csurf');
var path = require('path');
var favicon = require('serve-favicon');
var flash = require('connect-flash');
var logger = require('morgan');
var cookieParser = require('cookie-parser');
var bodyParser = require('body-parser');
var session = require('express-session');


var routes = require('./routes/index');
var users = require('./routes/users');
var profile = require('./routes/profile');

var app = express();


// view engine setup
app.set('views', path.join(__dirname, 'views'));
app.set('view engine', 'ejs');

// uncomment after placing your favicon in /public
//app.use(favicon(path.join(__dirname, 'public', 'favicon.ico')));

app.use(logger('dev'));

//Security shyts

app.use(helmet());
app.use(helmet.xssFilter({ setOnOldIE: true }));
app.use(helmet.frameguard('deny'));
app.use(helmet.hsts({maxAge: 7776000000, includeSubdomains: true}));
app.use(helmet.hidePoweredBy());
app.use(helmet.ieNoOpen());
app.use(helmet.noSniff());
app.use(helmet.noCache());

// rest of USE
app.use(logger('dev'));
app.use(bodyParser.json());
app.use(bodyParser.urlencoded({ extended: false }));
app.use(cookieParser());
app.use(session({secret: 'anystringoftext', saveUninitialized: true, resave: true, httpOnly: true, secure: true}));
app.use(csrf()); // Security, has to be after cookie and session.
app.use(flash());
app.use(express.static(path.join(__dirname, 'public')));
app.use('/', routes);
app.use('/users', users);
app.use('/profile', profile);


// catch 404 and forward to error handler

app.use(function (req, res, next) {
  res.cookie('XSRF-TOKEN', req.csrfToken());
  res.locals.csrftoken = req.csrfToken();
  next();
})

//app.use(function(req, res, next) {
//  var err = new Error('Not Found');
//  err.status = 404;
//  next(err);
//});

// error handlers

// development error handler
// will print stacktrace
if (app.get('env') === 'development') {
  app.use(function(err, req, res, next) {
    res.status(err.status || 500);
    res.render('error', {
      message: err.message,
      error: err
    });
  });
}

// production error handler
// no stacktraces leaked to user
app.use(function(err, req, res, next) {
  res.status(err.status || 500);
  res.render('error', {
    message: err.message,
    error: {}
  });
});


module.exports = app;
Where I’ve put csrf after session and cookie parser.
index.js
/* GET home page. */
router.get('/', function(req, res, next) {
  res.render('index', { title: 'some title',message: '' });
});

router.post('/',function(req,res){
// Where I have a bunch of mysql queries to check passwords and usernames where as if they succeed they get:
res.redirect('profile');
// Else:
res.redirect('/');
 });
What I get after submiting the form, no matter if I insert the correct username and password or not I still get the same error:
invalid csrf token

403

ForbiddenError: invalid csrf token
Also I want add that I’ve been working with node for about 2 weeks, so there is still alot I need to learn probably.
  | array(1) {
  | ["data"]=>
  | array(5) {
  | ["CSRFPreventionToken"]=>
  | string(52) "5F1B2D1F:string"
  | ["clustername"]=>
  | string(10) "devcluster"
  | ["ticket"]=>
  | string(367) "PVE:root@pam:5F1B2D1F:looooongStringWithSlashesAnd=="
  | ["username"]=>
  | string(8) "root@pam"
  | ["cap"]=>
  | array(5) {
  | ["dc"]=>
  | array(1) {
  | ["Sys.Audit"]=>
  | int(1)
  | }
  | ["nodes"]=>
  | array(6) {
  | ["Sys.Console"]=>
  | int(1)
  | ["Sys.Syslog"]=>
  | int(1)
  | ["Sys.PowerMgmt"]=>
  | int(1)
  | ["Permissions.Modify"]=>
  | int(1)
  | ["Sys.Audit"]=>
  | int(1)
  | ["Sys.Modify"]=>
  | int(1)
  | }
  | ["vms"]=>
  | array(18) {
  | ["VM.Snapshot.Rollback"]=>
  | int(1)
  | ["VM.Monitor"]=>
  | int(1)
  | ["VM.Config.Network"]=>
  | int(1)
  | ["VM.Config.Options"]=>
  | int(1)
  | ["VM.Config.CPU"]=>
  | int(1)
  | ["VM.Snapshot"]=>
  | int(1)
  | ["Permissions.Modify"]=>
  | int(1)
  | ["VM.PowerMgmt"]=>
  | int(1)
  | ["VM.Config.CDROM"]=>
  | int(1)
  | ["VM.Config.HWType"]=>
  | int(1)
  | ["VM.Console"]=>
  | int(1)
  | ["VM.Config.Disk"]=>
  | int(1)
  | ["VM.Allocate"]=>
  | int(1)
  | ["VM.Audit"]=>
  | int(1)
  | ["VM.Migrate"]=>
  | int(1)
  | ["VM.Clone"]=>
  | int(1)
  | ["VM.Config.Memory"]=>
  | int(1)
  | ["VM.Backup"]=>
  | int(1)
  | }
  | ["storage"]=>
  | array(5) {
  | ["Datastore.Allocate"]=>
  | int(1)
  | ["Datastore.AllocateTemplate"]=>
  | int(1)
  | ["Permissions.Modify"]=>
  | int(1)
  | ["Datastore.Audit"]=>
  | int(1)
  | ["Datastore.AllocateSpace"]=>
  | int(1)
  | }
  | ["access"]=>
  | array(3) {
  | ["Permissions.Modify"]=>
  | int(1)
  | ["Group.Allocate"]=>
  | int(1)
  | ["User.Modify"]=>
  | int(1)
  | }
  | }
  | }
  | }
Twitch.tv is a massive service, streaming to millions of people daily which uses complicated technology to ensure that everything runs smoothly.
A service of this size is never without any issues, a common one is an error message which reads {“status”:401,”message”:”invalid csrf token”}. This is a fairly common error, but rare to happen multiple times after resolving for users. It is easy to resolve.
What does {“status”:401,”message”:”invalid csrf token”} mean?
The first part of the error 401 is a HTTP response status which translates to humans as unauthorised – meaning the application you are trying to use is rejecting your communication with the server.
The second part of the error (or “message”) is invalid CSRF token. CSRF stands for cross-site request forgery – the CSRF token is a cookie which sits on your computer and has your credentials to use whatever application you are wanting to use.
A CSRF token is a unique, secret, unpredictable value that is generated by the server-side application and transmitted to the client in such a way that it is included in a subsequent HTTP request made by the client. When the later request is made, the server-side application validates that the request includes the expected token and rejects the request if the token is missing or invalid.
PortSwigger
By invalid it will either mean the credentials are incorrect or the most likely cause – your cookies have expired and there was an error refreshing them.
This error only appears when you are attempting to link a Twitch account with something else – hence the “cross-site” word in the acronym CSRF. The response will come from Twitch’s oAuth.
So, in short, you are seeing the {“status”:401,”message”:”invalid csrf token”} on Twitch or an application which connects with Twitch because your cookies are outdated.
When does the invalid CSRF token happen?
Here are some examples of events which are known to trigger {“status”:401,”message”:”invalid csrf token”}.
- Redeeming Prime loot
- Connecting SHiFT to Twitch
- Connecting Twitch with Discord
- Connecting Twitch to Curse Forge
- Logging in to chat bots such as Nightbot
- Logging in to streamlink GUI
- Authenticating Streamlabs
How to fix {“status”:401,”message”:”invalid csrf token”} Twitch error
Follow the list of fixes for these errors until it has worked, once a step has worked there’s no need to try the next one.
- Log out of Twitch and log back in
- Clear your cookies from a) Twitch.tv b) the application you are trying to connect to Twitch.
- Clear all of your browser’s cookies
- Update your browser to the latest version
- Unlink the connection you are trying to link up and then proceed to re-link them
- Do the above 5 steps and restart your computer
- Try logging in using incognito/private browsing – these two operate on a cleared cookie basis
- Try a different browser altogether, the invalid CSRF token is most common with Firefox
- Complain to the Twitch developers

It is extremely unlikely that following the first 6 steps would not resolve your issue. In the event that it does, keep repeating the steps or complain to Twitch with a detailed description is the only option left.
Recent Posts
How Stream and Record N64 on Twitch
Introduction
The nostalgia evoked by the original Nintendo 64 (N64) gameplay holds a unique allure for both gamers and viewers, making it a cherished relic in the rapidly evolving world of gaming….
Everdrive 64 X7 Review For Streamers
In a world where gaming nostalgia is booming, the Nintendo 64 reigns supreme as the heart of countless treasured memories. This iconic console, with its vast library of cult classic games, continues…
Shade634 opened this issue 3 years ago · comments
Describe the bug
I dont seem to be able to POST anything, i can get results trough GET.
The error i keep receiving is: «HTTP/1.1 401 Permission denied — invalid csrf token»
I have been trying to search for a solution but i havent found one yet, nor an option that passes the «csrftoken» in the header as mentioned in many solutions: https://forum.proxmox.com/threads/connection-problem-novnc-api.40751/
To Reproduce
$proxmox = new pve($credentials);
$response = $proxmox->nodes()->node($node)->qemu()->vmid($id)->status()->postStart([‘node’ => $node, ‘vmid’ => $id]);
Expected behavior
A VM that has been started
Hi Shade634,
thank you for the report. I have found the Problem, in the next hour i load a bugfix up.
Many thanks for support my library for proxmox 
Regrade
MrKampf
So update is published.
Many thanks again
I get a «Object of class GuzzleHttpClient could not be converted to string» Error now, also on the GET requests.
vendor/mrkampf/proxmox-ve/src/proxmox/pve.php :: getCSRFPreventionToken (line 49)
vendor/mrkampf/proxmox-ve/src/proxmox/pve.php :: refreshCSRFToket (line 263)
vendor/mrkampf/proxmox-ve/src/proxmox/pve.php :: getCSRFToken (line 75)
vendor/mrkampf/proxmox-ve/src/proxmox/Helper/connection.php (line 49)
When i do:
new pve($credentials)
Did i do something wrong?
Many sorry, i have released the new architecture from this git.
I fixed it.
No worries, i just pulled:
Package operations: 0 installs, 1 update, 0 removals
- Updating mrkampf/proxmox-ve (0.2.2 => 0.2.6): Downloading (100%)
Now it throws me a «Can’t login with this data.» on
new pve($credentials);
While these credentials did work before?
in vendor/mrkampf/proxmox-ve/src/proxmox/pve.php -> setLoginTokens (line 50)
in vendor/mrkampf/proxmox-ve/src/proxmox/pve.php (line 61)
But if i var_dump($json) it results in:
array(1) { ["data"]=> array(5) { ["CSRFPreventionToken"]
Hi,
i have test this by me and i can login and become no error. Have you right data? Can you send my the code?
Hi,
i have test this by me and i can login and become no error. Have you right data? Can you send my the code?
i mean your code
$credentials = [
'hostname' => $proxmoxConfig->getDomain(), // ipadres without protocol
'username' => $proxmoxConfig->getUser(), // username string
'password' => $proxmoxConfig->getPassword(true), // password string
'authType' => 'pam', // string
'port' => $proxmoxConfig->getPort(), 'string of 4 numbers'
];
return new pve($credentials);
  | array(1) {
  | ["data"]=>
  | array(5) {
  | ["CSRFPreventionToken"]=>
  | string(52) "5F1B2D1F:string"
  | ["clustername"]=>
  | string(10) "devcluster"
  | ["ticket"]=>
  | string(367) "PVE:root@pam:5F1B2D1F:looooongStringWithSlashesAnd=="
  | ["username"]=>
  | string(8) "root@pam"
  | ["cap"]=>
  | array(5) {
  | ["dc"]=>
  | array(1) {
  | ["Sys.Audit"]=>
  | int(1)
  | }
  | ["nodes"]=>
  | array(6) {
  | ["Sys.Console"]=>
  | int(1)
  | ["Sys.Syslog"]=>
  | int(1)
  | ["Sys.PowerMgmt"]=>
  | int(1)
  | ["Permissions.Modify"]=>
  | int(1)
  | ["Sys.Audit"]=>
  | int(1)
  | ["Sys.Modify"]=>
  | int(1)
  | }
  | ["vms"]=>
  | array(18) {
  | ["VM.Snapshot.Rollback"]=>
  | int(1)
  | ["VM.Monitor"]=>
  | int(1)
  | ["VM.Config.Network"]=>
  | int(1)
  | ["VM.Config.Options"]=>
  | int(1)
  | ["VM.Config.CPU"]=>
  | int(1)
  | ["VM.Snapshot"]=>
  | int(1)
  | ["Permissions.Modify"]=>
  | int(1)
  | ["VM.PowerMgmt"]=>
  | int(1)
  | ["VM.Config.CDROM"]=>
  | int(1)
  | ["VM.Config.HWType"]=>
  | int(1)
  | ["VM.Console"]=>
  | int(1)
  | ["VM.Config.Disk"]=>
  | int(1)
  | ["VM.Allocate"]=>
  | int(1)
  | ["VM.Audit"]=>
  | int(1)
  | ["VM.Migrate"]=>
  | int(1)
  | ["VM.Clone"]=>
  | int(1)
  | ["VM.Config.Memory"]=>
  | int(1)
  | ["VM.Backup"]=>
  | int(1)
  | }
  | ["storage"]=>
  | array(5) {
  | ["Datastore.Allocate"]=>
  | int(1)
  | ["Datastore.AllocateTemplate"]=>
  | int(1)
  | ["Permissions.Modify"]=>
  | int(1)
  | ["Datastore.Audit"]=>
  | int(1)
  | ["Datastore.AllocateSpace"]=>
  | int(1)
  | }
  | ["access"]=>
  | array(3) {
  | ["Permissions.Modify"]=>
  | int(1)
  | ["Group.Allocate"]=>
  | int(1)
  | ["User.Modify"]=>
  | int(1)
  | }
  | }
  | }
  | }
Hi,
i have test this by me and i can login and become no error. Have you right data? Can you send my the code?i mean your code
placed the code and the returned $json, but i still get the «Can’t login with this data.» while i could get data with this credentials on GET requests before the initial fix
Tho it does not make much sense to me at the moment either.
I will be on vacation for 2 weeks now, i will look deeper into it later.
I found the issue, its caused by a foreach loop on my end.
Good, i have searched a error on my code and i haven’t found. But it’s good you have found the error.
Thanks for support this project