-
#1
Hi!
I am managing a cluster running PVE v6, which currently includes two servers. My third node has been replaced but I am unable to join it.
When I access hv102 using the GUI on hv101, I get «Connection error 596: Broken pipe».
If I try to join hv103, I get this:
Code:
root@hv103 ~ # pvecm add 192.168.120.11 -force
Please enter superuser (root) password for '192.168.120.11': **********
Establishing API connection with host '192.168.120.11'
The authenticity of host '192.168.120.11' can't be established.
X509 SHA256 key fingerprint is 94:DC:85:CD:88:FA:4D:80:8F:CA:37:49:C0:C7:26:4B:5E:EE:28:A8:4B:C0:AD:95:E9:F1:B3:43:2B:6D:3F:C7.
Are you sure you want to continue connecting (yes/no)? yes
500 500 Server closed connection without sending any data back
The pvecm status is fine, I can even run «pvesh get /nodes/hv102/status» from hv101 but I can see it fail, when pveproxy needs to process it for the webif.
This cluster has been updated from v5 in the past but hv103 is a fresh install.
Looks like something is broken. What do I need to do?
![]()
-
#3
Check the journal of all nodes — anything related to problems around the time you tried to join the third node?
look for messages from pveproxy, pmxcfs (pve-cluster), corosync, pvedaemon
-
#4
No issues, just a restart of the replication service.
What I do not understand is that the status query works using shell and failes when run by pveproxy (when the webif needs the data).
This will most likely be the same issue.
-
#1
Hey,
I’m currently working on adding a proxmox node to my proxmox cluster.
I tried everything but it don’t seems to work so I want to ask you guys for help
I installed 2 nodes with the newest proxmox iso
I edited both /etc/hosts configs, so I added node002 to the node001 hosts file and node001 to the node002 hosts file.
I checked if multicast is working with iperf, it’s working finde when I use the multicast address
The 2 nodes are in the same IP Network 31.172.9x.xxx/28
I created a cluster on the 1st node with this command:
pvecm create test
then I tried to add the cluster on my 2nd node with this command:
pvecm add 31.172.9x.x21 —force (IP from the 1st node)
It seems working all fine, there weren’t any errors after I entered the password…
But the problem ist: Node002 appears in the Node002 webinterface, but I can’t manage it: Broken pipe (596)
service corosync status of 1st node (where I created the cluster)
Code:
root@node001:~# service corosync status
● corosync.service - Corosync Cluster Engine
   Loaded: loaded (/lib/systemd/system/corosync.service; enabled)
   Active: active (running) since Sat 2016-08-27 18:14:25 CEST; 30min ago
  Process: 13572 ExecStop=/usr/share/corosync/corosync stop (code=exited, status=0/SUCCESS)
  Process: 13584 ExecStart=/usr/share/corosync/corosync start (code=exited, status=0/SUCCESS)
Main PID: 13593 (corosync)
   CGroup: /system.slice/corosync.service
           └─13593 corosync

Aug 27 18:14:25 node001 corosync[13584]: Starting Corosync Cluster Engine (corosync): [  OK  ]
Aug 27 18:14:51 node001 corosync[13593]: [QUORUM] This node is within the primary component and will provide service.
Aug 27 18:14:51 node001 corosync[13593]: [QUORUM] Members[1]: 1
Aug 27 18:14:56 node001 corosync[13593]: [CFG   ] Config reload requested by node 1
Aug 27 18:15:16 node001 corosync[13593]: [CFG   ] Config reload requested by node 1
Aug 27 18:15:16 node001 corosync[13593]: [QUORUM] This node is within the non-primary component and will NOT provide any services.
Aug 27 18:15:16 node001 corosync[13593]: [QUORUM] Members[1]: 1
Aug 27 18:18:19 node001 corosync[13593]: [TOTEM ] A new membership (31.172.9x.x21:116) was formed. Members
Aug 27 18:18:19 node001 corosync[13593]: [QUORUM] Members[1]: 1
Aug 27 18:18:19 node001 corosync[13593]: [MAIN  ] Completed service synchronization, ready to provide service.
service corosync status on the 2nd node
Code:
root@node002:~# service corosync status
● corosync.service - Corosync Cluster Engine
   Loaded: loaded (/lib/systemd/system/corosync.service; enabled)
   Active: active (running) since Sat 2016-08-27 18:18:19 CEST; 28min ago
  Process: 1383 ExecStart=/usr/share/corosync/corosync start (code=exited, status=0/SUCCESS)
Main PID: 1390 (corosync)
   CGroup: /system.slice/corosync.service
           └─1390 corosync

Aug 27 18:18:18 node002 corosync[1390]: [SERV  ] Service engine loaded: corosync profile loading service [4]
Aug 27 18:18:18 node002 corosync[1390]: [QUORUM] Using quorum provider corosync_votequorum
Aug 27 18:18:18 node002 corosync[1390]: [SERV  ] Service engine loaded: corosync vote quorum service v1.0 [5]
Aug 27 18:18:18 node002 corosync[1390]: [QB    ] server name: votequorum
Aug 27 18:18:18 node002 corosync[1390]: [SERV  ] Service engine loaded: corosync cluster quorum service v0.1 [3]
Aug 27 18:18:18 node002 corosync[1390]: [QB    ] server name: quorum
Aug 27 18:18:18 node002 corosync[1390]: [TOTEM ] A new membership (31.172.9x.217:16) was formed. Members joined: 2
Aug 27 18:18:18 node002 corosync[1390]: [QUORUM] Members[1]: 2
Aug 27 18:18:18 node002 corosync[1390]: [MAIN  ] Completed service synchronization, ready to provide service.
Aug 27 18:18:19 node002 corosync[1383]: Starting Corosync Cluster Engine (corosync): [  OK  ]
pvecm status on the 1st node
Code:
root@node001:~# pvecm status
Quorum information
------------------
Date:             Sat Aug 27 18:47:14 2016
Quorum provider:  corosync_votequorum
Nodes:            1
Node ID:          0x00000001
Ring ID:          120
Quorate:          Yes

Votequorum information
----------------------
Expected votes:   1
Highest expected: 1
Total votes:      1
Quorum:           1
Flags:            Quorate

Membership information
----------------------
    Nodeid      Votes Name
0x00000001          1 31.172.9x.x21 (local)
pvecm status on the 2nd node
Code:
root@node002:~# pvecm status
Quorum information
------------------
Date:             Sat Aug 27 18:47:54 2016
Quorum provider:  corosync_votequorum
Nodes:            1
Node ID:          0x00000002
Ring ID:          16
Quorate:          Yes

Votequorum information
----------------------
Expected votes:   1
Highest expected: 1
Total votes:      1
Quorum:           1
Flags:            Quorate

Membership information
----------------------
    Nodeid      Votes Name
0x00000002          1 31.172.9x.x17 (local)
/etc/corosync/corosync.conf on the 1st node
Code:
root@node001:~# cat /etc/corosync/corosync.conf
logging {
  debug: off
  to_syslog: yes
}

nodelist {
  node {
    name: node001
    nodeid: 1
    quorum_votes: 1
    ring0_addr: node001
  }

  node {
    name: node002
    nodeid: 2
    quorum_votes: 1
    ring0_addr: node002
  }

}

quorum {
  provider: corosync_votequorum
}

totem {
  cluster_name: avoro
  config_version: 8
  ip_version: ipv4
  secauth: on
  version: 2
  interface {
    bindnetaddr: 31.172.9x.x21
    ringnumber: 0
  }

}
and on the 2nd node
Code:
root@node002:~# cat /etc/corosync/corosync.conf
logging {
  debug: off
  to_syslog: yes
}

nodelist {
  node {
    name: node001
    nodeid: 1
    quorum_votes: 1
    ring0_addr: node001
  }

  node {
    name: node002
    nodeid: 2
    quorum_votes: 1
    ring0_addr: node002
  }

}

quorum {
  provider: corosync_votequorum
}

totem {
  cluster_name: avoro
  config_version: 8
  ip_version: ipv4
  secauth: on
  version: 2
  interface {
    bindnetaddr: 31.172.9x.x21
    ringnumber: 0
  }

}
the hosts file on the 1st node
Code:
127.0.0.1 localhost.localdomain localhost
31.172.9x.x21 node001.avoro.eu node001 pvelocalhost
31.172.9x.x17 node002.avoro.eu node002

# The following lines are desirable for IPv6 capable hosts

::1     ip6-localhost ip6-loopback
fe00::0 ip6-localnet
ff00::0 ip6-mcastprefix
ff02::1 ip6-allnodes
ff02::2 ip6-allrouters
ff02::3 ip6-allhosts
and the 2nd node
Code:
127.0.0.1 localhost.localdomain localhost
31.172.9x.x17 node002.avoro.eu node002 pvelocalhost
31.172.9x.x21 node001.avoro.eu node001

# The following lines are desirable for IPv6 capable hosts

::1     ip6-localhost ip6-loopback
fe00::0 ip6-localnet
ff00::0 ip6-mcastprefix
ff02::1 ip6-allnodes
ff02::2 ip6-allrouters
ff02::3 ip6-allhosts
31.172.9x.x21 is the IP of the 1st Host (Where I created the cluster)
31.172.9x.x17 of the 2nd (Where I tried to add the cluster)
It would be pretty nice if someone could help me
Thanks!
![]()
-
#3
Hey,
thanks for your reply!
This is the result of my test:
Code:
root@node002:~# omping -c 10000 -i 0.001 -F -q node001 node002
node001 : waiting for response msg
node001 : joined (S,G) = (*, 232.43.211.234), pinging
node001 : given amount of query messages was sent

node001 :   unicast, xmt/rcv/%loss = 10000/10000/0%, min/avg/max/std-dev = 0.088/0.153/1.611/0.037
node001 : multicast, xmt/rcv/%loss = 10000/0/100%, min/avg/max/std-dev = 0.000/0.000/0.000/0.000
root@node002:~#
Code:
root@node001:~# omping -c 10000 -i 0.001 -F -q node001 node002
node002 : waiting for response msg
node002 : joined (S,G) = (*, 232.43.211.234), pinging
node002 : waiting for response msg
node002 : server told us to stop
node002 :   unicast, xmt/rcv/%loss = 9842/9842/0%, min/avg/max/std-dev = 0.094/0.148/1.254/0.028
node002 : multicast, xmt/rcv/%loss = 9842/0/100%, min/avg/max/std-dev = 0.000/0.000/0.000/0.000
Best regards
Leif
![]()
-
#4
you have 100% loss of the multicast packages, so this will not work unless you make multicast work
-
#5
you have 100% loss of the multicast packages, so this will not work unless you make multicast work
I already tried to active it on the node side with
and my network config looks like this on booth nodes (same subnet):
Code:
auto lo
iface lo inet loopback

auto vmbr0
iface vmbr0 inet static
        address 31.172.9x.x21
        netmask 255.255.255.240
        gateway 31.172.9x.x09
        bridge_ports eth0
        bridge_stp off
        bridge_fd 0
        post-up ( echo 1 > /sys/devices/virtual/net/$IFACE/bridge/multicast_querier )
Best regards
Leif
Если вы используете SSH для подключения к удаленным серверам Linux, вы заметите, что если вы оставите сеанс SSH неактивным в течение некоторого времени, а затем попытаетесь использовать его снова, сеанс SSH отключается с сообщением об ошибке, например:
:client_loop: send disconnect: Broken pipe
В некоторых системах отображается сообщение: ‘Write failed: Broken pipe’ or ‘Connection closed by remote host’.
Давайте посмотрим, что вызывает эту ошибку и как сохранить соединение SSH.
Исправление ошибки сломанной трубы с помощью SSH
Как вы уже догадались, соединение SSH закрыто из-за бездействия. Нет установленного значения, но обычно оно составляет около 5 минут или около того.
Что вы можете сделать, чтобы избежать отключения сеанса SSH, – это отправить «живое сообщение» либо с сервера клиенту ( ClientAliveInterval), либо от клиента к серверу ( ServerAliveInterval) через определенный интервал времени.
Таким образом, вы поддерживаете сеанс SSH в активном состоянии, потому что между клиентом и сервером существует связь, и сервер понимает, что клиент все еще существует.
Есть два способа сделать это. Либо вы отправляете живое сообщение от клиента к серверу, либо с сервера клиенту.
- Если вы подключаетесь к нескольким серверам через SSH, установите его на своем компьютере.
- Если вы системный администратор и несколько пользователей жалуются на частое отключение SSH-соединения, вы можете установить его на сервере.
Метод 1: изменение конфигурации SSH на стороне клиента
Предположим, вы хотите, чтобы ваше SSH-соединение оставалось активным до 10 минут (600 секунд) простоя.
При подключении к удаленной системе Linux через SSH вы можете указать значение ServerAliveInterval:
ssh -o ServerAliveInterval=600 username@server_ip_address
Теперь это работает, но вручную вводить эту опцию каждый раз, когда вы подключаетесь к серверу, утомительно. Почему бы не сделать его постоянным?
Надеюсь, вы знаете о файлах конфигурации SSH. На стороне клиента вы можете воспользоваться этим, чтобы установить определенные параметры SSH для определенных подключений или всех из них.
Во-первых, убедитесь, что у вас есть файл конфигурации ssh. Если не создать:
touch ~/.ssh/config
Важно предоставить ему правильные права доступа к файлам, в противном случае при подключении через SSH у вас будет ошибка отказа в разрешении.
Используйте команду chmod и добавьте к ней следующие права доступа к файлу:
chmod 600 ~/.ssh/config
Если вам лень или вы не хотите вдаваться в подробности, используйте эту команду, чтобы установить интервал активности на 600 секунд (10 минут):
echo "ServerAliveInterval 600" >> ~/.ssh/config
Это установит значение ServerAliveInterval на 10 минут для всех SSH-соединений, которые вы будете использовать. Попробуйте, если хотите.
Если вы хотите сделать его более правильным, вы должны добавить его так:
Host *
ServerAliveInterval 600
Метод 2: изменение конфигурации SSH на стороне сервера
Файл конфигурации SSH для сервера обычно находится в /etc/ssh/sshd_config.
Если вы откроете этот файл, вы найдете здесь два интересующих параметра:
- ClientAliveInterval: Это период времени бездействия, по истечении которого сервер отправит сообщение об активности подключенному по ssh клиенту.
- ClientAliveCountMax: Это количество попыток, которые сервер сделает для отправки живого сообщения.
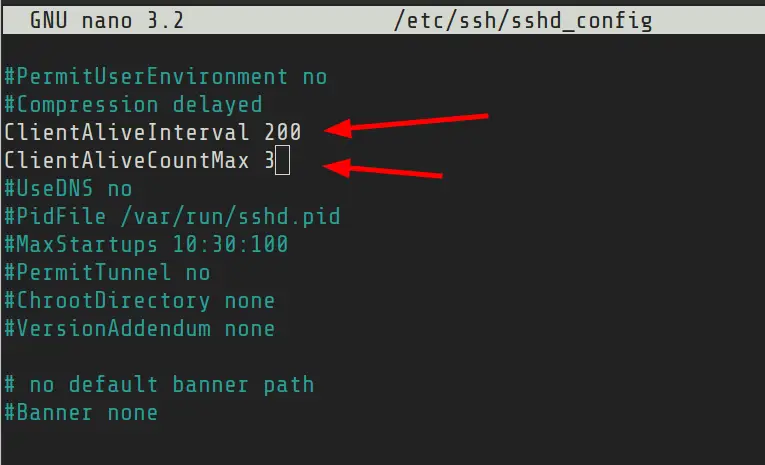
Скажем, вы установили ClientAliveInterval в 200 секунд и ClientAliveCountMax в 3. Это означает, что сервер отправит живое сообщение через 200 секунд. Если со стороны клиента нет активности, он снова отправит живое сообщение через 400 секунд. Нет ответа/активности от клиента, и другое живое сообщение отправлено через 600 секунд. По истечении этого времени (600 секунд) соединение SSH прерывается.
Вы можете отредактировать файл /etc/ssh/sshd_config в своем любимом текстовом редакторе на базе терминала, таком как Vim. Найдите записи ClientAliveInterval и ClientAliveCountMax. Удалите ключ # в начале строк и присвойте им соответствующее значение.

Сохраните и выйдите из файла.
Пожалуйста, не устанавливайте тайм-аут SSH-соединения на несколько часов. Это было бы пустой тратой ресурсов.
Мы надеемся, что эта статья помогла вам решить проблему с ошибкой сломанной трубы при SSH-соединении. Ваше мнение приветствуется.
Если вы нашли ошибку, пожалуйста, выделите фрагмент текста и нажмите Ctrl+Enter.
If you use SSH to connect to remote Linux servers, you’ll notice that if you keep your SSH session inactive for some time and then try to use it again, the SSH session disconnects with an error message like this:
:client_loop: send disconnect: Broken pipeOn some systems, it will display ‘Write failed: Broken pipe’ or ‘Connection closed by remote host’.
Let’s see what causes this error and how to go about keeping your SSH connection alive.
Fixing broken pipe error with SSH
As you may have guessed, the SSH connection is closed because of inactivity. There is no set value but it usually around 5 minutes or so.
What you can do to avoid the SSH session disconnection is to send an ‘alive message’ either from the server to client (ClientAliveInterval) or from client to server (ServerAliveInterval) at certain time interval.
This way, you keep the SSH session alive because there is a communication between the client and server and the server understands that client is still there.
Now, there are two ways to do that. Either you send the alive message from the client to the server or from the server to the client.
- If you connect to multiple servers via SSH, set it on your machine.
- If you are a sysadmin and several of users complain about frequent SSH connection disconnect, you may set it on the server.
Method 1: Client side SSH configuration change
Let’s say you want to keep your SSH connection alive with up to 10 minutes (600 seconds) of idle time.
While connecting to the remote Linux system through SSH, you can mention the ServerAliveInterval value like this:
ssh -o ServerAliveInterval=600 [email protected]_ip_addressNow, this thing work but manually entering this option each time you connect to the server is tiresome. Why not make it permanent?
I hope you are aware of the SSH config files. On the client side, you can take advantage of it to set certain SSH parameters for specific connections or all of them. I have explained SSH config file in detail here.
First, make sure that you have the ssh config file. If not create it:
touch ~/.ssh/configIt is important to give it the correct file permissions otherwise you’ll have permission denied error while connecting via SSH.
Use the chmod command and add the following file permission to it:
chmod 600 ~/.ssh/configIf you’re feeling lazy or don’t want to go in detail, use this command to set the alive interval to 600 seconds (10 minutes):
echo "ServerAliveInterval 600" >> ~/.ssh/config This will set the ServerAliveInterval value to 10 minutes for all SSH connection you’ll use. Give it a try if you want to.
If you want to make it more proper, you should add it like this:
Host *
ServerAliveInterval 600
Method 2: Server side SSH config change
The SSH config file for the server is usually located at /etc/ssh/sshd_config.
If you open this file, you’ll find two parameters of interest here:
ClientAliveInterval: This is the inactivity time period after which the server will send an alive message to the ssh connected client.ClientAliveCountMax: This is the number of attempts the server will make to send the alive message.
Say, you set ClientAliveInterval to 200 seconds and ClientAliveCountMax to 3. This means the server will send alive message after 200 seconds. If there is no activity from the client, it will again send an alive message at 400 seconds. No response/activity from the client and another alive message is sent at 600 seconds. After this (600 seconds) the SSH connection is disconnected.
You can edit the /etc/ssh/sshd_config file in your favorite terminal based text editor like Vim. Look for ClientAliveInterval and ClientAliveCountMax entries. Remove the # key at the beginning of the lines and give them the appropriate value.
Save and exit the file.
Please do not set the SSH connection timeout to several hours. That would be a waste of resources.
I hope this tutorial helped you to fix the broken pipe error issue with SSH connection. Your feedback is welcome.

Creator of Linux Handbook and It’s FOSS. An ardent Linux user & open source promoter. Huge fan of classic detective mysteries from Agatha Christie and Sherlock Holmes to Columbo & Ellery Queen.
-
#1
Hi!
I am managing a cluster running PVE v6, which currently includes two servers. My third node has been replaced but I am unable to join it.
When I access hv102 using the GUI on hv101, I get «Connection error 596: Broken pipe».
If I try to join hv103, I get this:
Code:
root@hv103 ~ # pvecm add 192.168.120.11 -force
Please enter superuser (root) password for '192.168.120.11': **********
Establishing API connection with host '192.168.120.11'
The authenticity of host '192.168.120.11' can't be established.
X509 SHA256 key fingerprint is 94:DC:85:CD:88:FA:4D:80:8F:CA:37:49:C0:C7:26:4B:5E:EE:28:A8:4B:C0:AD:95:E9:F1:B3:43:2B:6D:3F:C7.
Are you sure you want to continue connecting (yes/no)? yes
500 500 Server closed connection without sending any data back
The pvecm status is fine, I can even run «pvesh get /nodes/hv102/status» from hv101 but I can see it fail, when pveproxy needs to process it for the webif.
This cluster has been updated from v5 in the past but hv103 is a fresh install.
Looks like something is broken. What do I need to do?
![]()
-
- May 2, 2018
-
- 8,123
-
- 1,360
-
- 174
-
#3
Check the journal of all nodes — anything related to problems around the time you tried to join the third node?
look for messages from pveproxy, pmxcfs (pve-cluster), corosync, pvedaemon
-
#4
No issues, just a restart of the replication service.
What I do not understand is that the status query works using shell and failes when run by pveproxy (when the webif needs the data).
This will most likely be the same issue.
-
#1
Hi!
I am managing a cluster running PVE v6, which currently includes two servers. My third node has been replaced but I am unable to join it.
When I access hv102 using the GUI on hv101, I get «Connection error 596: Broken pipe».
If I try to join hv103, I get this:
Code:
root@hv103 ~ # pvecm add 192.168.120.11 -force
Please enter superuser (root) password for '192.168.120.11': **********
Establishing API connection with host '192.168.120.11'
The authenticity of host '192.168.120.11' can't be established.
X509 SHA256 key fingerprint is 94:DC:85:CD:88:FA:4D:80:8F:CA:37:49:C0:C7:26:4B:5E:EE:28:A8:4B:C0:AD:95:E9:F1:B3:43:2B:6D:3F:C7.
Are you sure you want to continue connecting (yes/no)? yes
500 500 Server closed connection without sending any data back
The pvecm status is fine, I can even run «pvesh get /nodes/hv102/status» from hv101 but I can see it fail, when pveproxy needs to process it for the webif.
This cluster has been updated from v5 in the past but hv103 is a fresh install.
Looks like something is broken. What do I need to do?
![]()
-
#3
Check the journal of all nodes — anything related to problems around the time you tried to join the third node?
look for messages from pveproxy, pmxcfs (pve-cluster), corosync, pvedaemon
-
#4
No issues, just a restart of the replication service.
What I do not understand is that the status query works using shell and failes when run by pveproxy (when the webif needs the data).
This will most likely be the same issue.
-
#1
Hey,
I’m currently working on adding a proxmox node to my proxmox cluster.
I tried everything but it don’t seems to work so I want to ask you guys for help
I installed 2 nodes with the newest proxmox iso
I edited both /etc/hosts configs, so I added node002 to the node001 hosts file and node001 to the node002 hosts file.
I checked if multicast is working with iperf, it’s working finde when I use the multicast address
The 2 nodes are in the same IP Network 31.172.9x.xxx/28
I created a cluster on the 1st node with this command:
pvecm create test
then I tried to add the cluster on my 2nd node with this command:
pvecm add 31.172.9x.x21 —force (IP from the 1st node)
It seems working all fine, there weren’t any errors after I entered the password…
But the problem ist: Node002 appears in the Node002 webinterface, but I can’t manage it: Broken pipe (596)
service corosync status of 1st node (where I created the cluster)
Code:
root@node001:~# service corosync status
● corosync.service - Corosync Cluster Engine
   Loaded: loaded (/lib/systemd/system/corosync.service; enabled)
   Active: active (running) since Sat 2016-08-27 18:14:25 CEST; 30min ago
  Process: 13572 ExecStop=/usr/share/corosync/corosync stop (code=exited, status=0/SUCCESS)
  Process: 13584 ExecStart=/usr/share/corosync/corosync start (code=exited, status=0/SUCCESS)
Main PID: 13593 (corosync)
   CGroup: /system.slice/corosync.service
           └─13593 corosync

Aug 27 18:14:25 node001 corosync[13584]: Starting Corosync Cluster Engine (corosync): [  OK  ]
Aug 27 18:14:51 node001 corosync[13593]: [QUORUM] This node is within the primary component and will provide service.
Aug 27 18:14:51 node001 corosync[13593]: [QUORUM] Members[1]: 1
Aug 27 18:14:56 node001 corosync[13593]: [CFG   ] Config reload requested by node 1
Aug 27 18:15:16 node001 corosync[13593]: [CFG   ] Config reload requested by node 1
Aug 27 18:15:16 node001 corosync[13593]: [QUORUM] This node is within the non-primary component and will NOT provide any services.
Aug 27 18:15:16 node001 corosync[13593]: [QUORUM] Members[1]: 1
Aug 27 18:18:19 node001 corosync[13593]: [TOTEM ] A new membership (31.172.9x.x21:116) was formed. Members
Aug 27 18:18:19 node001 corosync[13593]: [QUORUM] Members[1]: 1
Aug 27 18:18:19 node001 corosync[13593]: [MAIN  ] Completed service synchronization, ready to provide service.
service corosync status on the 2nd node
Code:
root@node002:~# service corosync status
● corosync.service - Corosync Cluster Engine
   Loaded: loaded (/lib/systemd/system/corosync.service; enabled)
   Active: active (running) since Sat 2016-08-27 18:18:19 CEST; 28min ago
  Process: 1383 ExecStart=/usr/share/corosync/corosync start (code=exited, status=0/SUCCESS)
Main PID: 1390 (corosync)
   CGroup: /system.slice/corosync.service
           └─1390 corosync

Aug 27 18:18:18 node002 corosync[1390]: [SERV  ] Service engine loaded: corosync profile loading service [4]
Aug 27 18:18:18 node002 corosync[1390]: [QUORUM] Using quorum provider corosync_votequorum
Aug 27 18:18:18 node002 corosync[1390]: [SERV  ] Service engine loaded: corosync vote quorum service v1.0 [5]
Aug 27 18:18:18 node002 corosync[1390]: [QB    ] server name: votequorum
Aug 27 18:18:18 node002 corosync[1390]: [SERV  ] Service engine loaded: corosync cluster quorum service v0.1 [3]
Aug 27 18:18:18 node002 corosync[1390]: [QB    ] server name: quorum
Aug 27 18:18:18 node002 corosync[1390]: [TOTEM ] A new membership (31.172.9x.217:16) was formed. Members joined: 2
Aug 27 18:18:18 node002 corosync[1390]: [QUORUM] Members[1]: 2
Aug 27 18:18:18 node002 corosync[1390]: [MAIN  ] Completed service synchronization, ready to provide service.
Aug 27 18:18:19 node002 corosync[1383]: Starting Corosync Cluster Engine (corosync): [  OK  ]
pvecm status on the 1st node
Code:
root@node001:~# pvecm status
Quorum information
------------------
Date:             Sat Aug 27 18:47:14 2016
Quorum provider:  corosync_votequorum
Nodes:            1
Node ID:          0x00000001
Ring ID:          120
Quorate:          Yes

Votequorum information
----------------------
Expected votes:   1
Highest expected: 1
Total votes:      1
Quorum:           1
Flags:            Quorate

Membership information
----------------------
    Nodeid      Votes Name
0x00000001          1 31.172.9x.x21 (local)
pvecm status on the 2nd node
Code:
root@node002:~# pvecm status
Quorum information
------------------
Date:             Sat Aug 27 18:47:54 2016
Quorum provider:  corosync_votequorum
Nodes:            1
Node ID:          0x00000002
Ring ID:          16
Quorate:          Yes

Votequorum information
----------------------
Expected votes:   1
Highest expected: 1
Total votes:      1
Quorum:           1
Flags:            Quorate

Membership information
----------------------
    Nodeid      Votes Name
0x00000002          1 31.172.9x.x17 (local)
/etc/corosync/corosync.conf on the 1st node
Code:
root@node001:~# cat /etc/corosync/corosync.conf
logging {
  debug: off
  to_syslog: yes
}

nodelist {
  node {
    name: node001
    nodeid: 1
    quorum_votes: 1
    ring0_addr: node001
  }

  node {
    name: node002
    nodeid: 2
    quorum_votes: 1
    ring0_addr: node002
  }

}

quorum {
  provider: corosync_votequorum
}

totem {
  cluster_name: avoro
  config_version: 8
  ip_version: ipv4
  secauth: on
  version: 2
  interface {
    bindnetaddr: 31.172.9x.x21
    ringnumber: 0
  }

}
and on the 2nd node
Code:
root@node002:~# cat /etc/corosync/corosync.conf
logging {
  debug: off
  to_syslog: yes
}

nodelist {
  node {
    name: node001
    nodeid: 1
    quorum_votes: 1
    ring0_addr: node001
  }

  node {
    name: node002
    nodeid: 2
    quorum_votes: 1
    ring0_addr: node002
  }

}

quorum {
  provider: corosync_votequorum
}

totem {
  cluster_name: avoro
  config_version: 8
  ip_version: ipv4
  secauth: on
  version: 2
  interface {
    bindnetaddr: 31.172.9x.x21
    ringnumber: 0
  }

}
the hosts file on the 1st node
Code:
127.0.0.1 localhost.localdomain localhost
31.172.9x.x21 node001.avoro.eu node001 pvelocalhost
31.172.9x.x17 node002.avoro.eu node002

# The following lines are desirable for IPv6 capable hosts

::1     ip6-localhost ip6-loopback
fe00::0 ip6-localnet
ff00::0 ip6-mcastprefix
ff02::1 ip6-allnodes
ff02::2 ip6-allrouters
ff02::3 ip6-allhosts
and the 2nd node
Code:
127.0.0.1 localhost.localdomain localhost
31.172.9x.x17 node002.avoro.eu node002 pvelocalhost
31.172.9x.x21 node001.avoro.eu node001

# The following lines are desirable for IPv6 capable hosts

::1     ip6-localhost ip6-loopback
fe00::0 ip6-localnet
ff00::0 ip6-mcastprefix
ff02::1 ip6-allnodes
ff02::2 ip6-allrouters
ff02::3 ip6-allhosts
31.172.9x.x21 is the IP of the 1st Host (Where I created the cluster)
31.172.9x.x17 of the 2nd (Where I tried to add the cluster)
It would be pretty nice if someone could help me
Thanks!
![]()
-
#3
Hey,
thanks for your reply!
This is the result of my test:
Code:
root@node002:~# omping -c 10000 -i 0.001 -F -q node001 node002
node001 : waiting for response msg
node001 : joined (S,G) = (*, 232.43.211.234), pinging
node001 : given amount of query messages was sent

node001 :   unicast, xmt/rcv/%loss = 10000/10000/0%, min/avg/max/std-dev = 0.088/0.153/1.611/0.037
node001 : multicast, xmt/rcv/%loss = 10000/0/100%, min/avg/max/std-dev = 0.000/0.000/0.000/0.000
root@node002:~#
Code:
root@node001:~# omping -c 10000 -i 0.001 -F -q node001 node002
node002 : waiting for response msg
node002 : joined (S,G) = (*, 232.43.211.234), pinging
node002 : waiting for response msg
node002 : server told us to stop
node002 :   unicast, xmt/rcv/%loss = 9842/9842/0%, min/avg/max/std-dev = 0.094/0.148/1.254/0.028
node002 : multicast, xmt/rcv/%loss = 9842/0/100%, min/avg/max/std-dev = 0.000/0.000/0.000/0.000
Best regards
Leif
![]()
-
#4
you have 100% loss of the multicast packages, so this will not work unless you make multicast work
-
#5
you have 100% loss of the multicast packages, so this will not work unless you make multicast work
I already tried to active it on the node side with
and my network config looks like this on booth nodes (same subnet):
Code:
auto lo
iface lo inet loopback

auto vmbr0
iface vmbr0 inet static
        address 31.172.9x.x21
        netmask 255.255.255.240
        gateway 31.172.9x.x09
        bridge_ports eth0
        bridge_stp off
        bridge_fd 0
        post-up ( echo 1 > /sys/devices/virtual/net/$IFACE/bridge/multicast_querier )
Best regards
Leif
Если вы используете SSH для подключения к удаленным серверам Linux, вы заметите, что если вы оставите сеанс SSH неактивным в течение некоторого времени, а затем попытаетесь использовать его снова, сеанс SSH отключается с сообщением об ошибке, например:
:client_loop: send disconnect: Broken pipe
В некоторых системах отображается сообщение: ‘Write failed: Broken pipe’ or ‘Connection closed by remote host’.
Давайте посмотрим, что вызывает эту ошибку и как сохранить соединение SSH.
Исправление ошибки сломанной трубы с помощью SSH
Как вы уже догадались, соединение SSH закрыто из-за бездействия. Нет установленного значения, но обычно оно составляет около 5 минут или около того.
Что вы можете сделать, чтобы избежать отключения сеанса SSH, – это отправить «живое сообщение» либо с сервера клиенту ( ClientAliveInterval), либо от клиента к серверу ( ServerAliveInterval) через определенный интервал времени.
Таким образом, вы поддерживаете сеанс SSH в активном состоянии, потому что между клиентом и сервером существует связь, и сервер понимает, что клиент все еще существует.
Есть два способа сделать это. Либо вы отправляете живое сообщение от клиента к серверу, либо с сервера клиенту.
- Если вы подключаетесь к нескольким серверам через SSH, установите его на своем компьютере.
- Если вы системный администратор и несколько пользователей жалуются на частое отключение SSH-соединения, вы можете установить его на сервере.
Метод 1: изменение конфигурации SSH на стороне клиента
Предположим, вы хотите, чтобы ваше SSH-соединение оставалось активным до 10 минут (600 секунд) простоя.
При подключении к удаленной системе Linux через SSH вы можете указать значение ServerAliveInterval:
ssh -o ServerAliveInterval=600 username@server_ip_address
Теперь это работает, но вручную вводить эту опцию каждый раз, когда вы подключаетесь к серверу, утомительно. Почему бы не сделать его постоянным?
Надеюсь, вы знаете о файлах конфигурации SSH. На стороне клиента вы можете воспользоваться этим, чтобы установить определенные параметры SSH для определенных подключений или всех из них.
Во-первых, убедитесь, что у вас есть файл конфигурации ssh. Если не создать:
touch ~/.ssh/config
Важно предоставить ему правильные права доступа к файлам, в противном случае при подключении через SSH у вас будет ошибка отказа в разрешении.
Используйте команду chmod и добавьте к ней следующие права доступа к файлу:
chmod 600 ~/.ssh/config
Если вам лень или вы не хотите вдаваться в подробности, используйте эту команду, чтобы установить интервал активности на 600 секунд (10 минут):
echo "ServerAliveInterval 600" >> ~/.ssh/config
Это установит значение ServerAliveInterval на 10 минут для всех SSH-соединений, которые вы будете использовать. Попробуйте, если хотите.
Если вы хотите сделать его более правильным, вы должны добавить его так:
Host *
ServerAliveInterval 600
Метод 2: изменение конфигурации SSH на стороне сервера
Файл конфигурации SSH для сервера обычно находится в /etc/ssh/sshd_config.
Если вы откроете этот файл, вы найдете здесь два интересующих параметра:
- ClientAliveInterval: Это период времени бездействия, по истечении которого сервер отправит сообщение об активности подключенному по ssh клиенту.
- ClientAliveCountMax: Это количество попыток, которые сервер сделает для отправки живого сообщения.
Скажем, вы установили ClientAliveInterval в 200 секунд и ClientAliveCountMax в 3. Это означает, что сервер отправит живое сообщение через 200 секунд. Если со стороны клиента нет активности, он снова отправит живое сообщение через 400 секунд. Нет ответа/активности от клиента, и другое живое сообщение отправлено через 600 секунд. По истечении этого времени (600 секунд) соединение SSH прерывается.
Вы можете отредактировать файл /etc/ssh/sshd_config в своем любимом текстовом редакторе на базе терминала, таком как Vim. Найдите записи ClientAliveInterval и ClientAliveCountMax. Удалите ключ # в начале строк и присвойте им соответствующее значение.
Сохраните и выйдите из файла.
Пожалуйста, не устанавливайте тайм-аут SSH-соединения на несколько часов. Это было бы пустой тратой ресурсов.
Мы надеемся, что эта статья помогла вам решить проблему с ошибкой сломанной трубы при SSH-соединении. Ваше мнение приветствуется.
Если вы нашли ошибку, пожалуйста, выделите фрагмент текста и нажмите Ctrl+Enter.
If you use SSH to connect to remote Linux servers, you’ll notice that if you keep your SSH session inactive for some time and then try to use it again, the SSH session disconnects with an error message like this:
:client_loop: send disconnect: Broken pipeOn some systems, it will display ‘Write failed: Broken pipe’ or ‘Connection closed by remote host’.
Let’s see what causes this error and how to go about keeping your SSH connection alive.
Fixing broken pipe error with SSH
As you may have guessed, the SSH connection is closed because of inactivity. There is no set value but it usually around 5 minutes or so.
What you can do to avoid the SSH session disconnection is to send an ‘alive message’ either from the server to client (ClientAliveInterval) or from client to server (ServerAliveInterval) at certain time interval.
This way, you keep the SSH session alive because there is a communication between the client and server and the server understands that client is still there.
Now, there are two ways to do that. Either you send the alive message from the client to the server or from the server to the client.
- If you connect to multiple servers via SSH, set it on your machine.
- If you are a sysadmin and several of users complain about frequent SSH connection disconnect, you may set it on the server.
Method 1: Client side SSH configuration change
Let’s say you want to keep your SSH connection alive with up to 10 minutes (600 seconds) of idle time.
While connecting to the remote Linux system through SSH, you can mention the ServerAliveInterval value like this:
ssh -o ServerAliveInterval=600 [email protected]_ip_addressNow, this thing work but manually entering this option each time you connect to the server is tiresome. Why not make it permanent?
I hope you are aware of the SSH config files. On the client side, you can take advantage of it to set certain SSH parameters for specific connections or all of them. I have explained SSH config file in detail here.
First, make sure that you have the ssh config file. If not create it:
touch ~/.ssh/configIt is important to give it the correct file permissions otherwise you’ll have permission denied error while connecting via SSH.
Use the chmod command and add the following file permission to it:
chmod 600 ~/.ssh/configIf you’re feeling lazy or don’t want to go in detail, use this command to set the alive interval to 600 seconds (10 minutes):
echo "ServerAliveInterval 600" >> ~/.ssh/config This will set the ServerAliveInterval value to 10 minutes for all SSH connection you’ll use. Give it a try if you want to.
If you want to make it more proper, you should add it like this:
Host *
ServerAliveInterval 600
Method 2: Server side SSH config change
The SSH config file for the server is usually located at /etc/ssh/sshd_config.
If you open this file, you’ll find two parameters of interest here:
ClientAliveInterval: This is the inactivity time period after which the server will send an alive message to the ssh connected client.ClientAliveCountMax: This is the number of attempts the server will make to send the alive message.
Say, you set ClientAliveInterval to 200 seconds and ClientAliveCountMax to 3. This means the server will send alive message after 200 seconds. If there is no activity from the client, it will again send an alive message at 400 seconds. No response/activity from the client and another alive message is sent at 600 seconds. After this (600 seconds) the SSH connection is disconnected.
You can edit the /etc/ssh/sshd_config file in your favorite terminal based text editor like Vim. Look for ClientAliveInterval and ClientAliveCountMax entries. Remove the # key at the beginning of the lines and give them the appropriate value.
Save and exit the file.
Please do not set the SSH connection timeout to several hours. That would be a waste of resources.
I hope this tutorial helped you to fix the broken pipe error issue with SSH connection. Your feedback is welcome.
Creator of Linux Handbook and It’s FOSS. An ardent Linux user & open source promoter. Huge fan of classic detective mysteries from Agatha Christie and Sherlock Holmes to Columbo & Ellery Queen.
Programmable HTTP proxy server for Node.js
Node.js implementation of a proxy server (think Squid) with support for SSL, authentication, upstream proxy chaining,
custom HTTP responses and measuring traffic statistics.
The authentication and proxy chaining configuration is defined in code and can be dynamic.
Note that the proxy server only supports Basic authentication
(see Proxy-Authorization for details).
For example, this package is useful if you need to use proxies with authentication
in the headless Chrome web browser, because it doesn’t accept proxy URLs such as http://username:password@proxy.example.com:8080.
With this library, you can set up a local proxy server without any password
that will forward requests to the upstream proxy with password.
The package is used for this exact purpose by the Apify web scraping platform.
To learn more about the rationale behind this package,
read How to make headless Chrome and Puppeteer use a proxy server with authentication.
Run a simple HTTP/HTTPS proxy server
const ProxyChain = require('proxy-chain');

const server = new ProxyChain.Server({ port: 8000 });

server.listen(() => {
    console.log(`Proxy server is listening on port ${8000}`);
});
Run a HTTP/HTTPS proxy server with credentials and upstream proxy
const ProxyChain = require('proxy-chain');

const server = new ProxyChain.Server({
    // Port where the server will listen. By default 8000.
    port: 8000,

    // Enables verbose logging
    verbose: true,

    // Custom user-defined function to authenticate incoming proxy requests,
    // and optionally provide the URL to chained upstream proxy.
    // The function must return an object (or promise resolving to the object) with the following signature:
    // { requestAuthentication: boolean, upstreamProxyUrl: string, failMsg?: string, customTag?: unknown }
    // If the function is not defined or is null, the server runs in simple mode.
    // Note that the function takes a single argument with the following properties:
    // * request      - An instance of http.IncomingMessage class with information about the client request
    //                  (which is either HTTP CONNECT for SSL protocol, or other HTTP request)
    // * username     - Username parsed from the Proxy-Authorization header. Might be empty string.
    // * password     - Password parsed from the Proxy-Authorization header. Might be empty string.
    // * hostname     - Hostname of the target server
    // * port         - Port of the target server
    // * isHttp       - If true, this is a HTTP request, otherwise it's a HTTP CONNECT tunnel for SSL
    //                  or other protocols
    // * connectionId - Unique ID of the HTTP connection. It can be used to obtain traffic statistics.
    prepareRequestFunction: ({ request, username, password, hostname, port, isHttp, connectionId }) => {
        return {
            // If set to true, the client is sent HTTP 407 resposne with the Proxy-Authenticate header set,
            // requiring Basic authentication. Here you can verify user credentials.
            requestAuthentication: username !== 'bob' || password !== 'TopSecret',

            // Sets up an upstream HTTP proxy to which all the requests are forwarded.
            // If null, the proxy works in direct mode, i.e. the connection is forwarded directly
            // to the target server. This field is ignored if "requestAuthentication" is true.
            // The username and password must be URI-encoded.
            upstreamProxyUrl: `http://username:password@proxy.example.com:3128`,

            // If "requestAuthentication" is true, you can use the following property
            // to define a custom error message to return to the client instead of the default "Proxy credentials required"
            failMsg: 'Bad username or password, please try again.',

            // Optional custom tag that will be passed back via
            // `tunnelConnectResponded` or `tunnelConnectFailed` events
            // Can be used to pass information between proxy-chain
            // and any external code or application using it
            customTag: { userId: '123' },
        };
    },
});

server.listen(() => {
  console.log(`Proxy server is listening on port ${server.port}`);
});

// Emitted when HTTP connection is closed
server.on('connectionClosed', ({ connectionId, stats }) => {
  console.log(`Connection ${connectionId} closed`);
  console.dir(stats);
});

// Emitted when HTTP request fails
server.on('requestFailed', ({ request, error }) => {
  console.log(`Request ${request.url} failed`);
  console.error(error);
});
A different approach to 502 Bad Gateway
502 status code is not comprehensive enough. Therefore, the server may respond with 590-599 instead:
590 Non Successful
Upstream responded with non-200 status code.
591 RESERVED
This status code is reserved for further use.
592 Status Code Out Of Range
Upstream respondend with status code different than 100-999.
593 Not Found
DNS lookup failed — EAI_NODATA or EAI_NONAME.
594 Connection Refused
Upstream refused connection.
595 Connection Reset
Connection reset due to loss of connection or timeout.
596 Broken Pipe
Trying to write on a closed socket.
597 Auth Failed
Incorrect upstream credentials.
598 RESERVED
This status code is reserved for further use.
599 Upstream Error
Generic upstream error.
590 and 592 indicate an issue on the upstream side.
593 indicates an incorrect proxy-chain configuration.
594, 595 and 596 may occur due to connection loss.
597 indicates incorrect upstream credentials.
599 is a generic error, where the above is not applicable.
Custom error responses
To return a custom HTTP response to indicate an error to the client,
you can throw the RequestError from inside of the prepareRequestFunction function.
The class constructor has the following parameters: RequestError(body, statusCode, headers).
By default, the response will have Content-Type: text/plain; charset=utf-8.
const ProxyChain = require('proxy-chain');

const server = new ProxyChain.Server({
    prepareRequestFunction: ({ request, username, password, hostname, port, isHttp, connectionId }) => {
        if (username !== 'bob') {
           throw new ProxyChain.RequestError('Only Bob can use this proxy!', 400);
        }
    },
});
Measuring traffic statistics
To get traffic statistics for a certain HTTP connection, you can use:
const stats = server.getConnectionStats(connectionId);
console.dir(stats);
The resulting object looks like:
{
    // Number of bytes sent to client
    srcTxBytes: Number,
    // Number of bytes received from client
    srcRxBytes: Number,
    // Number of bytes sent to target server (proxy or website)
    trgTxBytes: Number,
    // Number of bytes received from target server (proxy or website)
    trgRxBytes: Number,
}
If the underlying sockets were closed, the corresponding values will be null,
rather than 0.
Custom responses
Custom responses allow you to override the response to a HTTP requests to the proxy, without contacting any target host.
For example, this is useful if you want to provide a HTTP proxy-style interface
to an external API or respond with some custom page to certain requests.
Note that this feature is only available for HTTP connections. That’s because HTTPS
connections cannot be intercepted without access to the target host’s private key.
To provide a custom response, the result of the prepareRequestFunction function must
define the customResponseFunction property, which contains a function that generates the custom response.
The function is passed no parameters and it must return an object (or a promise resolving to an object)
with the following properties:
{
  // Optional HTTP status code of the response. By default it is 200.
  statusCode: 200,

  // Optional HTTP headers of the response
  headers: {
    'X-My-Header': 'bla bla',
  }

  // Optional string with the body of the HTTP response
  body: 'My custom response',

  // Optional encoding of the body. If not provided, defaults to 'UTF-8'
  encoding: 'UTF-8',
}
Here is a simple example:
const ProxyChain = require('proxy-chain');

const server = new ProxyChain.Server({
    port: 8000,
    prepareRequestFunction: ({ request, username, password, hostname, port, isHttp }) => {
        return {
            customResponseFunction: () => {
                return {
                    statusCode: 200,
                    body: `My custom response to ${request.url}`,
                };
            },
        };
    },
});

server.listen(() => {
  console.log(`Proxy server is listening on port ${server.port}`);
});
Routing CONNECT to another HTTP server
While customResponseFunction enables custom handling methods such as GET and POST, many HTTP clients rely on CONNECT tunnels.
It’s possible to route those requests differently using the customConnectServer option. It accepts an instance of Node.js HTTP server.
const http = require('http');
const ProxyChain = require('proxy-chain');

const exampleServer = http.createServer((request, response) => {
    response.end('Hello from a custom server!');
});

const server = new ProxyChain.Server({
    port: 8000,
    prepareRequestFunction: ({ request, username, password, hostname, port, isHttp }) => {
        if (request.url.toLowerCase() === 'example.com:80') {
            return {
                customConnectServer: exampleServer,
            };
        }

        return {};
    },
});

server.listen(() => {
  console.log(`Proxy server is listening on port ${server.port}`);
});
In the example above, all CONNECT tunnels to example.com are overridden.
This is an unsecure server, so it accepts only http: requests.
In order to intercept https: requests, https.createServer should be used instead, along with a self signed certificate.
const https = require('https');
const fs = require('fs');
const key = fs.readFileSync('./test/ssl.key');
const cert = fs.readFileSync('./test/ssl.crt');

const exampleServer = https.createServer({
    key,
    cert,
}, (request, response) => {
    response.end('Hello from a custom server!');
});
-if (request.url.toLowerCase() === 'example.com:80') {
+if (request.url.toLowerCase() === 'example.com:443') {
Closing the server
To shut down the proxy server, call the close([destroyConnections], [callback]) function. For example:
server.close(true, () => {
  console.log('Proxy server was closed.');
});
The closeConnections parameter indicates whether pending proxy connections should be forcibly closed.
If it’s false, the function will wait until all connections are closed, which can take a long time.
If the callback parameter is omitted, the function returns a promise.
Accessing the CONNECT response headers for proxy tunneling
Some upstream proxy providers might include valuable debugging information in the CONNECT response
headers when establishing the proxy tunnel, for they may not modify future data in the tunneled
connection.
The proxy server would emit a tunnelConnectResponded event for exposing such information, where
the parameter types of the event callback are described in Node.js’s documentation. Example:
server.on('tunnelConnectResponded', ({ proxyChainId, response, socket, head, customTag }) => {
    console.log(`CONNECT response headers received: ${response.headers}`);
});
Alternatively a helper function may be used:
listenConnectAnonymizedProxy(anonymizedProxyUrl, ({ response, socket, head }) => {
    console.log(`CONNECT response headers received: ${response.headers}`);
});
You can also listen to CONNECT requests that receive response with status code different from 200.
The proxy server would emit a tunnelConnectFailed event.
server.on('tunnelConnectFailed', ({ proxyChainId, response, socket, head, customTag }) => {
    console.log(`CONNECT response failed with status code: ${response.statusCode}`);
});
Helper functions
The package also provides several utility functions.
anonymizeProxy({ url, port }, callback)
Parses and validates a HTTP proxy URL. If the proxy requires authentication,
then the function starts an open local proxy server that forwards to the proxy.
The port is chosen randomly.
The function takes an optional callback that receives the anonymous proxy URL.
If no callback is supplied, the function returns a promise that resolves to a String with
anonymous proxy URL or the original URL if it was already anonymous.
The following example shows how you can use a proxy with authentication
from headless Chrome and Puppeteer.
For details, read this blog post.
const puppeteer = require('puppeteer');
const proxyChain = require('proxy-chain');

(async() => {
    const oldProxyUrl = 'http://bob:password123@proxy.example.com:8000';
    const newProxyUrl = await proxyChain.anonymizeProxy(oldProxyUrl);

    // Prints something like "http://127.0.0.1:45678"
    console.log(newProxyUrl);

    const browser = await puppeteer.launch({
        args: [`--proxy-server=${newProxyUrl}`],
    });

    // Do your magic here...
    const page = await browser.newPage();
    await page.goto('https://www.example.com');
    await page.screenshot({ path: 'example.png' });
    await browser.close();

    // Clean up
    await proxyChain.closeAnonymizedProxy(newProxyUrl, true);
})();
closeAnonymizedProxy(anonymizedProxyUrl, closeConnections, callback)
Closes anonymous proxy previously started by anonymizeProxy().
If proxy was not found or was already closed, the function has no effect
and its result is false. Otherwise the result is true.
The closeConnections parameter indicates whether pending proxy connections are forcibly closed.
If it’s false, the function will wait until all connections are closed, which can take a long time.
The function takes an optional callback that receives the result Boolean from the function.
If callback is not provided, the function returns a promise instead.
createTunnel(proxyUrl, targetHost, options, callback)
Creates a TCP tunnel to targetHost that goes through a HTTP proxy server
specified by the proxyUrl parameter.
The optional options parameter is an object with the following properties:
port: Number— Enables specifying the local port to listen at. By default0,
which means a random port will be selected.hostname: String— Local hostname to listen at. By defaultlocalhost.verbose: Boolean— Iftrue, the functions logs a lot. By defaultfalse.
The result of the function is a local endpoint in a form of hostname:port.
All TCP connections made to the local endpoint will be tunneled through the proxy to the target host and port.
For example, this is useful if you want to access a certain service from a specific IP address.
The tunnel should be eventually closed by calling the closeTunnel() function.
The createTunnel() function accepts an optional Node.js-style callback that receives the path to the local endpoint.
If no callback is supplied, the function returns a promise that resolves to a String with
the path to the local endpoint.
For more information, read this blog post.
Example:
const host = await createTunnel('http://bob:pass123@proxy.example.com:8000', 'service.example.com:356');
// Prints something like "localhost:56836"
console.log(host);
closeTunnel(tunnelString, closeConnections, callback)
Closes tunnel previously started by createTunnel().
The result value is false if the tunnel was not found or was already closed, otherwise it is true.
The closeConnections parameter indicates whether pending connections are forcibly closed.
If it’s false, the function will wait until all connections are closed, which can take a long time.
The function takes an optional callback that receives the result of the function.
If the callback is not provided, the function returns a promise instead.
listenConnectAnonymizedProxy(anonymizedProxyUrl, tunnelConnectRespondedCallback)
Allows to configure a callback on the anonymized proxy URL for the CONNECT response headers. See the
above section Accessing the CONNECT response headers for proxy tunneling
for details.
redactUrl(url, passwordReplacement)
Takes a URL and hides the password from it. For example:
// Prints 'http://bob:<redacted>@example.com'
console.log(redactUrl('http://bob:pass123@example.com'));
BrokenPipeError at /ru/api/v1/my_url/
[Errno 32] Broken pipe
Request Method: POST
Request URL: https://apihrc.wienerdeming.com/ru/api/v1/my_url/
Django Version: 2.0
Python Executable: /my_project/.venv/bin/uwsgi
Python Version: 3.6.1
Python Path: [‘.’, », ‘/my_project/.venv/lib64/python36.zip’, ‘/my_project/.venv/lib64/python3.6’, ‘/my_project/.venv/lib64/python3.6/lib-dynload’, ‘/usr/lib64/python3.6’, ‘/usr/lib/python3.6’, ‘/my_project/.venv/lib/python3.6/site-packages’, ‘/my_project’, ‘/my_project/apps’]
Server time: Пн, 30 Июл 2018 16:02:43 +0500
Installed Applications:
[‘django.contrib.admin’,
‘django.contrib.auth’,
‘django.contrib.contenttypes’,
‘django.contrib.sessions’,
‘django.contrib.messages’,
‘django.contrib.staticfiles’,
‘django.contrib.gis’,
‘easy_thumbnails’,
‘django_filters’,
‘rest_framework’,
‘dynamic_rest’,
‘rest_framework.authtoken’,
‘easy_pdf’,
‘corsheaders’,
‘parler’,
*’my_apps’
]
Installed Middleware:
[‘raven.contrib.django.middleware.SentryMiddleware’,
‘django.middleware.security.SecurityMiddleware’,
‘django.contrib.sessions.middleware.SessionMiddleware’,
‘django.middleware.locale.LocaleMiddleware’,
‘corsheaders.middleware.CorsMiddleware’,
‘django.middleware.common.CommonMiddleware’,
‘django.middleware.csrf.CsrfViewMiddleware’,
‘django.contrib.auth.middleware.AuthenticationMiddleware’,
‘django.contrib.messages.middleware.MessageMiddleware’,
‘django.middleware.clickjacking.XFrameOptionsMiddleware’,
‘system.utils.middleware.RequestLogsMiddleware’]
Traceback:
File «/my_project/.venv/lib/python3.6/site-packages/django/core/handlers/exception.py» in inner
35. response = get_response(request)
File «/my_project/.venv/lib/python3.6/site-packages/django/core/handlers/base.py» in _get_response
128. response = self.process_exception_by_middleware(e, request)
File «/my_project/.venv/lib/python3.6/site-packages/django/core/handlers/base.py» in _get_response
126. response = wrapped_callback(request, *callback_args, **callback_kwargs)
File «/my_project/.venv/lib/python3.6/site-packages/django/views/decorators/csrf.py» in wrapped_view
54. return view_func(*args, **kwargs)
File «/my_project/.venv/lib/python3.6/site-packages/rest_framework/viewsets.py» in view
95. return self.dispatch(request, *args, **kwargs)
File «/my_project/.venv/lib/python3.6/site-packages/rest_framework/views.py» in dispatch
494. response = self.handle_exception(exc)
File «/my_project/.venv/lib/python3.6/site-packages/rest_framework/views.py» in handle_exception
454. self.raise_uncaught_exception(exc)
File «/my_project/.venv/lib/python3.6/site-packages/rest_framework/views.py» in dispatch
491. response = handler(request, *args, **kwargs)
File «/my_project/.venv/lib/python3.6/site-packages/rest_framework/mixins.py» in create
21. self.perform_create(serializer)
File «/my_project/.venv/lib/python3.6/site-packages/rest_framework/mixins.py» in perform_create
26. serializer.save()
File «/my_project/.venv/lib/python3.6/site-packages/rest_framework/serializers.py» in save
214. self.instance = self.create(validated_data)
File «/usr/lib64/python3.6/contextlib.py» in inner
53. return func(*args, **kwds)
File «/my_project/apps/applications/serializers/application_action.py» in create
83. self._submit_to_client(application, validated_data.get(‘comment’, «»))
File «/my_project/apps/applications/serializers/application_action.py» in _submit_to_client
113. send = gmail.messages.send_message(message=message)
File «/my_project/apps/mailboxes/utils/gmail/messages.py» in send_message
129. message = self.service.users().messages().send(userId=’me’, body=message).execute()
File «/my_project/.venv/lib/python3.6/site-packages/googleapiclient/_helpers.py» in positional_wrapper
130. return wrapped(*args, **kwargs)
File «/my_project/.venv/lib/python3.6/site-packages/googleapiclient/http.py» in execute
835. method=str(self.method), body=self.body, headers=self.headers)
File «/my_project/.venv/lib/python3.6/site-packages/googleapiclient/http.py» in _retry_request
179. raise exception
File «/my_project/.venv/lib/python3.6/site-packages/googleapiclient/http.py» in _retry_request
162. resp, content = http.request(uri, method, *args, **kwargs)
File «/my_project/.venv/lib/python3.6/site-packages/oauth2client/transport.py» in new_request
175. redirections, connection_type)
File «/my_project/.venv/lib/python3.6/site-packages/oauth2client/transport.py» in request
282. connection_type=connection_type)
File «/my_project/.venv/lib/python3.6/site-packages/httplib2/__init__.py» in request
1322. (response, content) = self._request(conn, authority, uri, request_uri, method, body, headers, redirections, cachekey)
File «/my_project/.venv/lib/python3.6/site-packages/httplib2/__init__.py» in _request
1072. (response, content) = self._conn_request(conn, request_uri, method, body, headers)
File «/my_project/.venv/lib/python3.6/site-packages/httplib2/__init__.py» in _conn_request
996. conn.request(method, request_uri, body, headers)
File «/usr/lib64/python3.6/http/client.py» in request
1239. self._send_request(method, url, body, headers, encode_chunked)
File «/usr/lib64/python3.6/http/client.py» in _send_request
1285. self.endheaders(body, encode_chunked=encode_chunked)
File «/usr/lib64/python3.6/http/client.py» in endheaders
1234. self._send_output(message_body, encode_chunked=encode_chunked)
File «/usr/lib64/python3.6/http/client.py» in _send_output
1065. self.send(chunk)
File «/usr/lib64/python3.6/http/client.py» in send
986. self.sock.sendall(data)
File «/usr/lib64/python3.6/ssl.py» in sendall
965. v = self.send(data[count:])
File «/usr/lib64/python3.6/ssl.py» in send
935. return self._sslobj.write(data)
File «/usr/lib64/python3.6/ssl.py» in write
636. return self._sslobj.write(data)
Exception Type: BrokenPipeError at /ru/api/v1/my_url/
Exception Value: [Errno 32] Broken pipe
Request information:
USER: admin2
Go to Proxmox
r/Proxmox
This subreddit has gone dark as part of a mass protest against Reddit’s recent API changes, which break third-party apps and moderation tools. ++ The sub will remain private for at least 48hr from 0000UTC on 12th June 2023. ++ We look forward to seeing you later, and thank you for your understanding.
Members
Online
•
by
[deleted]
Error connection error 596: tls_process_server_certificate
Sorry, this post was deleted by the person who originally posted it.
More posts you may like
BrokenPipeError at /ru/api/v1/my_url/
[Errno 32] Broken pipe
Request Method: POST
Request URL: https://apihrc.wienerdeming.com/ru/api/v1/my_url/
Django Version: 2.0
Python Executable: /my_project/.venv/bin/uwsgi
Python Version: 3.6.1
Python Path: [‘.’, », ‘/my_project/.venv/lib64/python36.zip’, ‘/my_project/.venv/lib64/python3.6’, ‘/my_project/.venv/lib64/python3.6/lib-dynload’, ‘/usr/lib64/python3.6’, ‘/usr/lib/python3.6’, ‘/my_project/.venv/lib/python3.6/site-packages’, ‘/my_project’, ‘/my_project/apps’]
Server time: Пн, 30 Июл 2018 16:02:43 +0500
Installed Applications:
[‘django.contrib.admin’,
‘django.contrib.auth’,
‘django.contrib.contenttypes’,
‘django.contrib.sessions’,
‘django.contrib.messages’,
‘django.contrib.staticfiles’,
‘django.contrib.gis’,
‘easy_thumbnails’,
‘django_filters’,
‘rest_framework’,
‘dynamic_rest’,
‘rest_framework.authtoken’,
‘easy_pdf’,
‘corsheaders’,
‘parler’,
*’my_apps’
]
Installed Middleware:
[‘raven.contrib.django.middleware.SentryMiddleware’,
‘django.middleware.security.SecurityMiddleware’,
‘django.contrib.sessions.middleware.SessionMiddleware’,
‘django.middleware.locale.LocaleMiddleware’,
‘corsheaders.middleware.CorsMiddleware’,
‘django.middleware.common.CommonMiddleware’,
‘django.middleware.csrf.CsrfViewMiddleware’,
‘django.contrib.auth.middleware.AuthenticationMiddleware’,
‘django.contrib.messages.middleware.MessageMiddleware’,
‘django.middleware.clickjacking.XFrameOptionsMiddleware’,
‘system.utils.middleware.RequestLogsMiddleware’]
Traceback:
File «/my_project/.venv/lib/python3.6/site-packages/django/core/handlers/exception.py» in inner
35. response = get_response(request)
File «/my_project/.venv/lib/python3.6/site-packages/django/core/handlers/base.py» in _get_response
128. response = self.process_exception_by_middleware(e, request)
File «/my_project/.venv/lib/python3.6/site-packages/django/core/handlers/base.py» in _get_response
126. response = wrapped_callback(request, *callback_args, **callback_kwargs)
File «/my_project/.venv/lib/python3.6/site-packages/django/views/decorators/csrf.py» in wrapped_view
54. return view_func(*args, **kwargs)
File «/my_project/.venv/lib/python3.6/site-packages/rest_framework/viewsets.py» in view
95. return self.dispatch(request, *args, **kwargs)
File «/my_project/.venv/lib/python3.6/site-packages/rest_framework/views.py» in dispatch
494. response = self.handle_exception(exc)
File «/my_project/.venv/lib/python3.6/site-packages/rest_framework/views.py» in handle_exception
454. self.raise_uncaught_exception(exc)
File «/my_project/.venv/lib/python3.6/site-packages/rest_framework/views.py» in dispatch
491. response = handler(request, *args, **kwargs)
File «/my_project/.venv/lib/python3.6/site-packages/rest_framework/mixins.py» in create
21. self.perform_create(serializer)
File «/my_project/.venv/lib/python3.6/site-packages/rest_framework/mixins.py» in perform_create
26. serializer.save()
File «/my_project/.venv/lib/python3.6/site-packages/rest_framework/serializers.py» in save
214. self.instance = self.create(validated_data)
File «/usr/lib64/python3.6/contextlib.py» in inner
53. return func(*args, **kwds)
File «/my_project/apps/applications/serializers/application_action.py» in create
83. self._submit_to_client(application, validated_data.get(‘comment’, «»))
File «/my_project/apps/applications/serializers/application_action.py» in _submit_to_client
113. send = gmail.messages.send_message(message=message)
File «/my_project/apps/mailboxes/utils/gmail/messages.py» in send_message
129. message = self.service.users().messages().send(userId=’me’, body=message).execute()
File «/my_project/.venv/lib/python3.6/site-packages/googleapiclient/_helpers.py» in positional_wrapper
130. return wrapped(*args, **kwargs)
File «/my_project/.venv/lib/python3.6/site-packages/googleapiclient/http.py» in execute
835. method=str(self.method), body=self.body, headers=self.headers)
File «/my_project/.venv/lib/python3.6/site-packages/googleapiclient/http.py» in _retry_request
179. raise exception
File «/my_project/.venv/lib/python3.6/site-packages/googleapiclient/http.py» in _retry_request
162. resp, content = http.request(uri, method, *args, **kwargs)
File «/my_project/.venv/lib/python3.6/site-packages/oauth2client/transport.py» in new_request
175. redirections, connection_type)
File «/my_project/.venv/lib/python3.6/site-packages/oauth2client/transport.py» in request
282. connection_type=connection_type)
File «/my_project/.venv/lib/python3.6/site-packages/httplib2/__init__.py» in request
1322. (response, content) = self._request(conn, authority, uri, request_uri, method, body, headers, redirections, cachekey)
File «/my_project/.venv/lib/python3.6/site-packages/httplib2/__init__.py» in _request
1072. (response, content) = self._conn_request(conn, request_uri, method, body, headers)
File «/my_project/.venv/lib/python3.6/site-packages/httplib2/__init__.py» in _conn_request
996. conn.request(method, request_uri, body, headers)
File «/usr/lib64/python3.6/http/client.py» in request
1239. self._send_request(method, url, body, headers, encode_chunked)
File «/usr/lib64/python3.6/http/client.py» in _send_request
1285. self.endheaders(body, encode_chunked=encode_chunked)
File «/usr/lib64/python3.6/http/client.py» in endheaders
1234. self._send_output(message_body, encode_chunked=encode_chunked)
File «/usr/lib64/python3.6/http/client.py» in _send_output
1065. self.send(chunk)
File «/usr/lib64/python3.6/http/client.py» in send
986. self.sock.sendall(data)
File «/usr/lib64/python3.6/ssl.py» in sendall
965. v = self.send(data[count:])
File «/usr/lib64/python3.6/ssl.py» in send
935. return self._sslobj.write(data)
File «/usr/lib64/python3.6/ssl.py» in write
636. return self._sslobj.write(data)
Exception Type: BrokenPipeError at /ru/api/v1/my_url/
Exception Value: [Errno 32] Broken pipe
Request information:
USER: admin2