Skip to Content
Information Center
- Информационный центр
- Knowledge base
- Network and wireless issues
- Troubleshooting a communication failure issue
Поиск по Информационному центру
Issue description
It is important that the printer is communicating properly to the computer to be able to print and/or scan.
The communication depends on the connection of the devices whether through a USB or network (Ethernet or wireless) connection.
Solution
Connected through USB cable
-
Turn off the printer and turn it on again after a minute. Make sure that the printer is on the Ready state. Otherwise, capture the error message and restart the printer again.
-
Print the Menu Settings Page to determine if the printer hardware is working.
- Press Menu or Settings > Reports > Menu Settings Page.
- If the printer does not print, capture the error message and search for the error message in the Lexmark Support Site.
-
Check the actual connection between your computer and the printer.
- Make sure that a known working printer USB type A and B cable connector is used.
- Make sure that the USB Type B cable connector is connected to the USB port at the back of the printer properly and directly.
Note: It is a common mistake to plug the USB Type B cable to the Ethernet port. Make sure that the cable is connected to theUSB port and not the Ethernet port.
- Ensure that the USB Type A cable connector is directly and properly connected to the computer.
Note: It is NOT Recommended to use any peripheral between printer and computer such USB hub, switch, splitter. You can also use a different USB port in your computer to ensure good connection.
-
Verify if the computer detects the USB printer.
- For Windows OS user:
-
Go to the Computer’s Device Manager to determine if the printer is detected by the Windows computer, and capture the USB port number.
-
On Windows computer, go to Control Panel and click System then select Device Manager.
-
Under Device Manager, click View, then click Show hidden devices.
-
Look for Printers and click the right arrow sign to expand.
-
Check and make sure that the printer is on the list. If the printer is not detected, try a different USB cable or another USB port on your computer.
-
Right click the printer and click Properties.
-
Go to the Details tab. Click the dropdown and select Device Instance Path.
-
Take note of the USB port number at the end of the value.

-
-
Go to Control Panel and click Devices and Printers.
-
Right click the printer, then click Printer Properties. Select the Ports tab.
-
Put a checkmark in the USB port number that matches the printer in the device manager.
-
Click Apply, then OK to save the changes.
-
- For Mac OS user:
-
Click the Apple menu, and the click System Preferences.
-
Depending on your operating system version, click Print & Fax, Print & Scan, or Printers & Scanners.
-
Check if the name of your printer displays in the Printers list.
-
If your printer is on the list, remove and re-add the printer to confirm communication and to make sure that correct driver is used. Click the name of the printer, then click the minus sign (—). Once printer is removed, click the plus sign, click Add Printer or Scanner, click the name of your printer, and proceed to the succeeding steps.
-
If your printer is not on the list, click the plus sign (+), click Add Printer or Scanner, click the name of your printer, and proceed to the next step.
-
If your printer is not found in the Add Printer or Scanner window, make sure that printer is turned On and the physical cable is properly connected, try to add the printer again and proceed to the succeeding steps.
-
-
- For Windows OS user:
-
Clear print jobs stuck on the queue.
-
Check the print driver Ports settings.
- For Windows OS user only:
-
Go to Control Panel and click Devices and Printers.
-
Right click the printer, then click Printer Properties. Select the Ports tab.
-
Make sure that the correct printer USB port number is selected based on the Device Manager. If the port number is not selected, change it to match and apply the settings.
-
Ensure that the print object is online from the computer.
- For Windows OS user only:
-
Go to Control Panel and click Devices and Printers.
-
Right click the printer, click See what’s printing, then click Printer.
-
Disable Pause Printing and Use Printer Offline.
-
Remove and add the printer to the computer.
-
For Windows OS user:
-
Go to Control Panel and click Devices and Printers.
-
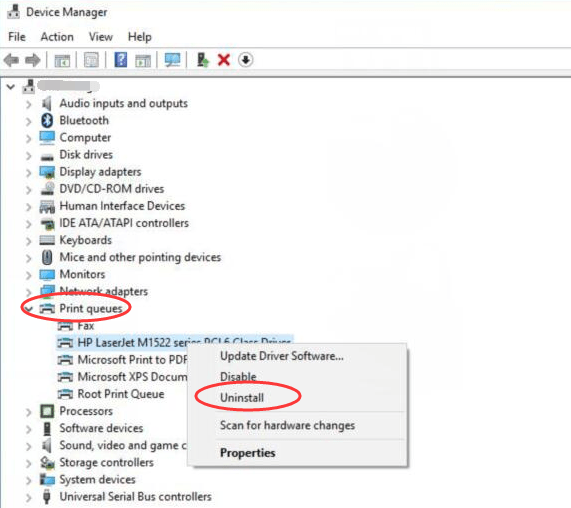
Right click the printer, click Remove device.
-
Select any printer object and click Print server properties.
-
Click the Drivers tab, select the driver in the list, then click Remove and click OK to complete.
-
Re-add the printer by clicking the Add a printer to set up the printer. See this article for more information.
-
- For Mac OS user:
-
Click the Apple menu, and the click System Preferences.
-
Depending on your operating system version, click Print & Fax, Print & Scan, or Printers & Scanners.
-
Right click anywhere inside the Printers window, click Reset printing system, then click Reset. Enter the Administrator name and password, click OK to complete.
-
Re-add the printer by clicking the plus sign to set up the printer. See this article for more information.
-
-
Print a test page and check if any error still appears.
![]()
![]()
![]()
![]()
![]()
![]()
![]()
![]()
Connected through wired (Ethernet) network
-
Turn off the printer and turn it on again after a minute. Make sure that the printer is on the Ready state, otherwise capture the error message and restart the printer once more.
-
Check the actual connection of the printer. Make sure that the printer is on the same network with the computer.
- Make sure that you are using a known working Ethernet cable.
- Make sure that the Ethernet cable is connected at the back of the printer to the network router, switch, or other network source to which the computer is also connected.
-
Make sure that the Network Interface Card (NIC) LED light is lit up at the back of the printer. if the LED light is not lit, re-seat the network cable from printer and network source, use a different network port from the network source, or replace the Ethernet cable.
-
Print the Network Setup Page to review network connection settings.
- Press Menu or Settings > Reports > Network Setup Page.
- If the printer does not print, capture the error message and search for the error message in the Lexmark Support Site.
- Make sure that the Status is Connected.
- Under TCP/IP section, Capture the IP address, Netmask, Gateway, andAddress Source.
- Make sure that the Enable DHCP, Enable BootP, Enable RARP, and Enable AutoIP are set to On if the printer gets its IP address from these servers.
-
Set the printer network settings properly.
- Make sure that the Active NIC or Adapter is set to either Auto or Standard Network. Press Menu or Settings > Network/Ports >Network Overview > select Active NIC or Active Adapter > select either Auto or Standard Network.
- Turn on DHCP, BootP, RARP, andAutoIP. Press Menu or Settings, press Network/Ports > select Ethernet or TCP/IP.
-
Check the printer and computer communication.
-
Open any internet browser (Chrome, Safari, Internet Explorer, Firefox, etc.) from your computer. On the address bar, type the printer IP address and the Embedded Web Server (EWS) appears.
-
From Windows OS computer, open Command Prompt. Type “ping” followed by the printer IP address, and press Enter. If successful, reply from printer displays.
-
From Mac or Linux OS computer, open Terminal. Type “ping” followed by the printer IP address, and press Enter. If successful, reply from printer displays.
Note: Consider checking the computer firewall and other security software as this sometimes blocks communication. Consult IT or a system administrator for advanced troubleshooting steps.
-
-
Clear print jobs stuck on the queue and print a test page.
-
Check the print driver Ports settings.
-
For Windows OS user only:
-
Go to Control Panel and click Devices and Printers.
-
Right click the printer, then click Printer Properties and select the Ports tab.
-
Select the port that has a check mark. Click Configure Port.
-
Make sure that the Printer or IP Address is the correct printer IP address. Otherwise, change it to match and apply the settings.
-
-
-
Make sure that the print object is online from the computer.
-
For Windows OS user only:
-
Go to Control Panel and click Devices and Printers.
-
Right click the printer, click See what’s printing, then click Printer.
-
Disable Pause Printing and Use Printer Offline.
-
-
-
Remove and add the printer to the computer.
-
For Windows OS user:
-
On your Windows computer, go to Control Panel and click Devices and Printers.
-
Right click the printer, click Remove device.
-
Select any printer object and click Print server properties.
-
Click the Drivers tab, select the driver in the list, then click Remove and click OK to complete.
-
Re-add the printer by clicking the Add a printer to set up the printer. See this article for more information.
-
-
For Mac OS user:
-
Click the Apple menu, and the click System Preferences.
-
Depending on your operating system version, click Print & Fax, Print & Scan, or Printers & Scanners.
-
Right click anywhere inside the Printers window, click Reset printing system, then click Reset. Enter the Administrator name and password, click OK to complete.
-
Re-add the printer by clicking the plus sign to set up the printer. See this article for more information.
-
-
-
Print a test page and check if any error still appears.
![]()
![]()
![]()
![]()
![]()
![]()
![]()
![]()
![]()
Connected through wireless network
Note: For other issued related to wireless connection issues, refer to this article.
-
Turn off the printer and turn it on again after a minute. Make sure that the printer is on the Ready state, otherwise capture the error message and restart the printer once more.
-
Disconnect the Ethernet cable from the printer. Make sure the MarkNet™ wireless network card is installed in the printer.
- Depending on the type of printer, make sure that the wireless card is compatible and properly inserted at the back, side, or front of the device.
-
Set the printer network settings properly.
- Make sure that the Active NIC or Adapter is either set to Auto, Network1, or Wireless. Press Menu or Settings >Network/Ports > Network Overview > select Active NIC or Active Adapter > select Auto, Network1, or Wireless.
- Turn on the DHCP, BootP, RARP, andAutoIP. Press Menu or Settings, press Network/Ports, select Wireless or TCP/IP.
-
Connect the printer to the network where the computer is also connected.
- Make sure that your access point (wireless router) is turned on and is working properly.
- Connect the printer to the network using Wireless Setup Wizard, then go to Menu > Network/Ports > Network 1 >Network 1 Setup > Wireless > Wireless Connection Setup. Select Wi-Fi network, and then type the network password.
- Connect the printer using the Setup on Printer Panel, go to Settings > Network/Ports > Wireless > Setup On Printer Panel. Select Wi-Fi network, and then type the network password.
- Connect the printer using Lexmark Mobile Assistant.
-
Print the Network Setup Page to review network connection settings.
- Press Menu or Settings > Reports > Network Setup Page.
- If the printer does not print, capture the error message and search for the error message in the Lexmark Support Site.
- Make sure that the Status is Connected.
- Under TCP/IP section, Capture the IP address, Netmask, Gateway, Address Source.
- Ensure that Enable DHCP, Enable BootP, Enable RARP, and Enable AutoIP are set to On if the printer gets its IP address from these servers.
-
Check the printer and computer communication.
- Open any internet browser (Chrome, Safari, Internet Explorer, Firefox, etc.) from your computer. On the address bar, type the printer IP address and the Embedded Web Server (EWS) appears.
- From Windows OS computer, open Command Prompt. Type “ping” followed by the printer IP address, and press Enter. If successful, reply from printer displays.
- From Mac or Linux OS computer, open Terminal. Type “ping” followed by the printer IP address, and press Enter. If successful, reply from printer displays.
Note: Consider checking the computer firewall and other security software as this sometimes blocks communication. Consult IT or a system administrator for advanced troubleshooting steps.
-
Clear print jobs stuck on the queue and print a test page.
-
Check the print driver Ports settings.
- For Windows OS user only:
-
On your Windows computer, go to Control Panel and click Devices and Printers.
-
Right click the printer, then click Printer Properties. Select the Ports tab.
-
Select the port that has a check mark and click Configure Port.
-
Make sure that Printer or IP Address is the correct printer IP address. Otherwise, change it to match and apply the settings.
-
Make sure that print object is online from the computer.
- For Windows OS user only:
-
Go to Control Panel and click Devices and Printers.
-
Right click the printer, click See what’s printing then click Printer.
-
Disable Pause Printing and Use Printer Offline.
-
Remove and add the printer to the computer.
- For Windows OS user:
-
Go to Control Panel and click Devices and Printers.
-
Right click the printer, click Remove device.
-
Select any printer object and click Print server properties.
-
Click the Drivers tab, select the driver in the list, then click Remove and click OK to complete.
-
Re-add the printer by clicking the Add a printer to set up the printer. See this article for more information.
- For Mac OS user:
-
Click the Apple menu, and the click System Preferences.
-
Depending on your operating system version, click Print & Fax, Print & Scan, or Printers & Scanners.
-
Right click anywhere inside the Printers window, click Reset printing system, then click Reset. Enter the Administrator name and password, click OK to complete.
-
Re-add the printer by clicking the plus sign to set up the printer. See this article for more information.
-
Print a test page and check if any error still appears.
![]()
![]()
![]()
![]()
![]()
![]()
![]()
![]()
![]()
![]()
LEGACY ID: HO4141
Помогла ли вам эта статья?
Связанное содержимое
- Замятие бумаги за дверцей A
Извлеките картридж с тонером и блок формирования изображения, чтобы добраться до застрявшей бумаги за передней дверцей.
- Замена картриджа
Установите новый тонер-картридж, если принтер продолжает делать нечеткие отпечатки.
Top
Исправлено: принтер Lexmark не связывается с компьютером
Принтер Lexmark может внезапно прекратить печать по многим причинам, включая устаревшие драйверы принтера, сбой обновления Windows и т. Д. Несколько пользователей сообщили, что принтер Lexmark не связывается с ошибкой компьютера на форумах сообщества Microsoft.
Следуйте советам по устранению неполадок, приведенным в этой статье, чтобы устранить проблемы с принтером Lexmark в Windows.
Принтер Lexmark не подключается к ПК
1. Запустите средство устранения неполадок принтера
- Запустите встроенное средство устранения неполадок принтера Windows, чтобы устранить ошибку.
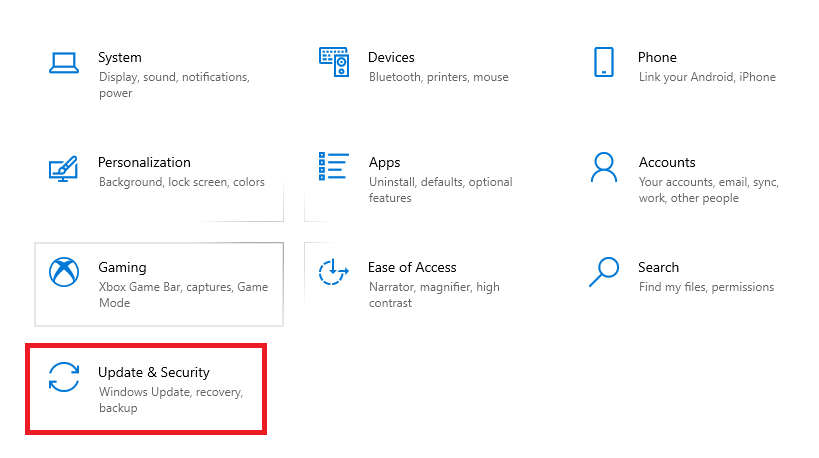
- Нажмите на Пуск и выберите Настройки.
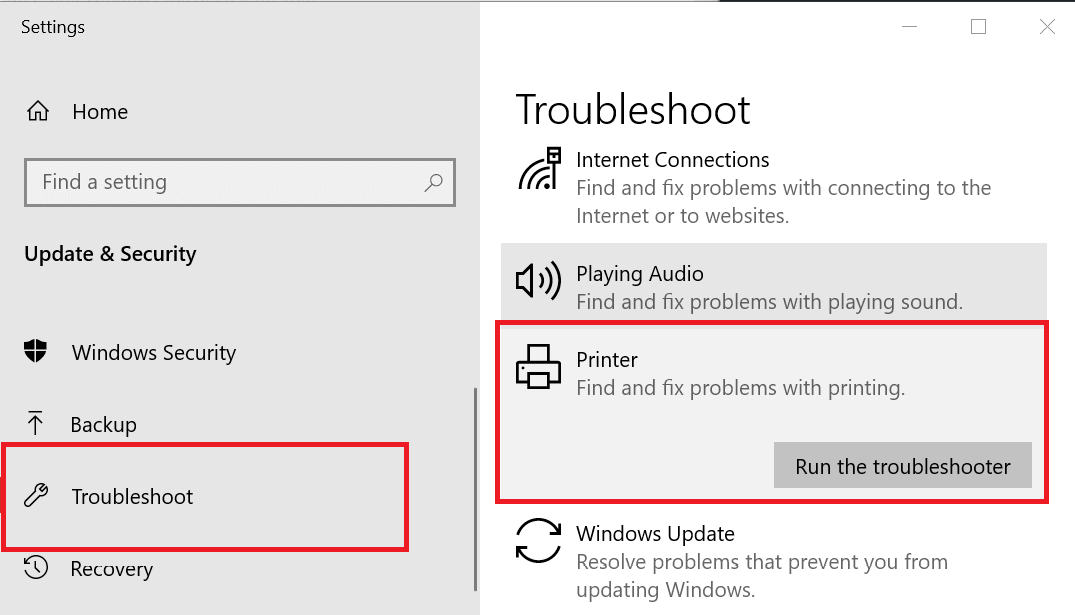
- Нажмите « Обновление и безопасность», а затем нажмите « Устранение неполадок».
- Прокрутите вниз до раздела « Принтер » и щелкните по нему.
- Теперь нажмите « Запустить средство устранения неполадок» .

- Windows проверит систему на наличие проблем, влияющих на функциональность принтера, и порекомендует соответствующие исправления.
- Примените исправления и перезагрузите систему. Попробуйте распечатать любой документ и проверить наличие каких-либо улучшений.
2. Обновите драйвер принтера
- Введите диспетчер устройств в поле поиска.
- Нажмите на Диспетчер устройств, чтобы открыть его.
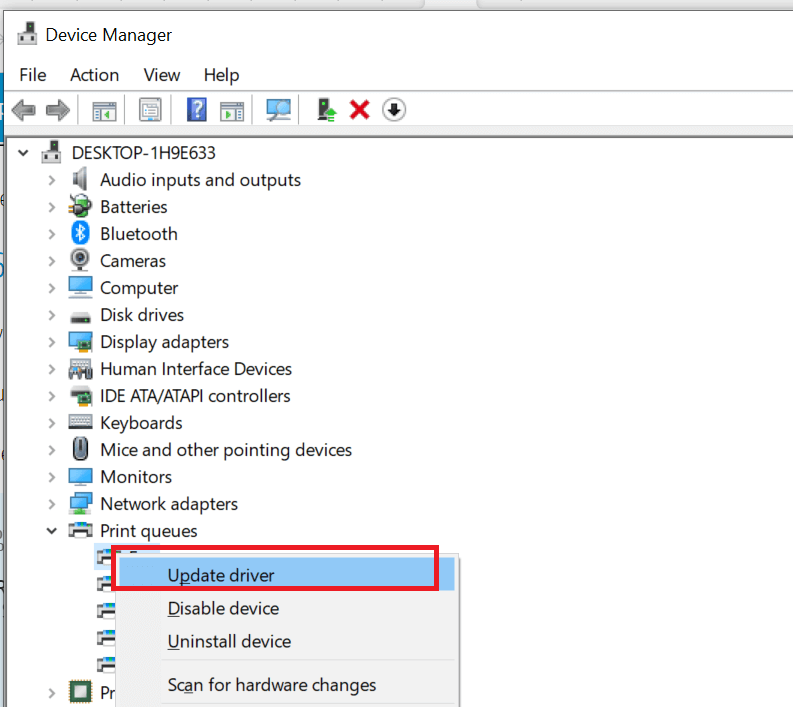
- В диспетчере устройств разверните раздел « Принтер ».
- Щелкните правой кнопкой мыши на вашем принтере и выберите « Обновить драйвер» .

- Выберите « Автоматический поиск обновленного программного обеспечения драйвера ».

- Теперь Windows будет искать любое ожидающее обновление драйвера и загружать его.
- После завершения установки перезагрузите компьютер, если будет предложено.
- Проверьте, распознает ли ваш компьютер принтер и может ли с него печатать.
Если проблема не устранена, попробуйте запустить драйвер принтера в режиме совместимости.
Мы много писали о проблемах подключения принтера. Проверьте эти руководства для получения дополнительной информации.
3. Удалите и переустановите принтер
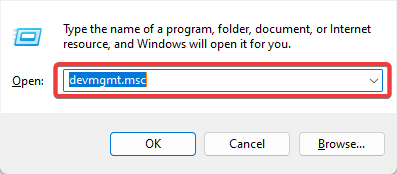
- Нажмите Windows Key + R, чтобы открыть Run.
- Введите devmgmt.msc и нажмите ОК.
- В диспетчере устройств разверните раздел « Принтер ».

- Щелкните правой кнопкой мыши на вашем принтере и выберите « Удалить устройство».
- Нажмите Да, если вас попросит UAC.
Удалить принтер из настроек
- Нажмите на Пуск и выберите Настройки.
- Нажмите « Устройства», затем выберите « Принтеры и сканер».
- Нажмите на свой принтер и выберите Удалить устройство.

- Если вашего принтера нет в списке, пропустите этот шаг.
Удалить драйвер принтера из свойств сервера
- Введите Control в поиске Windows и откройте панель управления.
- Перейдите в раздел «Оборудование и звук»> «Устройства и принтеры».
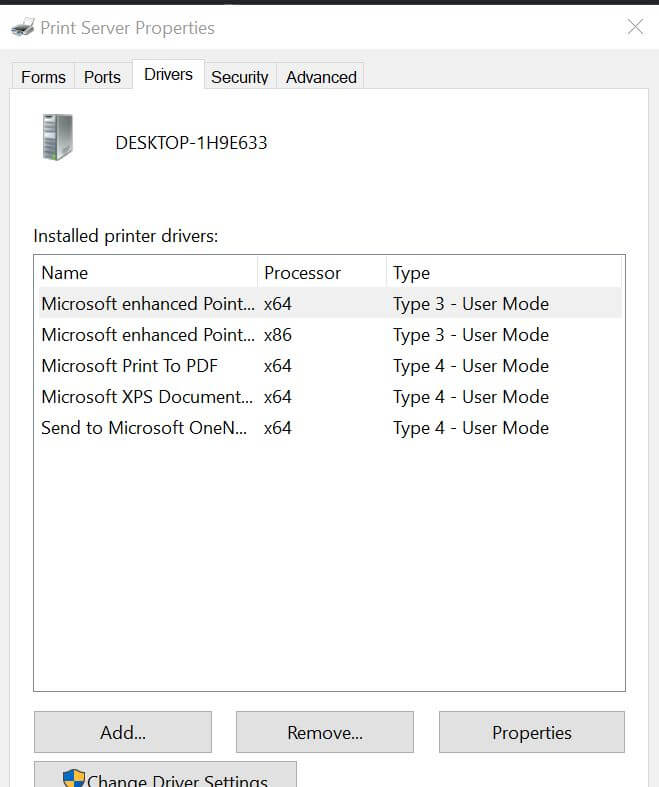
- Выберите ваш принтер и нажмите Свойства сервера печати (вверху).
- Перейдите на вкладку Драйверы. Выберите все драйверы для вашего принтера и нажмите кнопку Удалить .

Установите принтер
- Теперь выключите принтер и отсоедините все кабели от компьютера и настенной розетки для принтера. Перезагрузите компьютер.
- Подождите несколько минут, подключите кабель питания принтера и подключите его к компьютеру.
- Подождите, пока Windows распознает принтер и автоматически установит все драйверы. Дайте задание на печать и проверьте улучшения.
СВЯЗАННЫЕ ИСТОРИИ, КОТОРЫЕ ВЫ МОЖЕТЕ КАК:
- 6 программ управления документами для повышения эффективности в офисе
- Что делать, если на фотографиях принтера есть строки [СОВЕТЫ ЭКСПЕРТА]
- Вот как открыть PSD файлы в Windows 10
by Tashreef Shareef
Tashreef Shareef is a software developer turned tech writer. He discovered his interest in technology after reading a tech magazine accidentally. Now he writes about everything tech from… read more
Updated on August 26, 2020
XINSTALL BY CLICKING THE DOWNLOAD FILE
This software will repair common computer errors, protect you from file loss, malware, hardware failure and optimize your PC for maximum performance. Fix PC issues and remove viruses now in 3 easy steps:
- Download Restoro PC Repair Tool that comes with Patented Technologies (patent available here).
- Click Start Scan to find Windows issues that could be causing PC problems.
- Click Repair All to fix issues affecting your computer’s security and performance
- Restoro has been downloaded by 0 readers this month.
Your Lexmark printer can stop printing suddenly for many reasons including outdated printer drivers, Windows update glitches, etc. Several users have reported the Lexmark printer is not communicating with a computer error in the Microsoft Community Forums.
Follow the troubleshooting tips listed in this article to fix issues with your Lexmark printer in Windows.
Lexmark printer won’t connect to PC
1. Run the Printer Troubleshooter
- Run the built-in Windows printer troubleshooter to resolve the error.
- Click on Start and select Settings.
- Click on Update and Security and then click on Troubleshooter.
- Scroll down to Printer section and click on it.
- Now click on Run the Troubleshooter.
- Windows will scan the system for any issues that are affecting the printer functionalities and recommend appropriate fixes.
- Apply the fixes and reboot the system. Try to print any document and check for any improvements.
2. Update Printer Driver
- Type device manager in the search box.
- Click on Device Manager to open it.
- In the Device Manager, expand the Printer section.
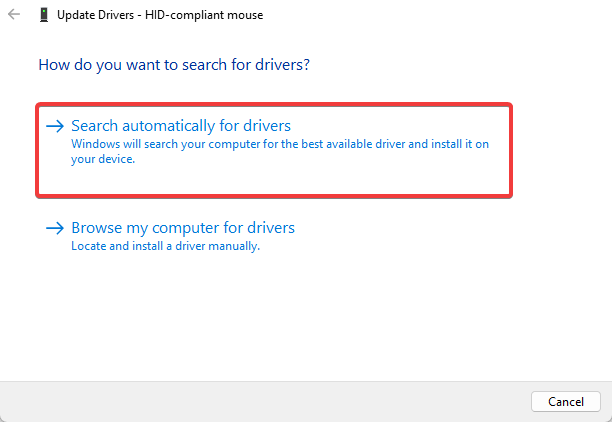
- Right-click on your Printer and select Update Driver.
- Select “Search automatically for updated driver software” option.

- Windows will now look for any pending driver update and download it.
- After the installation is over, restart the computer if prompted to.
- Check if your computer detects the printer and can print from it.
If the issue persists, try to run the printer driver in compatibility mode.
We’ve written extensively on printer connection issues. Check out these guides for more information.
3. Uninstall and Reinstall the Printer
- Press Windows Key + R to open Run.
- Type devmgmt.msc and press OK.
- In the Device Manager expand the Printer section.
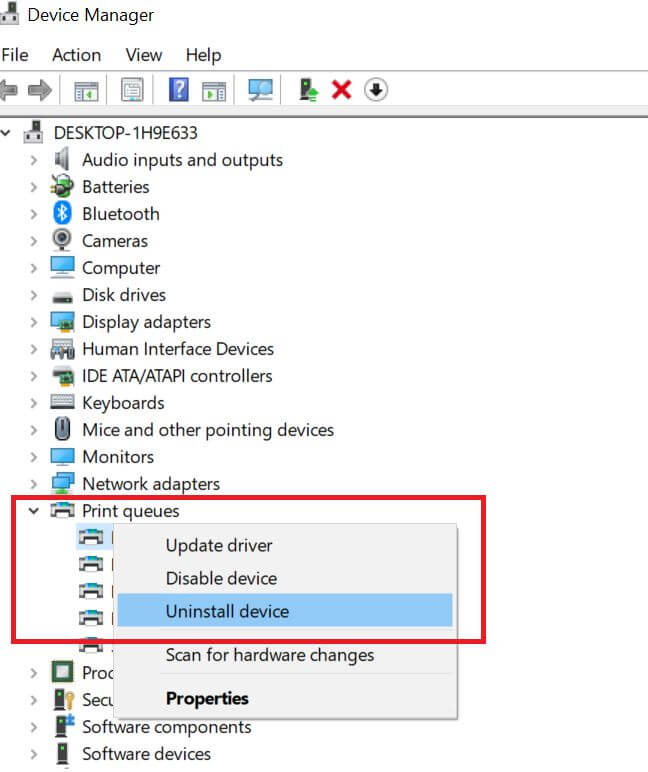
- Right-click on your Printer and select Uninstall Device.
- Click Yes if prompted by the UAC.
Remove Printer from Settings
- Click on Start and select Settings.
- Click on Devices and then select Printers and Scanner.
- Click on your printer and select Remove Device.

- If your printer is not listed here, skip this step.
Remove Printer Driver from Server Properties
- Type Control in the Windows search and open Control Panel.
- Go to Hardware and Sound > Devices and Printers.
- Select your printer and click on Printer Server Properties (on top).
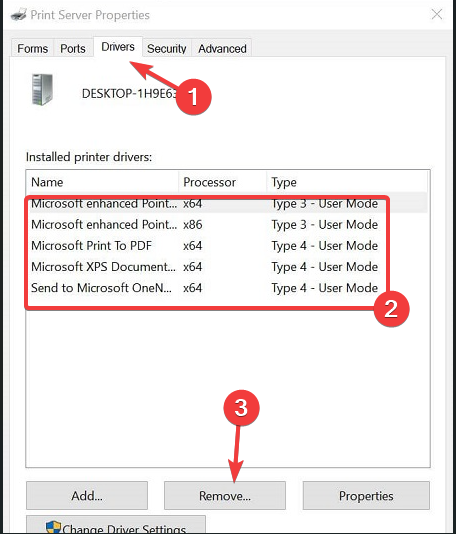
- Go to the Drivers tab. Select all the drivers for your printer and click the Remove button.
Install the Printer
- Now turn off the printer and unplug all the cables from the computer and wall outlet for the printer. Restart your computer.
- Wait for a few minutes and replug printer power cable and connect it to your computer.
- Wait for Windows to recognize the printer and automatically install all the drivers. Give a printing job and check for the improvements.
RELATED STORIES YOU MAY LIKE:
- 6 document management software to improve efficiency at the office
- What to do if Printer photos have lines [EXPERT TIPS]
- Here’s how to open PSD files in Windows 10
Still having issues? Fix them with this tool:
SPONSORED
If the advices above haven’t solved your issue, your PC may experience deeper Windows problems. We recommend downloading this PC Repair tool (rated Great on TrustPilot.com) to easily address them. After installation, simply click the Start Scan button and then press on Repair All.
![]()
Newsletter
by Tashreef Shareef
Tashreef Shareef is a software developer turned tech writer. He discovered his interest in technology after reading a tech magazine accidentally. Now he writes about everything tech from… read more
Updated on August 26, 2020
XINSTALL BY CLICKING THE DOWNLOAD FILE
This software will repair common computer errors, protect you from file loss, malware, hardware failure and optimize your PC for maximum performance. Fix PC issues and remove viruses now in 3 easy steps:
- Download Restoro PC Repair Tool that comes with Patented Technologies (patent available here).
- Click Start Scan to find Windows issues that could be causing PC problems.
- Click Repair All to fix issues affecting your computer’s security and performance
- Restoro has been downloaded by 0 readers this month.
Your Lexmark printer can stop printing suddenly for many reasons including outdated printer drivers, Windows update glitches, etc. Several users have reported the Lexmark printer is not communicating with a computer error in the Microsoft Community Forums.
Follow the troubleshooting tips listed in this article to fix issues with your Lexmark printer in Windows.
Lexmark printer won’t connect to PC
1. Run the Printer Troubleshooter
- Run the built-in Windows printer troubleshooter to resolve the error.
- Click on Start and select Settings.
- Click on Update and Security and then click on Troubleshooter.
- Scroll down to Printer section and click on it.
- Now click on Run the Troubleshooter.
- Windows will scan the system for any issues that are affecting the printer functionalities and recommend appropriate fixes.
- Apply the fixes and reboot the system. Try to print any document and check for any improvements.
2. Update Printer Driver
- Type device manager in the search box.
- Click on Device Manager to open it.
- In the Device Manager, expand the Printer section.
- Right-click on your Printer and select Update Driver.
- Select “Search automatically for updated driver software” option.
- Windows will now look for any pending driver update and download it.
- After the installation is over, restart the computer if prompted to.
- Check if your computer detects the printer and can print from it.
If the issue persists, try to run the printer driver in compatibility mode.
We’ve written extensively on printer connection issues. Check out these guides for more information.
3. Uninstall and Reinstall the Printer
- Press Windows Key + R to open Run.
- Type devmgmt.msc and press OK.
- In the Device Manager expand the Printer section.
- Right-click on your Printer and select Uninstall Device.
- Click Yes if prompted by the UAC.
Remove Printer from Settings
- Click on Start and select Settings.
- Click on Devices and then select Printers and Scanner.
- Click on your printer and select Remove Device.
- If your printer is not listed here, skip this step.
Remove Printer Driver from Server Properties
- Type Control in the Windows search and open Control Panel.
- Go to Hardware and Sound > Devices and Printers.
- Select your printer and click on Printer Server Properties (on top).
- Go to the Drivers tab. Select all the drivers for your printer and click the Remove button.
Install the Printer
- Now turn off the printer and unplug all the cables from the computer and wall outlet for the printer. Restart your computer.
- Wait for a few minutes and replug printer power cable and connect it to your computer.
- Wait for Windows to recognize the printer and automatically install all the drivers. Give a printing job and check for the improvements.
RELATED STORIES YOU MAY LIKE:
- 6 document management software to improve efficiency at the office
- What to do if Printer photos have lines [EXPERT TIPS]
- Here’s how to open PSD files in Windows 10
Still having issues? Fix them with this tool:
SPONSORED
If the advices above haven’t solved your issue, your PC may experience deeper Windows problems. We recommend downloading this PC Repair tool (rated Great on TrustPilot.com) to easily address them. After installation, simply click the Start Scan button and then press on Repair All.
![]()
Newsletter
Оглавление:
- Принтер Lexmark не подключается к ПК
- 1. Запустите средство устранения неполадок принтера
- 2. Обновите драйвер принтера
- 3. Удалите и переустановите принтер
Принтер Lexmark может внезапно прекратить печать по многим причинам, включая устаревшие драйверы принтера, сбой обновления Windows и т. Д. Несколько пользователей сообщили, что принтер Lexmark не связывается с ошибкой компьютера на форумах сообщества Microsoft.
Следуйте приведенным ниже советам по устранению неполадок, чтобы устранить проблемы с принтером Lexmark в Windows.
1. Запустите средство устранения неполадок принтера
- Запустите встроенное средство устранения неполадок принтера Windows, чтобы устранить ошибку.
- Нажмите на Пуск и выберите Настройки.
- Нажмите « Обновление и безопасность», а затем нажмите « Устранение неполадок».
- Прокрутите вниз до раздела « Принтер » и щелкните по нему.
- Теперь нажмите « Запустить средство устранения неполадок».

- Windows проверит систему на наличие проблем, влияющих на функциональность принтера, и порекомендует соответствующие исправления.
- Примените исправления и перезагрузите систему. Попробуйте распечатать любой документ и проверить наличие каких-либо улучшений.
2. Обновите драйвер принтера
- Введите диспетчер устройств в поле поиска.
- Нажмите на Диспетчер устройств, чтобы открыть его.
- В диспетчере устройств разверните раздел « Принтер ».
- Щелкните правой кнопкой мыши на вашем принтере и выберите « Обновить драйвер».

- Выберите « Автоматический поиск обновленного программного обеспечения драйвера ».

- Теперь Windows будет искать любое ожидающее обновление драйвера и загружать его.
- После завершения установки перезагрузите компьютер, если будет предложено.
- Проверьте, распознает ли ваш компьютер принтер и может ли с него печатать.
Если проблема не устранена, попробуйте запустить драйвер принтера в режиме совместимости.
3. Удалите и переустановите принтер
- Нажмите Windows Key + R, чтобы открыть Run.
- Введите devmgmt.msc и нажмите ОК.
- В диспетчере устройств разверните раздел « Принтер ».

- Щелкните правой кнопкой мыши на вашем принтере и выберите « Удалить устройство».
- Нажмите Да, если вас попросит UAC.
Удалить принтер из настроек
- Нажмите на Пуск и выберите Настройки.
- Нажмите « Устройства», затем выберите « Принтеры и сканер».
- Нажмите на свой принтер и выберите Удалить устройство.

- Если вашего принтера нет в списке, пропустите этот шаг.
Удалить драйвер принтера из свойств сервера
- Введите Control в поиске Windows и откройте панель управления.
- Перейдите в раздел «Оборудование и звук»> «Устройства и принтеры».
- Выберите ваш принтер и нажмите Свойства сервера печати (вверху).
- Перейдите на вкладку Драйверы. Выберите все драйверы для вашего принтера и нажмите кнопку Удалить.

Установите принтер
- Теперь выключите принтер и отсоедините все кабели от компьютера и настенной розетки для принтера. Перезагрузите компьютер.
- Подождите несколько минут, подключите кабель питания принтера и подключите его к компьютеру.
- Подождите, пока Windows распознает принтер и автоматически установит все драйверы. Дайте задание на печать и проверьте улучшения.
Исправлено: Windows 10 не дает мне доступ к моим файлам

Если вы не можете получить доступ к своим файлам в Windows 10 из-за различных сообщений об ошибках, попробуйте решения, перечисленные в этом руководстве, в зависимости от того, какое сообщение об ошибке вы получаете.
Исправлено: поверхность набора не будет сопрягаться с моим ПК или ноутбуком

Если вы не можете подключить Surface Dial к компьютеру или ноутбуку с Windows 10, решения, перечисленные в этом руководстве, помогут вам решить проблему.
7 удобных инструментов, чтобы уменьшить нагрузку на глаза, связанную с компьютером

Лучшие инструменты в Интернете, чтобы помочь уменьшить проблемы с нагрузкой на глаза и глаза.

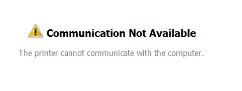
Сообщение об ошибке должно выглядеть так.
Решение 1. Выключите принтер и перезагрузите компьютер. Снова включите принтер.
Это решение может помочь решить проблему с вашим принтером.
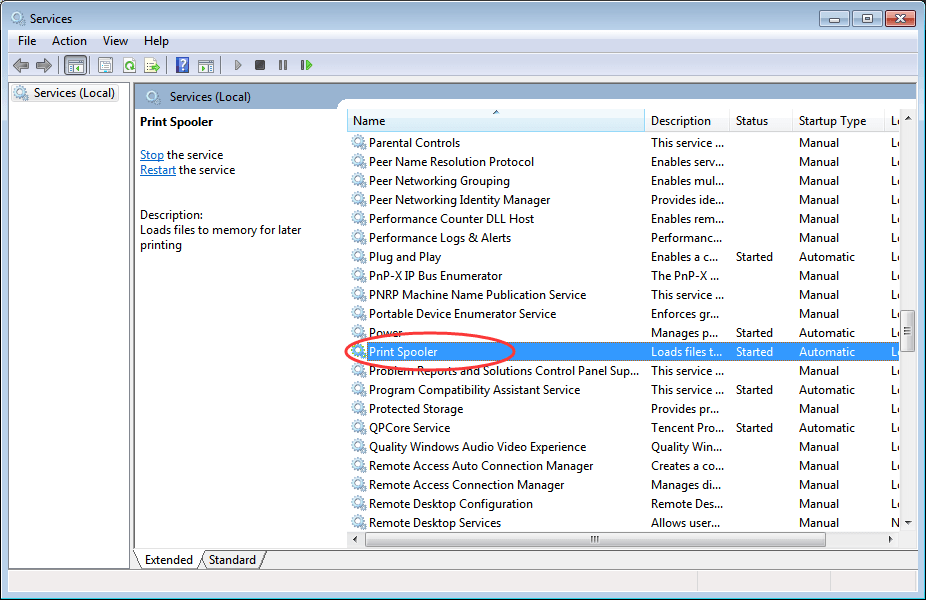
Решение 2. Остановите и запустите диспетчер очереди печати Windows.
Следуй этим шагам:
1. Нажмите Win + R (Клавиша Windows и клавиша R) одновременно. Появится диалоговое окно «Выполнить».
2. Скопируйте и вставьте services.msc в поле запуска и нажмите Хорошо кнопка.
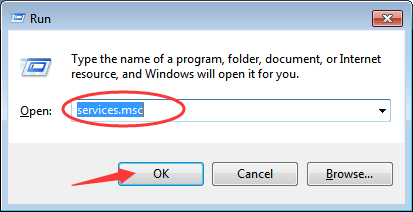
3. Найдите Спулер Sprint из списка имен. Дважды щелкните по нему, чтобы открыть диалоговое окно «Свойства».
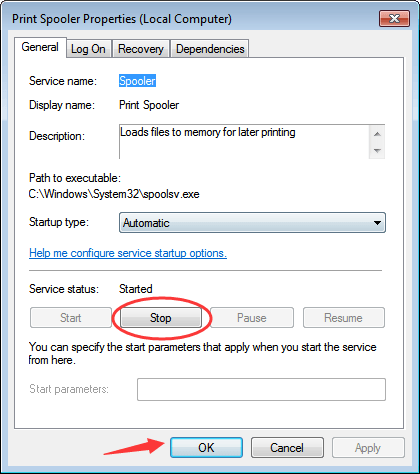
4. На вкладке «Общие» нажмите Стоп кнопка и Хорошо кнопку, чтобы отключить службу.
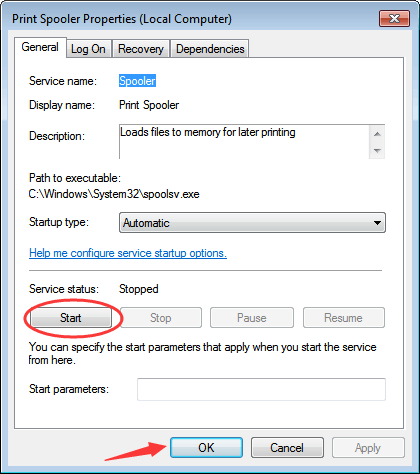
5. илиснова откройте диалоговое окно «Свойства». Нажмите Начало кнопка и Хорошо кнопку, чтобы включить службу.
Решение 3. Удалите принтер и снова обновите драйвер.
Поврежденный драйвер может быть причиной проблемы. Чтобы решить проблему, попробуйте обновить драйвер принтера. Перед этим сначала удалите принтер.
Выполните следующие действия, чтобы удалить принтер.
1. Отключите принтер.
2. Нажмите Win + R (Клавиша Windows и клавиша R) одновременно. Появится диалоговое окно «Выполнить».
3. Скопируйте и вставьте devmgmt.msc в поле запуска и нажмите Хорошо кнопка. 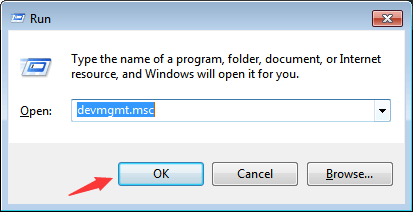
4. Найдите свой принтер в списке устройств. Обычно он указан в категории Очереди печати . Щелкните правой кнопкой мыши имя устройства и выберите Удалить в контекстном меню. (Примечание: если в принтере есть факс, удалите факс перед удалением принтера.)
Следующий снимок экрана предназначен только для справки. Здесь у другого принтера будет другое имя.
5. Перезагрузите компьютер, чтобы изменения вступили в силу.
Подключите принтер и перейдите на веб-сайт производителя принтера, чтобы загрузить последнюю версию драйвера. Прежде чем начать, убедитесь, что вы знаете модель принтера и конкретную операционную систему.
Если у вас возникли трудности с загрузкой драйверов вручную, вы можете использовать Водитель Easy чтобы помочь вам. Driver Easy может обнаружить все проблемные драйверы на вашем компьютере и предоставить вам список новых драйверов. С помощью Driver Easy вы можете обновить драйвер принтера за несколько минут.
Если вы подключаете принтер к ПК через порт USB, вы также можете выполнить следующие действия.
1. Открыть Диспетчер устройств .
2. Разверните ветку Контроллеры универсальной последовательной шины.
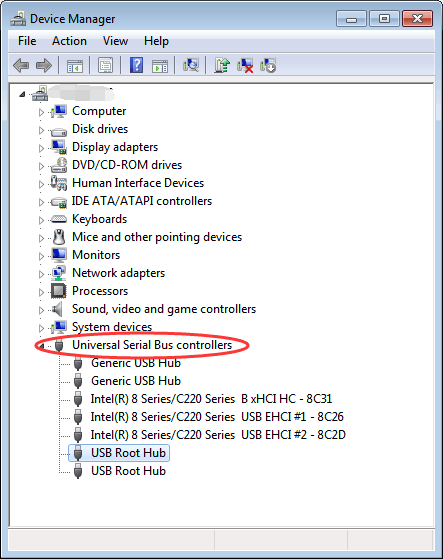
3. Дважды щелкните устройство USB Root Hub, а затем щелкните значок Управление энергопотреблением таб. (Если имеется более одного устройства USB Root Hub, повторите эти шаги для каждого из них.)
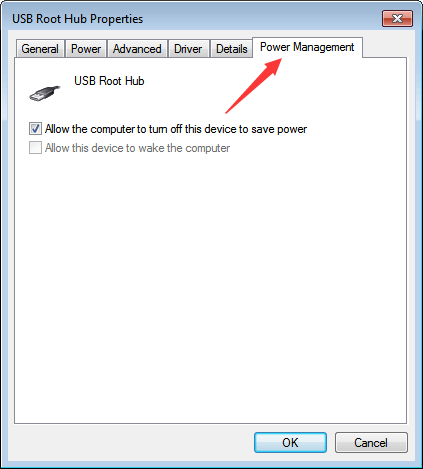
4. Выключите Разрешить компьютеру выключить это устройство для экономии энергии вариант и щелкните Хорошо кнопка.

5. Перезагрузите компьютер.
A few efficient fixes from our experts
by Tashreef Shareef
Tashreef Shareef is a software developer turned tech writer. He discovered his interest in technology after reading a tech magazine accidentally. Now he writes about everything tech from… read more
Updated on March 23, 2023
Reviewed by
Alex Serban

After moving away from the corporate work-style, Alex has found rewards in a lifestyle of constant analysis, team coordination and pestering his colleagues. Holding an MCSA Windows Server… read more
- You may have connection problems if there is a communication issue between your printer and computer.
- You may have to reinstall the printer as a final solution if nothing else works.
XINSTALL BY CLICKING THE DOWNLOAD FILE
Fortect is a tool that does not simply cleans up your PC, but has a repository with several millions of Windows System files stored in their initial version. When your PC encounters a problem, Fortect will fix it for you, by replacing bad files with fresh versions. To fix your current PC issue, here are the steps you need to take:
- Download Fortect and install it on your PC.
- Start the tool’s scanning process to look for corrupt files that are the source of your problem
- Right-click on Start Repair so the tool could start the fixing algorythm
- Fortect has been downloaded by 0 readers this month.
Your Lexmark printer can stop printing suddenly for many reasons, including outdated printer drivers, Windows update glitches, etc. In addition, several users have reported the Lexmark printer is not communicating with a computer error in the Microsoft Community Forums.
Follow the troubleshooting tips listed in this article to fix issues with your Lexmark printer in Windows.
Why is my Lexmark printer not connecting to the computer?
From user interaction, we gathered that a few things might be the trigger if your Lexmark printer is not connecting to your computer. Here are some possible causes:
- Connection issues – One of the most common causes is connectivity issues. This can be due to a loose or disconnected cable or a problem with your wireless network connection.
- Driver issues – Outdated or missing printer drivers can also cause your Lexmark printer to not connect to your computer.
- Printer settings – Incorrect printer settings can also cause connectivity issues. This could be a configuration problem with your printer’s network settings or an issue with the printer’s hardware.
- Printer offline – Your printer may be offline, so it will only connect to your computer once you change the setting.
What can I do if my Lexmark printer not communicating with the computer?
1. Run the Printer Troubleshooter
- Press Windows + I to open the Settings app, then click Update & Security.
- Select Troubleshooter, scroll down to the Printer section, click on it, and select Run the Troubleshooter.
- Windows will scan the system for issues affecting the printer functionalities and recommend appropriate fixes.
- Apply the fixes and reboot the system. Try to print any document and check for any improvements.
2. Update the Printer Driver
- Press Windows + R, type, and select hit Enter.
- In the Device Manager, expand the Printer section, right-click on your Printer, and select Update Driver.
- Select the Search automatically for drivers option.
- Windows will now look for any pending driver update and download it.
- After the installation is over, restart the computer if prompted to.
- Check if your computer detects the printer and can print from it.
If the manual method somehow doesn’t work for updating your printer driver, there is specialized software you can opt for.
Outbyte Driver Updater is a tool specifically designed to locate the latest updates for all your device drivers from a regularly-examined database.

Outbyte Driver Updater
Try updating your printer driver without effort by using the Outbyte Driver Updater software.
3. Uninstall and Reinstall the Printer
3.1 Uninstall the driver
- Press Windows + R, type, and select hit Enter.
- In the Device Manager, expand the Printer section, right-click your printer, and click Uninstall device.
- Click Yes if prompted by the UAC.
3.2 Remove Printer from Settings
- Press Windows + I to open the Settings app, then click Devices.
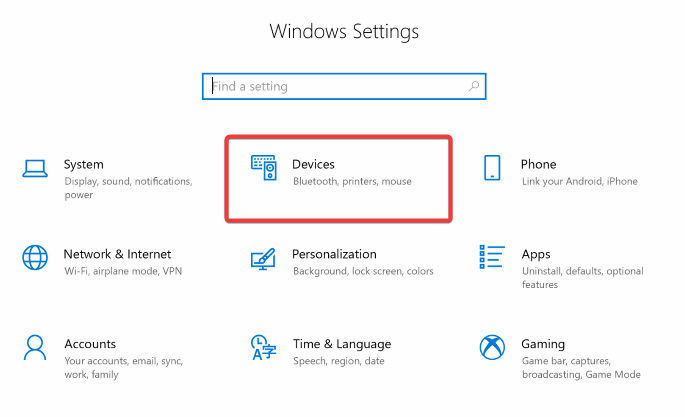
- Select Printers and Scanner, then click on your printer and select Remove Device.
- If your printer is not listed here, skip this step.
- What Is MusNotification.exe & How To Disable It?
- Fix: This Value Doesn’t Match the Data Validation
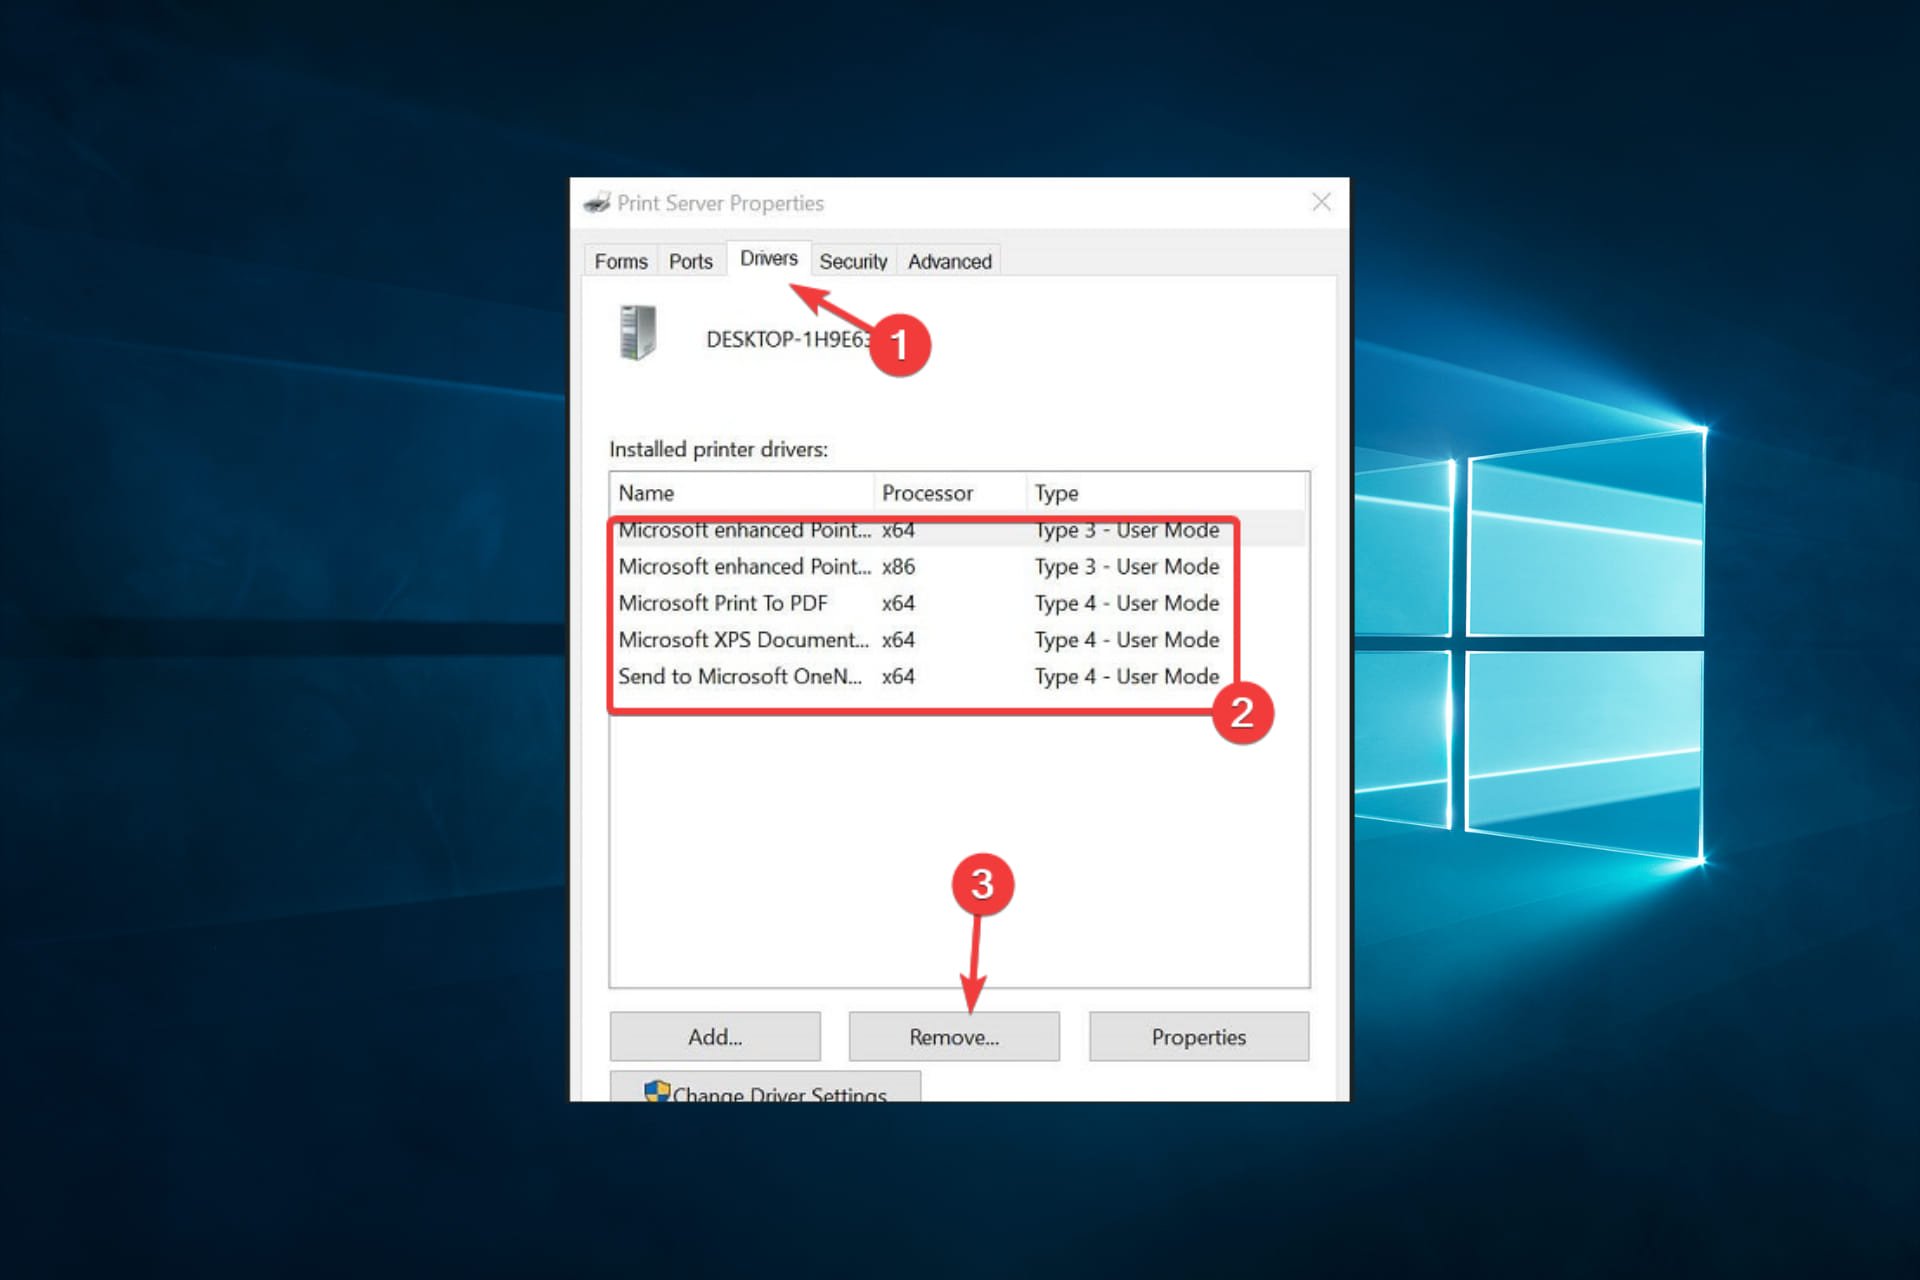
3.3 Remove Printer Driver from Server Properties
- Press Windows + R, type control, and hit Enter.
- Go to Hardware and Sound, then select Devices and Printers.
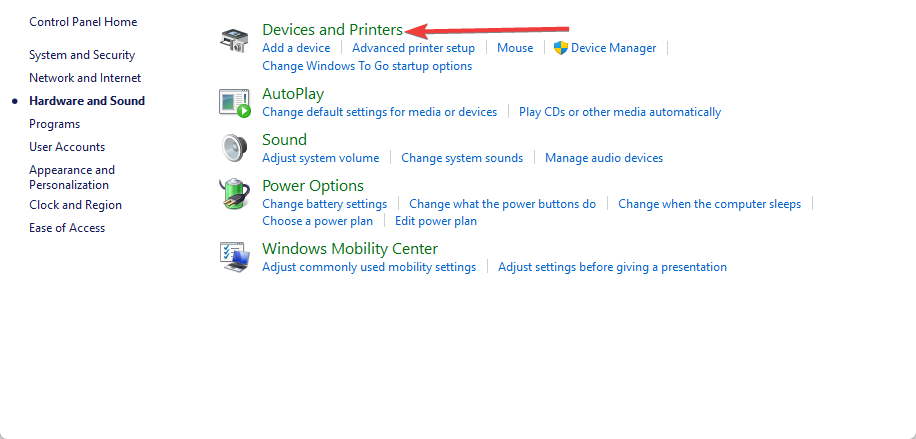
- Select your printer and click on Printer Server Properties (on top).
- Go to the Drivers tab. Select all the drivers for your printer and click the Remove button.
3.4 Install the Printer
- Now turn off the printer and unplug all the cables from the computer and the wall outlet for the printer. Restart your computer.
- Wait a few minutes, replug the printer power cable, and connect it to your computer.
- Wait for Windows to recognize the printer and automatically install all the drivers. Then, give a printing job and check for improvements.
A Lexmark printer not connecting to a computer can be a frustrating experience, but several potential causes and efficient fixes exist.
Following the recommended solutions, you can resolve the most common issues and get your printer back up and running. However, if you continue to experience problems, please get in touch with Lexmark customer support for further assistance.
Still experiencing issues?
SPONSORED
If the above suggestions have not solved your problem, your computer may experience more severe Windows troubles. We suggest choosing an all-in-one solution like Fortect to fix problems efficiently. After installation, just click the View&Fix button and then press Start Repair.
![]()
Оглавление:
- Принтер Lexmark не подключается к ПК
- 1. Запустите средство устранения неполадок принтера
- 2. Обновите драйвер принтера
- 3. Удалите и переустановите принтер
Принтер Lexmark может внезапно прекратить печать по многим причинам, включая устаревшие драйверы принтера, сбой обновления Windows и т. Д. Несколько пользователей сообщили, что принтер Lexmark не связывается с ошибкой компьютера на форумах сообщества Microsoft.
Следуйте приведенным ниже советам по устранению неполадок, чтобы устранить проблемы с принтером Lexmark в Windows.
Принтер Lexmark не подключается к ПК
1. Запустите средство устранения неполадок принтера
- Запустите встроенное средство устранения неполадок принтера Windows, чтобы устранить ошибку.
- Нажмите на Пуск и выберите Настройки.
- Нажмите « Обновление и безопасность», а затем нажмите « Устранение неполадок».
- Прокрутите вниз до раздела « Принтер » и щелкните по нему.
- Теперь нажмите « Запустить средство устранения неполадок».
- Windows проверит систему на наличие проблем, влияющих на функциональность принтера, и порекомендует соответствующие исправления.
- Примените исправления и перезагрузите систему. Попробуйте распечатать любой документ и проверить наличие каких-либо улучшений.
2. Обновите драйвер принтера
- Введите диспетчер устройств в поле поиска.
- Нажмите на Диспетчер устройств, чтобы открыть его.
- В диспетчере устройств разверните раздел « Принтер ».
- Щелкните правой кнопкой мыши на вашем принтере и выберите « Обновить драйвер».
- Выберите « Автоматический поиск обновленного программного обеспечения драйвера ».
- Теперь Windows будет искать любое ожидающее обновление драйвера и загружать его.
- После завершения установки перезагрузите компьютер, если будет предложено.
- Проверьте, распознает ли ваш компьютер принтер и может ли с него печатать.
Если проблема не устранена, попробуйте запустить драйвер принтера в режиме совместимости.
3. Удалите и переустановите принтер
- Нажмите Windows Key + R, чтобы открыть Run.
- Введите devmgmt.msc и нажмите ОК.
- В диспетчере устройств разверните раздел « Принтер ».
- Щелкните правой кнопкой мыши на вашем принтере и выберите « Удалить устройство».
- Нажмите Да, если вас попросит UAC.
Удалить принтер из настроек
- Нажмите на Пуск и выберите Настройки.
- Нажмите « Устройства», затем выберите « Принтеры и сканер».
- Нажмите на свой принтер и выберите Удалить устройство.
- Если вашего принтера нет в списке, пропустите этот шаг.
Удалить драйвер принтера из свойств сервера
- Введите Control в поиске Windows и откройте панель управления.
- Перейдите в раздел «Оборудование и звук»> «Устройства и принтеры».
- Выберите ваш принтер и нажмите Свойства сервера печати (вверху).
- Перейдите на вкладку Драйверы. Выберите все драйверы для вашего принтера и нажмите кнопку Удалить.
Установите принтер
- Теперь выключите принтер и отсоедините все кабели от компьютера и настенной розетки для принтера. Перезагрузите компьютер.
- Подождите несколько минут, подключите кабель питания принтера и подключите его к компьютеру.
- Подождите, пока Windows распознает принтер и автоматически установит все драйверы. Дайте задание на печать и проверьте улучшения.
Исправлено: Windows 10 не дает мне доступ к моим файлам
Если вы не можете получить доступ к своим файлам в Windows 10 из-за различных сообщений об ошибках, попробуйте решения, перечисленные в этом руководстве, в зависимости от того, какое сообщение об ошибке вы получаете.
Исправлено: поверхность набора не будет сопрягаться с моим ПК или ноутбуком
Если вы не можете подключить Surface Dial к компьютеру или ноутбуку с Windows 10, решения, перечисленные в этом руководстве, помогут вам решить проблему.
7 удобных инструментов, чтобы уменьшить нагрузку на глаза, связанную с компьютером
Лучшие инструменты в Интернете, чтобы помочь уменьшить проблемы с нагрузкой на глаза и глаза.