Ошибка 0x80242016, возникающая во время обновления ОС Windows 10, встречается пользователям все чаще и чаще. Более того, даже новая версия ОС Майкрософт, Windows 11, по всей видимости, подвержена такой же проблеме. Тщательно ознакомившись с информацией в сети, мы пришли к выводу, что ошибка 0x80242016 может появляться по следующему ряду причин:
- Типичный баг в работе ОС Windows.
- Некоторые службы или компоненты Центра обновления работают некорректно.
- Повреждение временных файлов Центра обновления.
- Повреждение системных файлов, хранилища компонентов и образа Windows.
- Баг в работе системного поисковика Windows.
Уже стало страшно? Нет нужды паниковать! 0x80242016 — довольно распространенная ошибка Центра обновления Windows, которая решается набором давно известных методов. В сегодняшней статье мы посмотрим с вами как раз на эти самые методы.
Содержание
- Метод №1 Средство устранения неполадок
- Метод №2 Перезапуск служб Центра обновления
- Метод №3 Сброс компонентов Центра обновления Windows
- Метод №4 Запуск SFC и DISM
- Метод №5 Коррекция параметров поисковой системы
Метод №1 Средство устранения неполадок
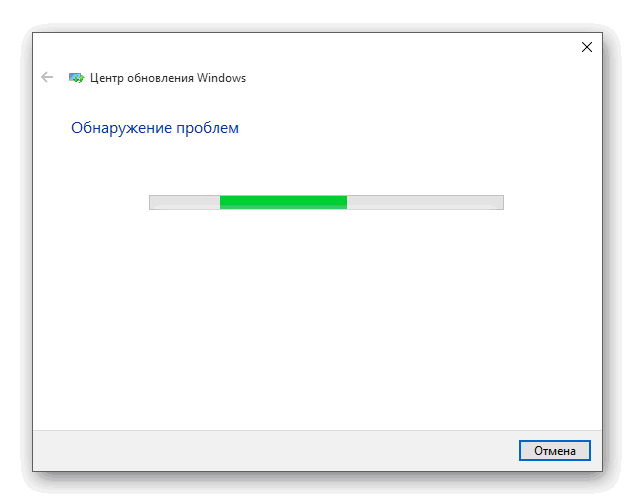
Прежде чем пытаться делать что-то «сложное», давайте попробуем воспользоваться с вами средством устранения неполадок, которое уже встроено в Windows 10. Данное средство не гарантирует решения проблем, однако в некоторых случаях оно действительно помогает пользователям.
Чтобы запустить средство устранения неполадок Центра обновления, вам нужно сделать следующее:
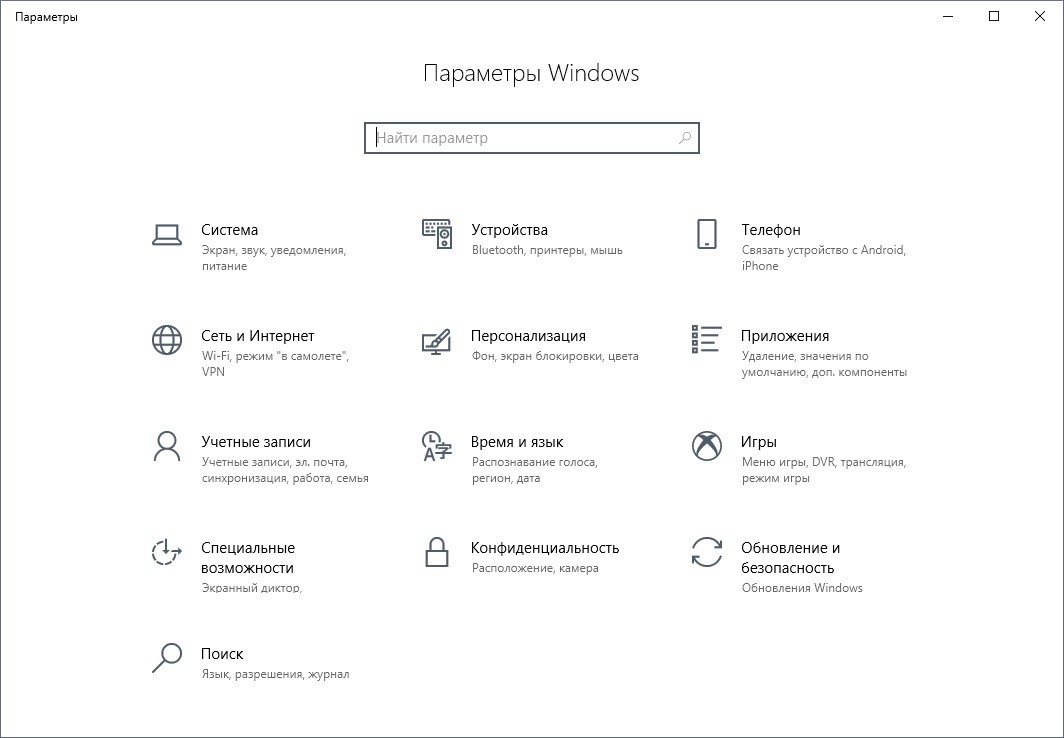
- нажмите ПКМ на меню Пуск и выберите пункт «Параметры»;
- перейдите в раздел «Обновление и безопасность», затем — в подраздел «Устранение неполадок»;
- опуститесь в самый низ окошка и кликните на пункт «Дополнительные средства устранения неполадок»;
- найдите в списке средств «Центр обновления Windows» и выберите его ЛКМ;
- кликните на кнопку «Запустить средство устранения неполадок»;
- следуйте инструкциям на экране, чтобы устранить потенциальные проблемы с обновлением в своей системе.
Как только закончите, закройте все окна, перезагрузите компьютер и проверьте наличие ошибки 0x80242016.
Метод №2 Перезапуск служб Центра обновления
Некоторые службы Центра обновления могут по той или иной причине прекратить свою работу. В таком случае пользователю необходимо запустить службы вручную, воспользовавшись Командной строкой (от администратора, разумеется) либо системным компонентом «Службы». К Центру обновления относятся следующие службы:
- Фоновая интеллектуальная служба передачи (BITS)
- Службы криптографии
- Центр обновления Windows
- Установщик модулей Windows
Чтобы запустить службу, вам нужно сделать на своем ПК следующее:

- нажмите на клавиатуре WIN+R, чтобы открыть диалоговое окошко «Выполнить»;
- пропишите в пустой строке значение «CMD» и нажмите комбинацию CTRL+SHIFT+ENTER;
- открыв консоль, выполните в ней ряд следующих команд:
- SC config wuauserv start=auto
- SC config bits start=auto
- SC config cryptsvc start=auto
- SC config trustedinstaller start=auto
- завершив ввод команд, закройте Командную строку и перезагрузите компьютер.
Заполучив контроль над системой, откройте Центр обновления и проверьте наличие ошибки 0x80242016.
Метод №3 Сброс компонентов Центра обновления Windows
Проблемы с Центром обновлениям могут возникать по причине повреждения одного или нескольких компонентов последнего. Дабы устранить полученные повреждения, необходимо провести так называемый «сброс компонентов». Данная операция выполняется как в ручном, так и в автоматическом режиме. Мы рассмотрим оба варианта.
Ручной сброс компонентов Центра обновления
Сброс компонентов Центра обновления вручную происходит через ввод множества команд в Командной строке. Разумеется, Командная строка запускается, само собой, от имени администратора.
- Нажмите комбинацию WIN+R, чтобы вызвать окошко «Выполнить»;
- вставьте в пустую строку «CMD» и нажмите комбинацию CTRL+SHIFT+ENTER;
- вызвать консоль, выполните в ней следующий набор команд:
- net stop bits
- net stop wuauserv
- net stop cryptsvc
- Del “%ALLUSERSPROFILE%Application DataMicrosoftNetworkDownloaderqmgr*.dat”
- Ren %Systemroot%SoftwareDistributionDataStore DataStore.bak
- Ren %Systemroot%SoftwareDistributionDownload Download.bak
- Ren %Systemroot%System32catroot2 catroot2.bak
- sc.exe sdset bits D:(A;;CCLCSWRPWPDTLOCRRC;;;SY)(A;;CCDCLCSWRPWPDTLOCRSDRCWDWO;;;BA)(A;;CCLCSWLOCRRC;;;AU)(A;;CCLCSWRPWPDTLOCRRC;;;PU)
- sc.exe sdset wuauserv D:(A;;CCLCSWRPWPDTLOCRRC;;;SY)(A;;CCDCLCSWRPWPDTLOCRSDRCWDWO;;;BA)(A;;CCLCSWLOCRRC;;;AU)(A;;CCLCSWRPWPDTLOCRRC;;;PU)
- cd /d %windir%system32
- regsvr32.exe atl.dll
- regsvr32.exe urlmon.dll
- regsvr32.exe mshtml.dll
- regsvr32.exe shdocvw.dll
- regsvr32.exe browseui.dll
- regsvr32.exe jscript.dll
- regsvr32.exe vbscript.dll
- regsvr32.exe scrrun.dll
- regsvr32.exe msxml.dll
- regsvr32.exe msxml3.dll
- regsvr32.exe msxml6.dll
- regsvr32.exe actxprxy.dll
- regsvr32.exe softpub.dll
- regsvr32.exe wintrust.dll
- regsvr32.exe dssenh.dll
- regsvr32.exe rsaenh.dll
- regsvr32.exe gpkcsp.dll
- regsvr32.exe sccbase.dll
- regsvr32.exe slbcsp.dll
- regsvr32.exe cryptdlg.dll
- regsvr32.exe oleaut32.dll
- regsvr32.exe ole32.dll
- regsvr32.exe shell32.dll
- regsvr32.exe initpki.dll
- regsvr32.exe wuapi.dll
- regsvr32.exe wuaueng.dll
- regsvr32.exe wuaueng1.dll
- regsvr32.exe wucltui.dll
- regsvr32.exe wups.dll
- regsvr32.exe wups2.dll
- regsvr32.exe wuweb.dll
- regsvr32.exe qmgr.dll
- regsvr32.exe qmgrprxy.dll
- regsvr32.exe wucltux.dll
- regsvr32.exe muweb.dll
- regsvr32.exe wuwebv.dll
- netsh winsock reset
- net start bits
- net start wuauserv
- net start cryptsvc
- закройте Командную строку и перезагрузите ПК.
Ни в коем случае не меняйте символы в командах, иначе они попросту не сработают. Кроме того, не нужно выполнять команды в случайном порядке, а только в том, в котором они указаны выше.
Автоматический сброс компонентов Центра обновления
В данном варианте вам практически не придется работать: создать текстовый файл, вставить в него скрипт от одного из Интернет-умельцев, переделать текстовик в BAT-файл и выполнить его от имени администратора. Звучит как что-то сложное, но все совсем не так — и сейчас мы это вам докажем.
- Нажмите ПКМ на Рабочий стол и выберите пункты «Создать→Текстовый документ»;
- откройте только что созданный текстовик и вставьте в него следующий скрипт:
:: Run the reset Windows Update components.
:: void components();
:: /*************************************************************************************/
:components
:: —— Stopping the Windows Update services ——
call :print Stopping the Windows Update services.
net stop bitscall :print Stopping the Windows Update services.
net stop wuauservcall :print Stopping the Windows Update services.
net stop appidsvccall :print Stopping the Windows Update services.
net stop cryptsvccall :print Canceling the Windows Update process.
taskkill /im wuauclt.exe /f
:: —— Checking the services status ——
call :print Checking the services status.sc query bits | findstr /I /C:»STOPPED»
if %errorlevel% NEQ 0 (
echo. Failed to stop the BITS service.
echo.
echo.Press any key to continue . . .
pause>nul
goto :eof
)call :print Checking the services status.sc query wuauserv | findstr /I /C:»STOPPED»
if %errorlevel% NEQ 0 (
echo. Failed to stop the Windows Update service.
echo.
echo.Press any key to continue . . .
pause>nul
goto :eof
)call :print Checking the services status.
sc query appidsvc | findstr /I /C:»STOPPED»
if %errorlevel% NEQ 0 (
sc query appidsvc | findstr /I /C:»OpenService FAILED 1060″
if %errorlevel% NEQ 0 (
echo. Failed to stop the Application Identity service.
echo.
echo.Press any key to continue . . .
pause>nul
if %family% NEQ 6 goto :eof
)
)call :print Checking the services status.
sc query cryptsvc | findstr /I /C:»STOPPED»
if %errorlevel% NEQ 0 (
echo. Failed to stop the Cryptographic Services service.
echo.
echo.Press any key to continue . . .
pause>nul
goto :eof
):: —— Delete the qmgr*.dat files ——
call :print Deleting the qmgr*.dat files.del /s /q /f «%ALLUSERSPROFILE%Application DataMicrosoftNetworkDownloaderqmgr*.dat»
del /s /q /f «%ALLUSERSPROFILE%MicrosoftNetworkDownloaderqmgr*.dat»:: —— Renaming the softare distribution folders backup copies ——
call :print Deleting the old software distribution backup copies.cd /d %SYSTEMROOT%
if exist «%SYSTEMROOT%winsxspending.xml.bak» (
del /s /q /f «%SYSTEMROOT%winsxspending.xml.bak»
)
if exist «%SYSTEMROOT%SoftwareDistribution.bak» (
rmdir /s /q «%SYSTEMROOT%SoftwareDistribution.bak»
)
if exist «%SYSTEMROOT%system32Catroot2.bak» (
rmdir /s /q «%SYSTEMROOT%system32Catroot2.bak»
)
if exist «%SYSTEMROOT%WindowsUpdate.log.bak» (
del /s /q /f «%SYSTEMROOT%WindowsUpdate.log.bak»
)call :print Renaming the software distribution folders.
if exist «%SYSTEMROOT%winsxspending.xml» (
takeown /f «%SYSTEMROOT%winsxspending.xml»
attrib -r -s -h /s /d «%SYSTEMROOT%winsxspending.xml»
ren «%SYSTEMROOT%winsxspending.xml» pending.xml.bak
)
if exist «%SYSTEMROOT%SoftwareDistribution» (
attrib -r -s -h /s /d «%SYSTEMROOT%SoftwareDistribution»
ren «%SYSTEMROOT%SoftwareDistribution» SoftwareDistribution.bak
if exist «%SYSTEMROOT%SoftwareDistribution» (
echo.
echo. Failed to rename the SoftwareDistribution folder.
echo.
echo.Press any key to continue . . .
pause>nul
goto :eof
)
)
if exist «%SYSTEMROOT%system32Catroot2» (
attrib -r -s -h /s /d «%SYSTEMROOT%system32Catroot2»
ren «%SYSTEMROOT%system32Catroot2» Catroot2.bak
)
if exist «%SYSTEMROOT%WindowsUpdate.log» (
attrib -r -s -h /s /d «%SYSTEMROOT%WindowsUpdate.log»
ren «%SYSTEMROOT%WindowsUpdate.log» WindowsUpdate.log.bak
):: —— Reset the BITS service and the Windows Update service to the default security descriptor ——
call :print Reset the BITS service and the Windows Update service to the default security descriptor.sc.exe sdset wuauserv D:(A;;CCLCSWLOCRRC;;;AU)(A;;CCDCLCSWRPWPDTLOCRSDRCWDWO;;;BA)(A;;CCDCLCSWRPWPDTLCRSDRCWDWO;;;SO)(A;;CCLCSWRPWPDTLOCRRC;;;SY)S:(AU;FA;CCDCLCSWRPWPDTLOCRSDRCWDWO;;WD)
sc.exe sdset bits D:(A;;CCLCSWLOCRRC;;;AU)(A;;CCDCLCSWRPWPDTLOCRSDRCWDWO;;;BA)(A;;CCDCLCSWRPWPDTLCRSDRCWDWO;;;SO)(A;;CCLCSWRPWPDTLOCRRC;;;SY)S:(AU;FA;CCDCLCSWRPWPDTLOCRSDRCWDWO;;WD)
sc.exe sdset cryptsvc D:(A;;CCLCSWLOCRRC;;;AU)(A;;CCDCLCSWRPWPDTLOCRSDRCWDWO;;;BA)(A;;CCDCLCSWRPWPDTLCRSDRCWDWO;;;SO)(A;;CCLCSWRPWPDTLOCRRC;;;SY)S:(AU;FA;CCDCLCSWRPWPDTLOCRSDRCWDWO;;WD)
sc.exe sdset trustedinstaller D:(A;;CCLCSWLOCRRC;;;AU)(A;;CCDCLCSWRPWPDTLOCRSDRCWDWO;;;BA)(A;;CCDCLCSWRPWPDTLCRSDRCWDWO;;;SO)(A;;CCLCSWRPWPDTLOCRRC;;;SY)S:(AU;FA;CCDCLCSWRPWPDTLOCRSDRCWDWO;;WD):: —— Reregister the BITS files and the Windows Update files ——
call :print Reregister the BITS files and the Windows Update files.cd /d %SYSTEMROOT%system32
regsvr32.exe /s atl.dll
regsvr32.exe /s urlmon.dll
regsvr32.exe /s mshtml.dll
regsvr32.exe /s shdocvw.dll
regsvr32.exe /s browseui.dll
regsvr32.exe /s jscript.dll
regsvr32.exe /s vbscript.dll
regsvr32.exe /s scrrun.dll
regsvr32.exe /s msxml.dll
regsvr32.exe /s msxml3.dll
regsvr32.exe /s msxml6.dll
regsvr32.exe /s actxprxy.dll
regsvr32.exe /s softpub.dll
regsvr32.exe /s wintrust.dll
regsvr32.exe /s dssenh.dll
regsvr32.exe /s rsaenh.dll
regsvr32.exe /s gpkcsp.dll
regsvr32.exe /s sccbase.dll
regsvr32.exe /s slbcsp.dll
regsvr32.exe /s cryptdlg.dll
regsvr32.exe /s oleaut32.dll
regsvr32.exe /s ole32.dll
regsvr32.exe /s shell32.dll
regsvr32.exe /s initpki.dll
regsvr32.exe /s wuapi.dll
regsvr32.exe /s wuaueng.dll
regsvr32.exe /s wuaueng1.dll
regsvr32.exe /s wucltui.dll
regsvr32.exe /s wups.dll
regsvr32.exe /s wups2.dll
regsvr32.exe /s wuweb.dll
regsvr32.exe /s qmgr.dll
regsvr32.exe /s qmgrprxy.dll
regsvr32.exe /s wucltux.dll
regsvr32.exe /s muweb.dll
regsvr32.exe /s wuwebv.dll:: —— Resetting Winsock ——
call :print Resetting Winsock.
netsh winsock reset:: —— Resetting WinHTTP Proxy ——
call :print Resetting WinHTTP Proxy.if %family% EQU 5 (
proxycfg.exe -d
) else (
netsh winhttp reset proxy
):: —— Set the startup type as automatic ——
call :print Resetting the services as automatics.
sc.exe config wuauserv start= auto
sc.exe config bits start= delayed-auto
sc.exe config cryptsvc start= auto
sc.exe config TrustedInstaller start= demand
sc.exe config DcomLaunch start= auto:: —— Starting the Windows Update services ——
call :print Starting the Windows Update services.
net start bitscall :print Starting the Windows Update services.
net start wuauservcall :print Starting the Windows Update services.
net start appidsvccall :print Starting the Windows Update services.
net start cryptsvccall :print Starting the Windows Update services.
net start DcomLaunch:: —— End process ——
call :print The operation completed successfully.echo.Press any key to continue . . .
pause>nul
goto :eof
:: /*************************************************************************************/
- пробежитесь глазами по скрипту и убедитесь, что ничего в нем не было нарушено;
- нажмите на кнопку «Файл» в строке меню окна Блокнота и выберите пункт «Сохранить как…»;
- назовите файл «UpdSerReset» и измените его расширение с «.txt» на «.bat»;
Заметка: если вы не видите расширений файлов, то вам необходимо активировать опцию «Расширения имен файлов» в параметрах Проводника Windows (вкладка «Вид»).
- выберите в качестве расположения свой Рабочий стол и нажмите на кнопку «Сохранить»;
- кликните на файл «UpdSerReset.bat» ПКМ и выберите пункт «Запуск от имени администратора»;
- подождите несколько секунд, после чего нажмите на любую кнопку, когда в Командной строке появится соответствующее сообщение;
- перезагрузите компьютер.
Описанный выше процесс должен исправить ошибку 0x80242016, если она была вызвана повреждениями компонентов Центра обновления. Если же ничего не изменилось, то давайте двигаться дальше.
Метод №4 Запуск SFC и DISM
Ошибка 0x80242016 может возникнуть в процессе обновления из-за поврежденных системных файлов, хранилища компонентов или образа Windows 10 в целом. Так или иначе проблема довольно серьезная, однако ее можно исправить, задействовав такие утилиты, как SFC и DISM.
- Откройте Командную строку от имени администратора, как это было показано во втором методе;
- вставьте в консоль команду «sfc /scannow» (без кавычек) и нажмите ENTER;
- подождите окончания выполнения команды и ознакомьтесь с результатами работы SFC;
- перезагрузите компьютер и снова вызовите Командную строку;
- поочередно выполните следующий набор команд:
- DISM /Online /Cleanup-Image /CheckHealth
- DISM /Online /Cleanup-Image /ScanHealth
- DISM /Online /Cleanup-Image /RestoreHealth
- ознакомьтесь с результатами работы DISM и перезагрузите ПК еще раз.
Вы практически наверняка избавитесь от ошибки 0x80242016 после использования SFC и DISM, если обе утилиты нашли в ОС Windows 10 какие-то повреждения и устранили их.
Метод №5 Коррекция параметров поисковой системы
Пользователи инсайдерских превью-билдов Windows 10 утверждают, что им удалось избавиться от ошибки 0x80242016, внеся некоторые изменения в параметры службы «Windows Search». Данная служба отвечает за индексирование контента, кэширование свойств и результатов поиска для файлов, электронной почты и другого контента в операционной системе. На вашем ПК установлена такая же версия Windows? Тогда попробуйте сделать следующее:
- нажмите на клавиатуре WIN+R для вызова окошка «Выполнить»;
- вставьте в пустую строку окна значение «services.msc» и нажмите ENTER;
- найдите в списке службу «Windows Search» и дважды кликните на нее ЛКМ;
- выберите в типе запуска службы значение «Вручную»;
- нажмите на кнопки «Применить» и «OK»;
- перезагрузите свой ПК.
Зайдите в Центр обновления Windows 10 и проверьте наличие ошибки 0x80242016.
К сожалению, если никакие из вышеуказанных методов не помогли вам с ошибкой 0x80242016, то вы практически наверняка имеете дело с серьезными повреждениями ОС, которые не решаются обычными способами. В таком случае вам придется либо возвращать ПК в исходное состояние (запускается через Параметры), либо полностью переустанавливать Windows.
У меня перестали устанавливаться обновления на Windows 10. Точнее, всякая мелочь благополучно вставала, но нажористый feature update под номером 2004 благополучно скачивался, что-то там делал, но после перезагрузки номер версии не менялся. В Центре обновлений появлялось уведомление об ошибке 0x80242016 и предложение попробовать еще разок.
Сначала я не обращал на это внимание. Обновление получилось несколько глючным, и Microsoft даже отзывала его на переделку. Но потом все наладилось. На тестовый ноутбук HP Elite Dragonfly версия 2004 встала с полпинка, и я стал с подозрением смотреть на большой компьютер. С одной стороны, фиг бы с ним, с этим обновлением. Ничего действительно серьезного в нем нет, переживу. С другой, очень раздражает, когда в компьютере что-то глючит. Даже по мелочи. Как показывает опыт, постепенно это перерастает во что-то большее. А я еще апгрейд планирую через недельку…
В общем, решил заняться багом всерьез. Как показало глубокое гугление, ошибка 0x80242016 известна довольно давно, и причин ее появления может быть немало. Иногда виноват сам механизм Windows Update, иногда сходила с ума служба Windows Search. Соответственно, рецептов борьбы с ошибкой в интернете тьма. От банальной рекомендации перезагрузить компьютер до шаманства в терминале по тотальному сбросу настроек Центра обновлений. Один из ярких примеров подборок рецептов здесь. Я перепробовал абсолютно все. Не помогло.

Последней надеждой было отключение службы Windows Search, но и это ничего не исправило. С учетом того, что у меня лицензионная копия Windows без каких-то особых прибамбасов, копать в ней особенно и некуда. Ну поотключал вообще все в автозагрузке, ну снес пару не очень нужных утилит. И всё, идеи кончаются.
И когда отчаяние уже печально дышало в затылок, я нашел первопричину проблемы. Как ни странно, на сайте самой Microsoft. Оказывается, обновление 2004 конкретно параноит по поводу загрузчика Windows, а конкретно насчет BCD (Boot Configuration Data). Если вы с ним что-то делали, даже самое невинное, обновление обидится, но вам не скажет.
А я ведь делал. Когда менял SSD на модель с поддержкой PCIe 4.0, переносил на него данные путем полного клонирования. С тех пор прошло, на минуточку, больше полугода, и операционная система работала безупречно. Но в версии 2004 решила психануть.
Сделать новую BCD, в общем, не очень сложно. Особенно в Windows 10, где эта процедура упростилась. Но все же надо соорудить загрузочный носитель, загрузиться с него и через командную строку дать ценные указания. Я использовал вот этот рецепт. Тут еще был нюанс, что простое «пересоздание» не помогает, надо удалить старую BCD, и потом с нуля делать новую.
Не скажу, что процесс прямо сложный. Но для нормального человека несколько… нервный, потому что все надо набирать командами. Иногда довольно длинными. Опечатаешься — и сидишь, ломаешь голову, что сделал не так. Конечно, при некоторой внимательности опечаток можно избежать, но у меня на часах была уже полночь, а за спиной целый день экспериментов.
В итоге все получилось. Новая BCD заработала, обновление скачалось и встало, как положено.

Послевкусие от этой истории противоречивое. С одной стороны, здорово, что я в итоге нашел и заборол проблему. С другой, в Microsoft явно начали забывать о существовании настоящих, больших компьютеров, где компоненты могут меняться довольно причудливо. Замена накопителя с переносом данных — абсолютно рутинная процедура, и даже странно, что ее последствия не учли в обновлении 2004.
В ходе экспериментов восстановил участие в программе Windows Insider, и теперь мне предлагают поставить сборку 20H2. Но что-то опасаюсь…
Содержание
- Код ошибки 80240016 при обновлении Windows 7/8/10: как исправить
- Как исправить ошибку 80240016 на Windows 7/8/10
- Убедитесь, что ваше сетевое подключение в порядке
- Проверка службы Центра обновления
- Восстановление поврежденных системных файлов
- Отключение антивируса и брандмауэра
- Восстановление компонентов Центра обновления
- Почему Виндовс 10 не обновляется через центр обновления и что делать
- Причины неработоспособности обновлений
- Вирусы
- Недостаток памяти
- Брандмауэр Windows
- Заполненный кэш обновлений
- Повреждение системных файлов
- Подключенные устройства
- Отключенная служба обновлений
- Способы решения проблемы
- Запуск средства устранения неполадок
- Отключение обновления других продуктов «Майкрософт»
- Очистка кэша Центра обновлений
- Загрузка обновления стека обслуживания (SSU)
- Скачивание свежих обновлений через базу знаний
- Опция «Обновление на месте»
- Проверка целостности и восстановление системных файлов
Код ошибки 80240016 при обновлении Windows 7/8/10: как исправить
В сегодняшнем материале мы будем рассматривать очередную ошибку, возникающую во время обновления операционной системы от компании Майкрософт – 80240016. Ни для кого не секрет, что различные версии ОС Windows просто таки наполнены всевозможными багами, ошибками и проблемами. Чтобы избавляться от них, разработчики не сидят на месте – и выпускают огромное количество обновлений. Однако, что остается делать простому пользователю, когда даже во время обновления системы тот сталкивается с ошибкой, в нашем случае, 80240016?
Что же, есть несколько методов, которыми потенциально можно от нее избавиться, и мы их рассмотрим в этом статье. Итак, стоит заметить, что ошибка 80240016 представляет собой крайне старый код, который успешно кочует с одной версии ОС Windows в другую. Увидеть его можно в Windows 7, Windows 8 и даже Windows 10. На более новых системах код может дополняться «0x», но сути это не меняет.
Причины: какие они для кода ошибки 80240016? На этот вопрос крайне затруднительно ответить. В принципе, можно попытаться выстроить список из потенциальных причин, способных вызвать ошибку 80240016. Давайте же посмотрим на него:
- проблемы с сетевым подключением на компьютере;
- повреждение системных файлов, участвующих в процессе обновления;
- повреждение компонентов Центра обновления Windows;
- приостановка работы служб Центра обновления Windows;
- установочные файлы предыдущих обновлений вступили в конфликт с установочными файлами нового обновления;
- антивирус или брандмауэр, как сторонние, так и системные вариации, заблокировали процесс загрузки файлов обновления либо их самих уже в системе.
Помимо вышеуказанного списка, могут существовать и другие причины. Хорошо, мы в должной мере ознакомились с ошибкой 80240016, так что теперь пора посмотреть, что можно сделать, чтобы та исчезла из вашей системы. Нижеуказанные методы – выполняйте в том порядке, в каком вам удобнее, так как это не имеет значения.
Как исправить ошибку 80240016 на Windows 7/8/10

Убедитесь, что ваше сетевое подключение в порядке
Первое, на что вам следует обратить внимание – это состояние вашего Интернет-подключения. Разумеется, для загрузки последних обновления Windows вам потребуется иметь доступ в Интернет. Читая эти строки, вы наверняка задаетесь вопросом: ну я ведь как-то перешел на эту ссылку, так причем тут доступ к Интернету? Дело в том, что ошибки подобной 80240016 могут также возникать и по причине нестабильного сетевого соединения, т.е. в один момент – доступ есть, а в другой – его нет. Проверьте, присутствует ли у вас стабильный доступ в Интернет. Если же оказалось, что с сетевым подключением и правда не все в порядке – вы нашли источник проблемы.
Проверка службы Центра обновления
Если служба Центра обновления была деактивирована или приостановлена, по какой-то причине, то это вполне могло вызвать ошибку 80240016. Сделать такую пакость могло много чего: стороннее программное обеспечение, баг в операционной системе, вирус и прочее. Тем не менее вы запросто можете проверить состояние этой службы в соответствующем компоненте вашей системы. Итак, чтобы выполнить проверку и запуск службы Центра обновления, вам потребуется сделать следующее:
- нажмите комбинацию клавиш Windows+R;
- впишите команду services.msc;
- нажмите Enter;
- найдите в списке службу «Центр обновления Windows»;
- кликните по ней дважды левой кнопкой мыши;
Перед вами откроется окно с состоянием указанной службы. Хорошенько осмотритесь и убедитесь, что та работает. Если вы заметили, что в строке состояния указано об остановке службы – нажмите на кнопку «Запустить». Далее выставьте в строке типа запуска опцию «Автоматически» и сохраните изменения в параметрах службы. Перезапустите свой компьютер и попробуйте запустить процесс обновления системы повторно. Если служба была деактивирована – это разрешит проблему.
Восстановление поврежденных системных файлов
Ок, давайте теперь убедимся с вами, что ошибка 80240016 не возникла по вине поврежденных системных файлов. В вашей системе встроена одна небольшая утилита под названием System File Check, которая как раз таки может просканировать системные файлы и восстановить их. Впрочем, последнее сделать она будет только тогда, когда это возможно, что, зачастую, представляется возможным. Итак, чтобы запустить утилиту System File Check, вам нужно выполнить следующие шаги:
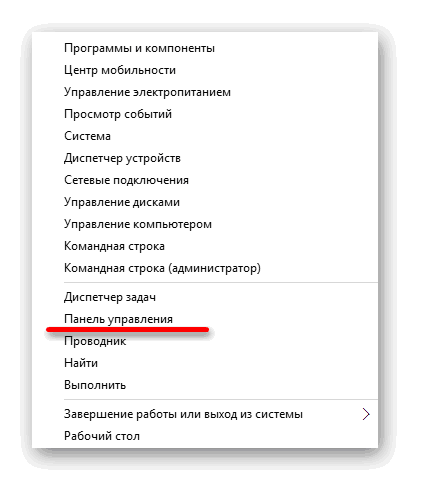
- нажмите Windows+X;
- выберите пункт «Командная строка(администратор)»;
- впишите команду sfc /scannow;
- нажмите Enter;
Как только вы нажмите на Enter, в окошке Командной строки запустится процесс сканирования системных файлов. Это может занять какое-то время – наберитесь терпения. После окончания сканирования системных файлов в том же окошке перед вами появятся результаты. Если в них будет указано, что были обнаружены и исправлены повреждения – перезапустите свой компьютер и проверьте, была ли устранена ошибка 80240016.
Отключение антивируса и брандмауэра
Следующей нашим способом станет отключение антивируса и брандмауэра. Несмотря на полезнейший функционал, которое предоставляет своим пользователям это программное обеспечение, оно может также и вызывать определенные проблемы. Например, сторонний антивирус мог заблокировать загруженные файлы устанавливаемого обновления, вследствие чего и возникла ошибка 80240016. Что же касается брандмауэра – он мог заблокировать сетевое подключение к серверам Майкрософт, на которых как раз находятся установочные файлы загружаемых обновлений.
Итак, чтобы проверить причастность этого ПО, вам нужно попросту отключить антивирус, а затем посмотреть, исчезнет ли проблема. Отключить сторонний антивирус можно по разному, например, через значок в панели уведомлений. Однако, со сторонним ПО вам так или иначе придется разбираться самостоятельно. Возможно, вам даже понадобится удалить антивирус со своего компьютера. Что же касается брандмауэра – мы можем показать вам, если вы пользуетесь системным ПО.
Чтобы отключить Брандмауэр Windows, сделайте следующее:
- нажмите Windows+R;
- впишите control;
- нажмите на Enter;
- откройте элемент «Брандмауэр Защитника Windows»;
- нажмите на ссылку «Включение и отключение брандмауэра Защитника Windows»;
- поставьте галочки напротив отключения общественной и локальной сети;
- сохраните изменения в параметрах Брандмауэра Windows.
Как только антивирус и брадмауэр перестанут функционировать, попробуйте запустить обновление Windows и посмотрите, была ли устранена ошибка 80240016.
Восстановление компонентов Центра обновления
Давайте попробуем кое-что более серьезное – сброс компонентов Центра обновления Windows. Возможно, какие-то компоненты были повреждены либо изменены, что и вызвало оговариваемую проблему. Чтобы выполнить сброс компонентов, вам нужно сделать следующее:
- нажмите Windows+X;
- выберите «Командная строка(администратор)»;
- впишите следующий набор команд:
- net stop bits
- net stop wuauserv
- net stop appidsvc
- net stop cryptsvc
- Del «%ALLUSERSPROFILE%Application
- DataMicrosoftNetworkDownloaderqmgr*.dat»
- Ren %systemroot%SoftwareDistribution SoftwareDistribution.bak
- Ren %systemroot%system32catroot2 catroot2.bak
- del /f /s /q %windir%windowsupdate.log
- sc.exe sdset bits D:(A;;CCLCSWRPWPDTLOCRRC;;;SY) (A;;CCDCLCSWRPWPDTLOCRSDRCWDWO;;;BA) (A;;CCLCSWLOCRRC;;;AU) (A;;CCLCSWRPWPDTLOCRRC;;;PU)
- sc.exe sdset wuauserv D:(A;;CCLCSWRPWPDTLOCRRC;;;SY) (A;;CCDCLCSWRPWPDTLOCRSDRCWDWO;;;BA) (A;;CCLCSWLOCRRC;;;AU) (A;;CCLCSWRPWPDTLOCRRC;;;PU)
- cd /d %windir%system32
- regsvr32.exe /U /s vbscript.dll
- regsvr32.exe /U /s mshtml.dll
- regsvr32.exe /U /s msjava.dll
- regsvr32.exe /U /s msxml.dll
- regsvr32.exe /U /s actxprxy.dll
- regsvr32.exe /U /s shdocvw.dll
- regsvr32.exe /U /s Mssip32.dll
- regsvr32.exe /U /s wintrust.dll
- regsvr32.exe /U /s initpki.dll
- regsvr32.exe /U /s dssenh.dll
- regsvr32.exe /U /s rsaenh.dll
- regsvr32.exe /U /s gpkcsp.dll
- regsvr32.exe /U /s sccbase.dll
- regsvr32.exe /U /s slbcsp.dll
- regsvr32.exe /U /s cryptdlg.dll
- regsvr32.exe /U /s Urlmon.dll
- regsvr32.exe /U /s Oleaut32.dll
- regsvr32.exe /U /s msxml2.dll
- regsvr32.exe /U /s Browseui.dll
- regsvr32.exe /U /s shell32.dll
- regsvr32.exe /U /s atl.dll
- regsvr32.exe /U /s jscript.dll
- regsvr32.exe /U /s msxml3.dll
- regsvr32.exe /U /s softpub.dll
- regsvr32.exe /U /s wuapi.dll
- regsvr32.exe /U /s wuaueng.dll
- regsvr32.exe /U /s wuaueng1.dll
- regsvr32.exe /U /s wucltui.dll
- regsvr32.exe /U /s wups.dll
- regsvr32.exe /U /s wups2.dll
- regsvr32.exe /U /s wuweb.dll
- regsvr32.exe /U /s scrrun.dll
- regsvr32.exe /U /s msxml6.dll
- regsvr32.exe /U /s ole32.dll
- regsvr32.exe /U /s qmgr.dll
- regsvr32.exe /U /s qmgrprxy.dll
- regsvr32.exe /U /s wucltux.dll
- regsvr32.exe /U /s muweb.dll
- regsvr32.exe /U /s wuwebv.dll
- regsvr32.exe /s vbscript.dll
- regsvr32.exe /s mshtml.dll
- regsvr32.exe /s msjava.dll
- regsvr32.exe /s msxml.dll
- regsvr32.exe /s actxprxy.dll
- regsvr32.exe /s shdocvw.dll
- regsvr32.exe /s Mssip32.dll
- regsvr32.exe /s wintrust.dll
- regsvr32.exe /s initpki.dll
- regsvr32.exe /s dssenh.dll
- regsvr32.exe /s rsaenh.dll
- regsvr32.exe /s gpkcsp.dll
- regsvr32.exe /s sccbase.dll
- regsvr32.exe /s slbcsp.dll
- regsvr32.exe /s cryptdlg.dll
- regsvr32.exe /s Urlmon.dll
- regsvr32.exe /s Oleaut32.dll
- regsvr32.exe /s msxml2.dll
- regsvr32.exe /s Browseui.dll
- regsvr32.exe /s shell32.dll
- regsvr32.exe /s Mssip32.dll
- regsvr32.exe /s atl.dll
- regsvr32.exe /s jscript.dll
- regsvr32.exe /s msxml3.dll
- regsvr32.exe /s softpub.dll
- regsvr32.exe /s wuapi.dll
- regsvr32.exe /s wuaueng.dll
- regsvr32.exe /s wuaueng1.dll
- regsvr32.exe /s wucltui.dll
- regsvr32.exe /s wups.dll
- regsvr32.exe /s wups2.dll
- regsvr32.exe /s wuweb.dll
- regsvr32.exe /s scrrun.dll
- regsvr32.exe /s msxml6.dll
- regsvr32.exe /s ole32.dll
- regsvr32.exe /s qmgr.dll
- regsvr32.exe /s qmgrprxy.dll
- regsvr32.exe /s wucltux.dll
- regsvr32.exe /s muweb.dll
- regsvr32.exe /s wuwebv.dll
- netsh winsock reset
- netsh winhttp reset proxy
- net start bits
- net start wuauserv
- net start appidsvc
- net start cryptsvc
Перезагрузите свой компьютер, а затем проверьте, была ли устранена ошибка 80240016.
Почему Виндовс 10 не обновляется через центр обновления и что делать

Компания Microsoft периодически предлагает пользователям ПК, ноутбуков обновление ОС Windows. В ходе операции добавляются функциональные возможности системы, улучшающие ее работу. При загрузке или инсталляции апгрейда могут возникнуть ошибки, которые мешают установке файлов обновлений. Это приводит к потенциальным проблемам с совместимостью, драйверами, ошибками. Рассмотрим основные причины, по которым не обновляется ОС Виндовс 10.
Причины неработоспособности обновлений
Неполадки в функционировании «Центра обновлений Windows» могут возникать по разным причинам. Рассмотрим самые распространенные из них.

Вирусы
Вредоносные программные ПО мешают процессу обновления системы. Пользователь может столкнуться с кодом ошибки 0x80242016. Причиной ее появления может стать конфликт между старыми и новыми установочными файлами. Процесс загрузки файлов может быть заблокирован антивирусами или брандмауэром. После того, как обнаружено вредоносное ПО, следует выполнить действия, чтобы эта проблема исчезла из системы.

Недостаток памяти
Переполненный жесткий диск может стать причиной появления ошибок. Если на компьютере обнаружено 0 процентов свободной памяти, потребуется системный диск освободить от ненужных файлов. Для их нормальной загрузки требуется не менее 5 Гб свободного пространства.
Бывает, что утилита, предназначенная для поиска причин сбоев, не работает самостоятельно. Для очистки системы можно воспользоваться помощником Acronis Disk Director.

Брандмауэр Windows
Брандмауэр или антивирусное ПО могут заблокировать систему. При этом программа выдает код ошибки. Проблема легко решается временным отключением приложений. После отключения пользователю нужно убедиться, что проблема была именно в этом. Если файлы вновь не открываются или не загружаются, значит, ошибка связана с другой причиной.

Заполненный кэш обновлений
Перед установкой файлы должны быть загружены на ПК. Из-за переполненного кэша данные не устанавливаются на устройство. Если утилита автоматически не справляется со своей задачей, требуется ручная очистка кэша.
Если система не загружает обновления, поможет отключение интернет-соединения, остановка работы Центра обновления. Последующая перезагрузка ПК обычно помогает при неполадках.

Повреждение системных файлов
Для выявления причины нужно делать следующее:
- отсканировать систему;
- исправить поврежденные файлы через «Командную строку».
Повреждения файлов могут быть вызваны вирусными ПО. Также решить проблему помогут специальные утилиты или восстановление системы из резервной копии.

Подключенные устройства
Иногда файлы не скачиваются по причине подключения съемных носителей и других внешних устройств. В этом случае может помочь отключение гаджета от компьютера и повторный запуск процесса обновления Windows.
Отключенная служба обновлений
Самая распространенная причина, которая связана с отключенной службой. Автоматический процесс мог отключить сам владелец ПК или создатель сборки Виндовс. В этом случае ожидание установки будет длиться до того момента, пока пользователь не подтвердит действие вручную. Настройки работы автообновления проверяются в соответствующем разделе.

Способы решения проблемы
Разработчики рекомендуют воспользоваться инструкцией по устранению сбоев и ошибок в системе, возникающих при обновлении Виндовс 10. В ней приведены самые распространенные причины ошибок и пути их решения.
Запуск средства устранения неполадок
Во всех Виндовсах создателями предусмотрен инструмент, который автоматически находит неполадки и устраняет их.
Для того чтобы запустить утилиту, нужно:
- Нажать комбинацию «Win+X».
- Выбрать пункт «Панель управления».
- Найти раздел «Устранение неполадок».
- Нажать на пункт «Система и безопасность».
- Тапнуть по строке «Устранение неполадок с помощью…».


- Сервис начнет автоматический поиск ошибок.
После сканирования потребуется применить исправления. После окончания процесса программа выдаст подробный отчет о ходе операции. Если утилита не найдет ошибок, то уведомит об этом в соответствующем сообщении. Такой метод поиска проблем не всегда является эффективным, серьезных проблем сервис не сможет обнаружить. Здесь рационально воспользоваться следующим вариантом.
Отключение обновления других продуктов «Майкрософт»
Нередко система автоматически обновляет драйверы и другие аппаратные компоненты ПК, когда это не нужно пользователю. При этом система может зависнуть или полностью прекратить загрузку. Установку обновлений других продуктов программы можно прекратить или скрыть с помощью сторонней утилиты Show or hide updates.
Для отключения или приостановки последних обновлений потребуется следовать пошаговой инструкции:
- Перейти в «Обновление и безопасность».
- Установить необходимые параметры.
Очистка кэша Центра обновлений
Сбой загрузки файлов может произойти из-за установленных компонентов. Решить проблему поможет очистка кэша.
Чтобы выполнить эту процедуру вручную, понадобится:
- Отключить сеть интернет.
- Вызвать командную строку удерживанием клавиш «Win+X».
- Ввести последовательно: net stop wuauserv, net stop bits.
- Оставить строку запроса открытой.
- Перейти в каталог Виндовс и удалить папку «Software Distribution».

- Вернуться к командной строке и ввести последовательно: net start bits и net start wuauserv.
- Восстановить подключение к сети.
- Проверить, скачиваются ли выявленные апгрейды.

Загрузка обновления стека обслуживания (SSU)
Наличие стека помогает устранять потенциальные проблемы, возникающие при установке обновлений и компонентов ОС. Если не установить инструмент, повысится вероятность того, что процесс не выполнится.
Выполнение загрузки происходит по следующему алгоритму:

- Выбрать пункт из списка в соответствии с учетом операционной системы.
- В открывшемся окне щелкнуть курсором по ссылке.

- Начнется загрузка, после ее завершения открыть установочный файл.
- Для успешного завершения инсталляции следовать инструкции.

Для вступления изменений в силу и перехода в рабочее состояние следует перезагрузить компьютер.
Скачивание свежих обновлений через базу знаний
Пользователем выполняется ручная установка с использованием информации из базы знаний.
Для этого нужно выполнить пошагово следующие этапы:
- Найти номер последней версии.
- Перейти на официальную страницу каталога, ввести номер.
- Поочередно загрузить обновления, выбрать подходящий из списка для установленной системы.
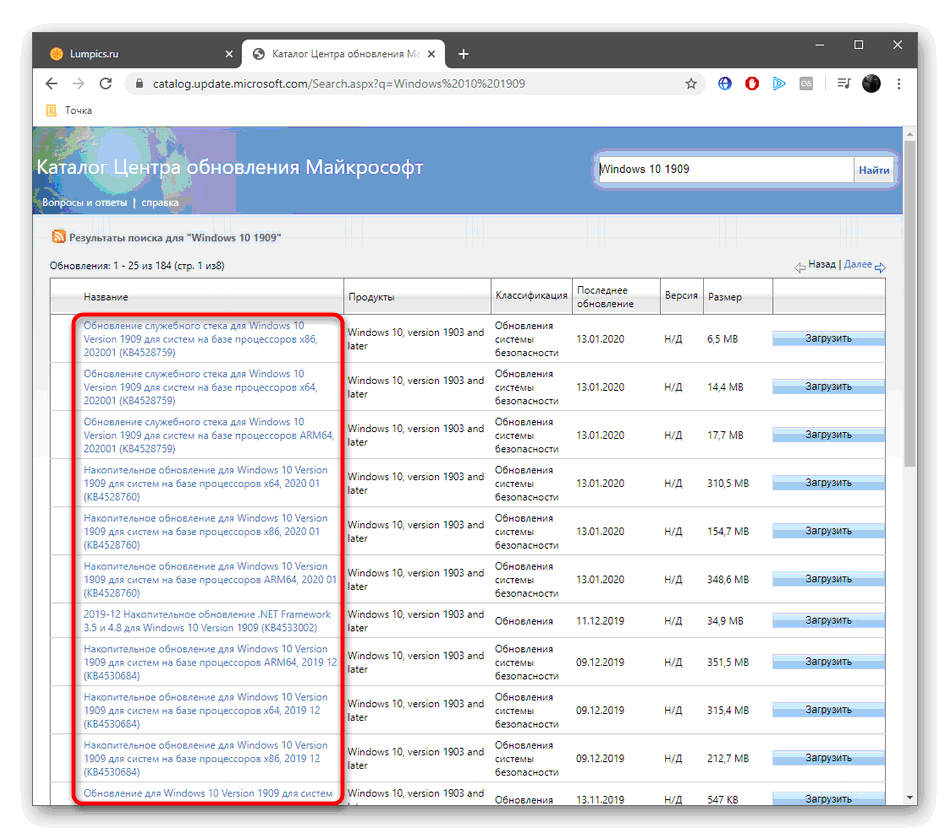
- В открывшемся окне тапнуть по ссылке, подтвердить скачивание.
- Дождаться полной загрузки, инсталлировать файлы ручным способом.
После выполнения всех этапов нужно перезагрузить устройство. Если ПК работает нормально, не зависает, значит, проблема устранена полностью.
Опция «Обновление на месте»
Отдельная утилита Update Assistant позволяет вернуть успешную загрузку обновлений, а также установить последнюю версию ОС Виндовс всего в несколько кликов.
Чтобы воспользоваться сервисом, нужно следовать инструкции:

- Нажать на пункт «Обновить сейчас».
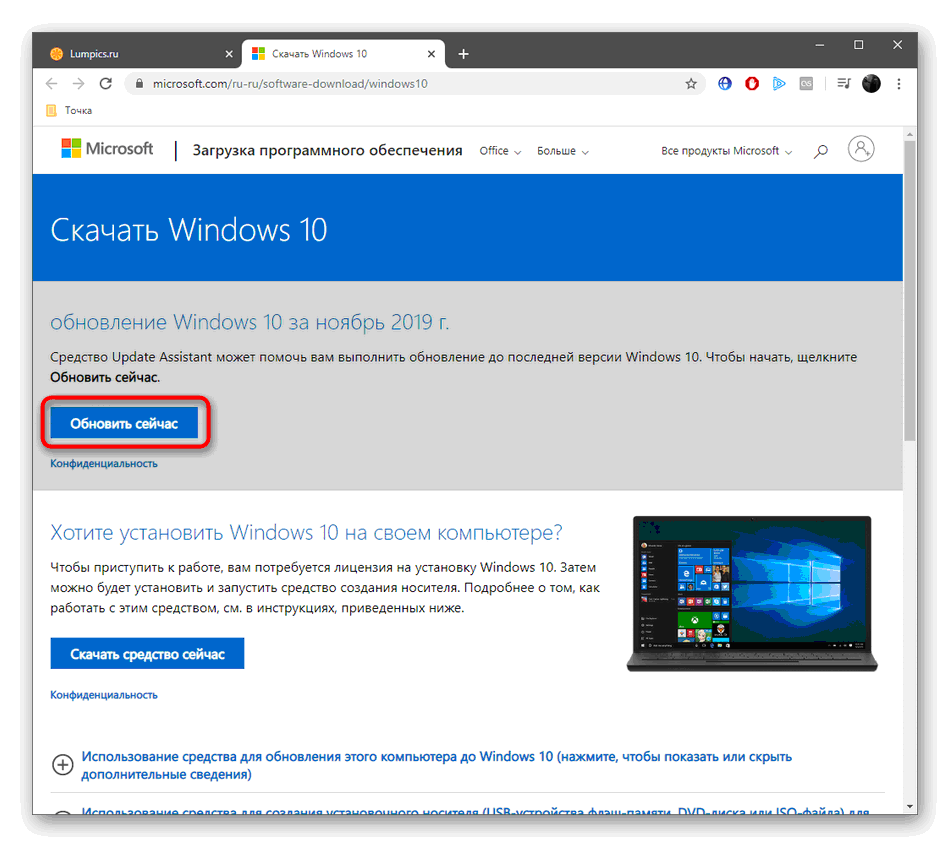
- Открыть файл после загрузки.
- Следовать инструкции.
- Перезапустить компьютер.
Проверка целостности и восстановление системных файлов
Если предыдущие методы не помогли исправить ситуацию, то остается воспользоваться утилитами SFC и DISM для восстановления поврежденных файлов. Нарушение их целостности могло быть связано с вирусами, поэтому речь здесь идет о восстановлении безопасности системы.
Устранить неполадку можно, выполнив следующее:
- Зайти в «Панель задач».
- Ввести запрос: cmd.
- Вызвать командную строку, нажать на пункт «Запуск от имени Администратора».
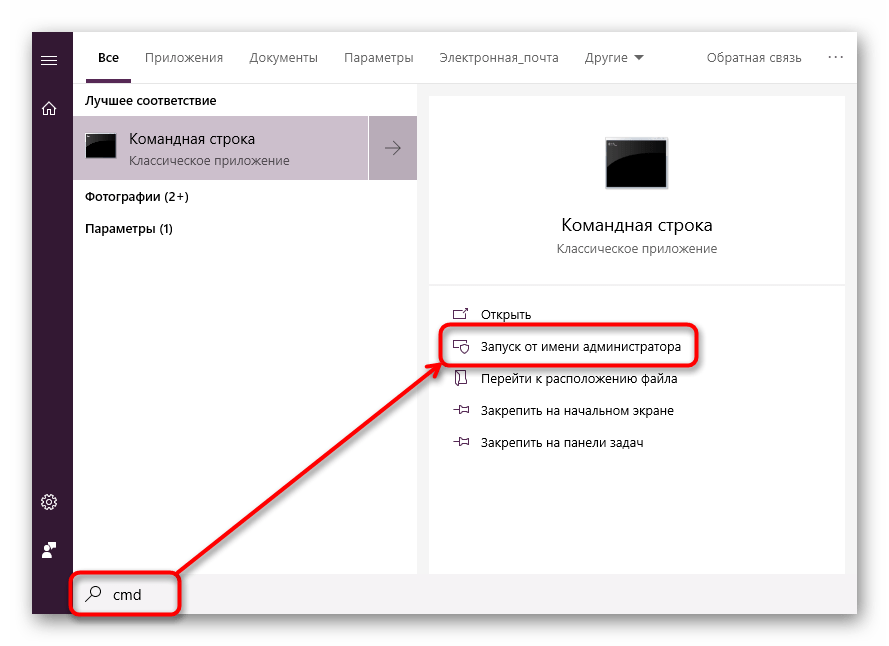
- Разрешить вносить изменения.
- Вставить запрос: DISM.exe /Online /Cleanup-image /Restorehealth.
- Дождаться завершения процесса поиска поврежденных файлов.

После выдачи результатов модуль представит отчет о выполненной работе. Пользователю останется перезагрузить гаджет, затем вновь запустить обновление.
При появлении ошибки при обновлении операционной системы юзер должен обратить внимание на код ошибки. Она служит основным ключом для устранения неполадок. Пользователь может настроить автоматическое устранение ошибок или выполнить процесс вручную.
Explore the expert-recommended methods to resolve the issue
by Vlad Turiceanu
Passionate about technology, Windows, and everything that has a power button, he spent most of his time developing new skills and learning more about the tech world. Coming… read more
Updated on December 30, 2022
Reviewed by
Alex Serban

After moving away from the corporate work-style, Alex has found rewards in a lifestyle of constant analysis, team coordination and pestering his colleagues. Holding an MCSA Windows Server… read more
- This common error might happen due to registry errors, incompatible hardware, or corrupted system files.
- This guide will discuss all possible reasons and the available fixes to eliminate this update error.
![Windows Update Error 0x80242016 [Solved] 5 Ways to Fix It](https://cdn.windowsreport.com/wp-content/uploads/2022/12/Windows-Update-Error-0x80242016-Solved-5-Ways-to-Fix-It.png)
XINSTALL BY CLICKING THE DOWNLOAD FILE
Fortect is a tool that does not simply cleans up your PC, but has a repository with several millions of Windows System files stored in their initial version. When your PC encounters a problem, Fortect will fix it for you, by replacing bad files with fresh versions. To fix your current PC issue, here are the steps you need to take:
- Download Fortect and install it on your PC.
- Start the tool’s scanning process to look for corrupt files that are the source of your problem
- Right-click on Start Repair so the tool could start the fixing algorythm
- Fortect has been downloaded by 0 readers this month.
If you fail to install 0x80242016, then you are not alone. Users often get such update errors while installing Windows updates on their computers. Luckily the issue can be fixed using simple methods.
This guide will walk you through the steps to fix the issue right after discussing the causes. Let’s get started!
What causes the failed to install 0x80242016 error?
There are a few reasons for the installation error to happen. Some of the popular ones are mentioned here:
- Wrong Registry values – If the values on your Registry Editor are corrupt, your computer might not work correctly. Hence you get an installation error when updating.
- Damaged system files – You can get this error if your system files are damaged or corrupt. To fix it, you need to run an SFC scan.
- Corrupt update component files – If the Windows update component is missing files or becomes corrupt, then it might trigger the error.
- Corrupted temp files – Whenever you install updates, some temporary files are created on your PC. If these files get damaged, then you might see the error.
- Computer infected with virus or malware – If your computer is infected with malware or virus, it might interfere with the update process, hence the issue.
- Not enough disk space – Before installing the update, you must check for sufficient hard disk space, as insufficient space could result in an error.
What can I do to fix Windows Update error 0x80242016?
Before engaging in advanced troubleshooting steps, you should consider performing the following checks:
- Remove all the peripherals except the essential ones.
- Disable Firewall.
- Ensure you have a stable internet connection.
- Check the date and time mentioned on the computer because an incorrect date and time can cause this issue.
1. Rename the Software Distribution folder & reset Windows Update components
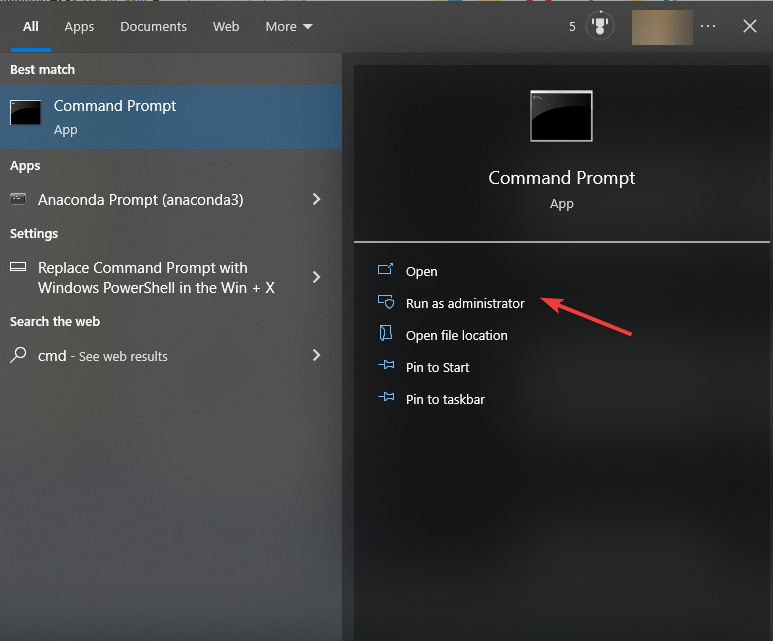
- Go to the Search bar, type CMD and click Run as administrator.
- Copy and paste the following command to stop the Windows Update service and press Enter. You might have to do it a couple of times to ensure it is not running:
taskkill /f /fi "SERVICES eq wuauserv" - Type the following commands one after the other and press Enter after each command:
net stop cryptSvcnet stop bitsnet stop appidsvcnet stop msiservernet stop wuauservren C:WindowsSoftwareDistribution SoftwareDistribution.oldrmdir C:WindowsSoftwareDistributionDataStorermdir C:WindowsSoftwareDistributionDownloadRen C:WindowsSystem32catroot2 Catroot2.oldnet start wuauservnet start cryptSvcnet start appidsvcnet start bitsnet start msiserver - Close the Command Prompt window and restart your PC when the process is complete.
2. Run Windows Update troubleshooter
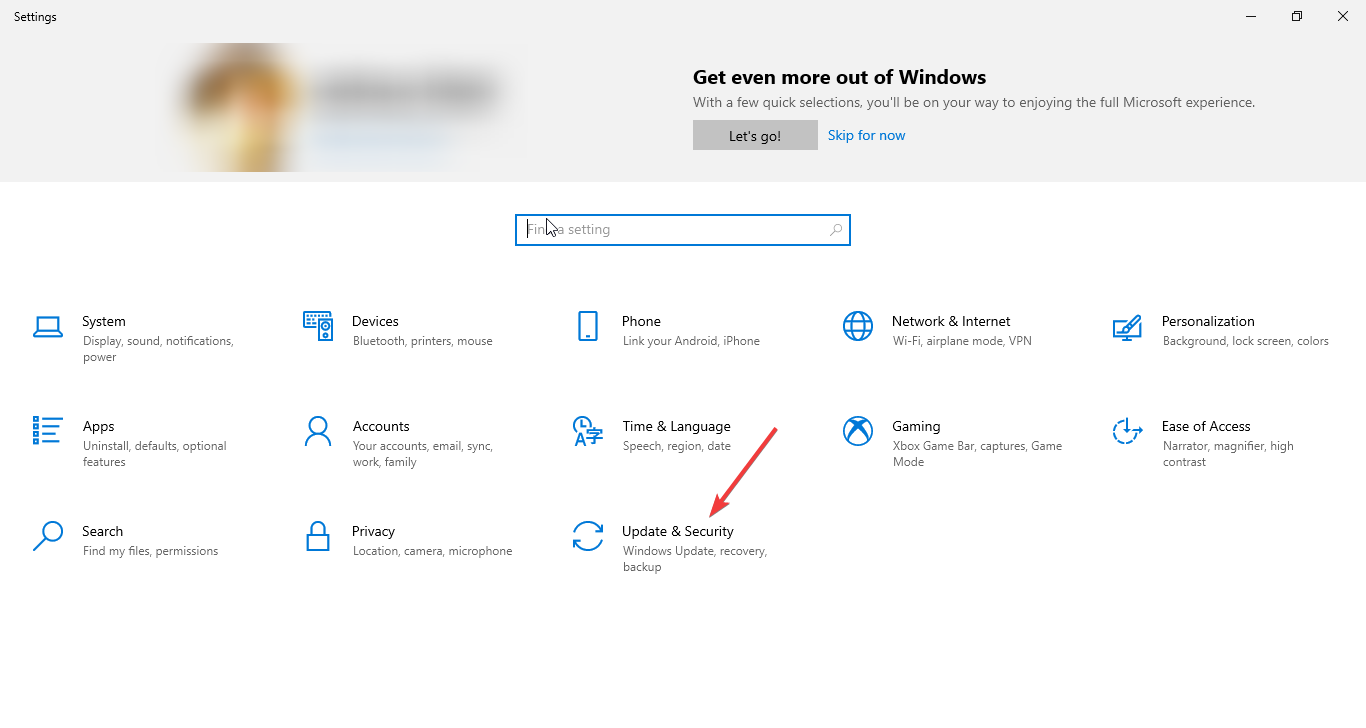
- Press Windows + I to open Settings.
- Go to Update & Security.
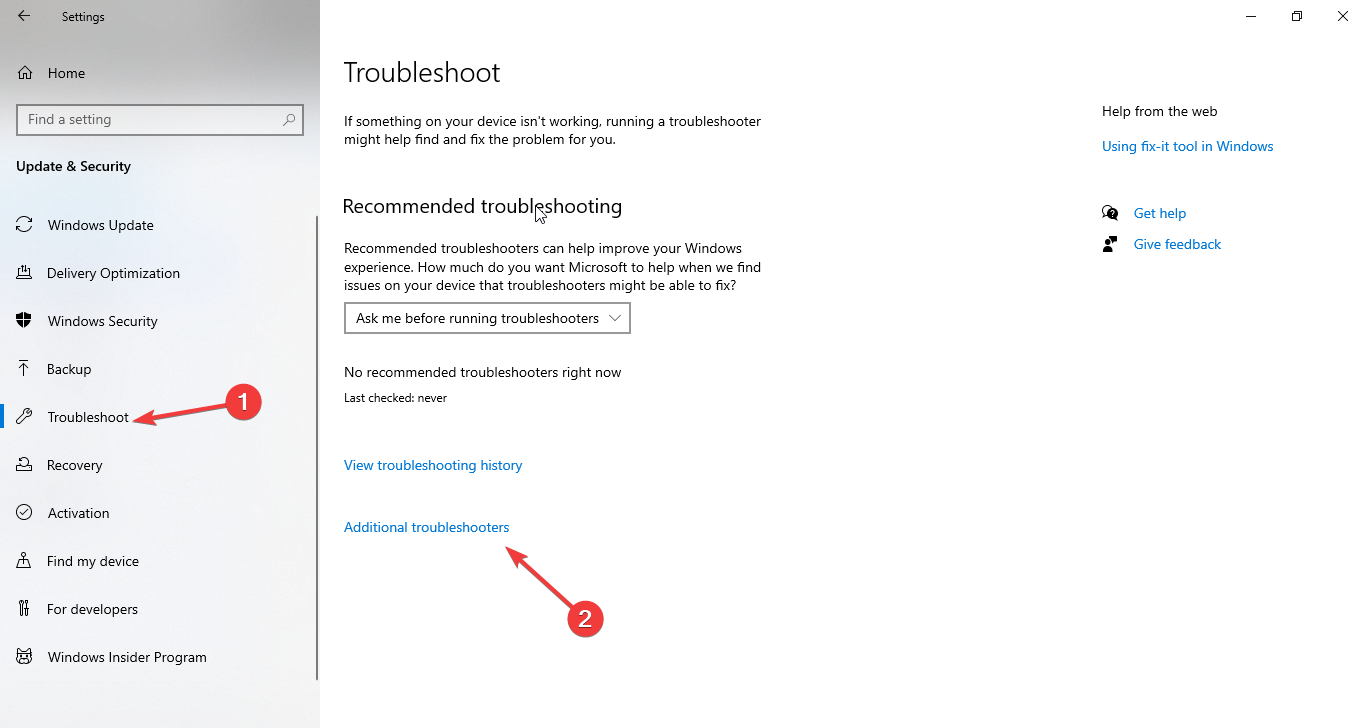
- Now go to Troubleshoot from the left pane, and click the Additional troubleshooters link.
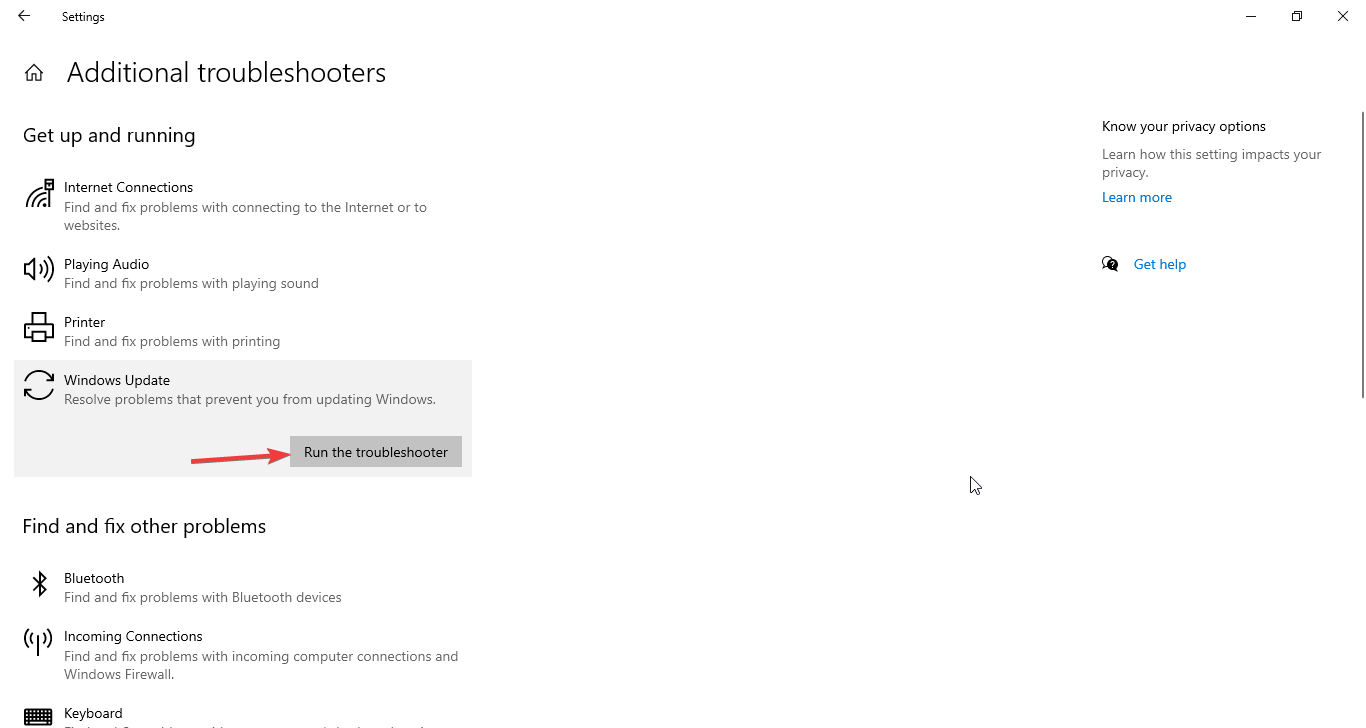
- On the next page, select Windows Update and click Run the troubleshooter button.
- Follow the on-screen instructions to complete the process.
- Make a Calendar in Google Sheets in Just 3 Easy Steps
- What is Mssecsvc.exe & How to Delete it
3. Run the SFC and DISM commands
- Open Command Prompt using the steps mentioned in Method 1.
- Type the following commands and press Enter after every command:
sfc/scannowdism /online /cleanup-image /scanhealthdism /online /cleanup-image /checkhealthdism /online /cleanup-image /restorehealth - Once complete, reboot your computer.
4. Disable the Windows Search service
- Press Windows + R to open the Run window.
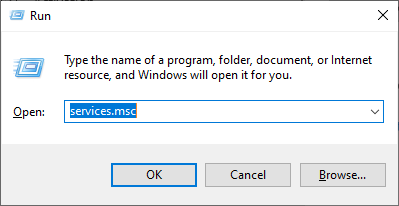
- Type services.msc and press Enter to open Services.
- Locate and double-click the Windows Search service.
- Select Startup type as Automatic.
- Click Apply and OK to confirm the changes.
5. Run Windows in a Clean boot environment
- Press Windows + R to open the Run window.
- Type msconfig and press Enter.
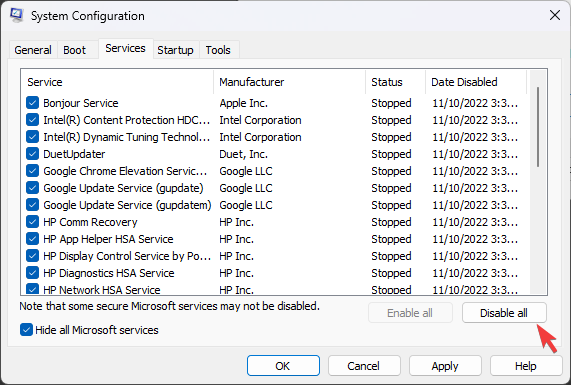
- On the System Configuration window, go to the Services tab, place a checkmark next to Hide all Microsoft services, then click Disable all.
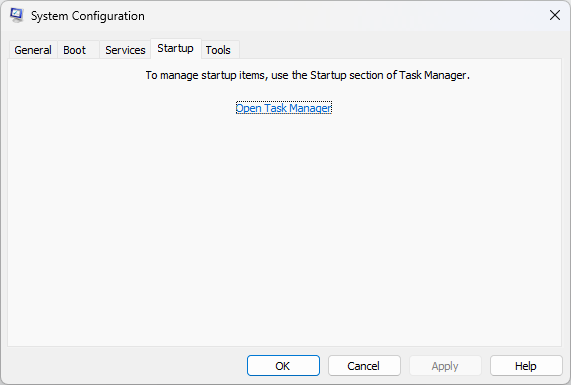
- Go to the Startup tab, and click Open in Task Manager.
- Right-click on all Enabled items one by one and select Disable.

- Click Apply and OK to confirm.
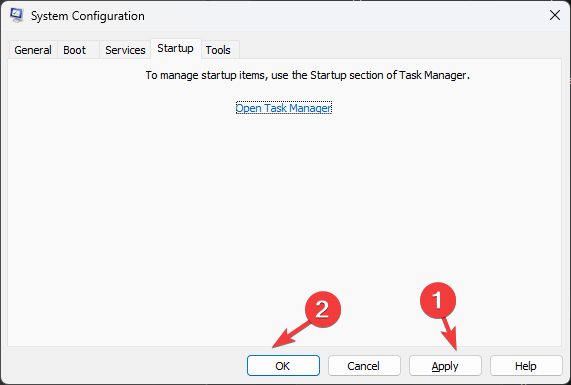
- Select Restart. Once restarted, try to install updates again.
So, these are methods that you can use to fix installation error code 0x80242016. If nothing has helped you, you must consider resetting Windows to resolve the issue.
If you have any questions or concerns about the process, feel free to let us know in the comments section below.
Still experiencing issues?
SPONSORED
If the above suggestions have not solved your problem, your computer may experience more severe Windows troubles. We suggest choosing an all-in-one solution like Fortect to fix problems efficiently. After installation, just click the View&Fix button and then press Start Repair.
![]()
Ошибка 0x80242016, возникающая во время обновления ОС Windows 10, встречается пользователям все чаще и чаще. Более того, даже новая версия ОС Майкрософт, Windows 11, по всей видимости, подвержена такой же проблеме. Тщательно ознакомившись с информацией в сети, мы пришли к выводу, что ошибка 0x80242016 может появляться по следующему ряду причин:
- Типичный баг в работе ОС Windows.
- Некоторые службы или компоненты Центра обновления работают некорректно.
- Повреждение временных файлов Центра обновления.
- Повреждение системных файлов, хранилища компонентов и образа Windows.
- Баг в работе системного поисковика Windows.
Уже стало страшно? Нет нужды паниковать! 0x80242016 — довольно распространенная ошибка Центра обновления Windows, которая решается набором давно известных методов. В сегодняшней статье мы посмотрим с вами как раз на эти самые методы.
Содержание
- Метод №1 Средство устранения неполадок
- Метод №2 Перезапуск служб Центра обновления
- Метод №3 Сброс компонентов Центра обновления Windows
- Метод №4 Запуск SFC и DISM
- Метод №5 Коррекция параметров поисковой системы
Метод №1 Средство устранения неполадок
Прежде чем пытаться делать что-то «сложное», давайте попробуем воспользоваться с вами средством устранения неполадок, которое уже встроено в Windows 10. Данное средство не гарантирует решения проблем, однако в некоторых случаях оно действительно помогает пользователям.
Чтобы запустить средство устранения неполадок Центра обновления, вам нужно сделать следующее:
- нажмите ПКМ на меню Пуск и выберите пункт «Параметры»;
- перейдите в раздел «Обновление и безопасность», затем — в подраздел «Устранение неполадок»;
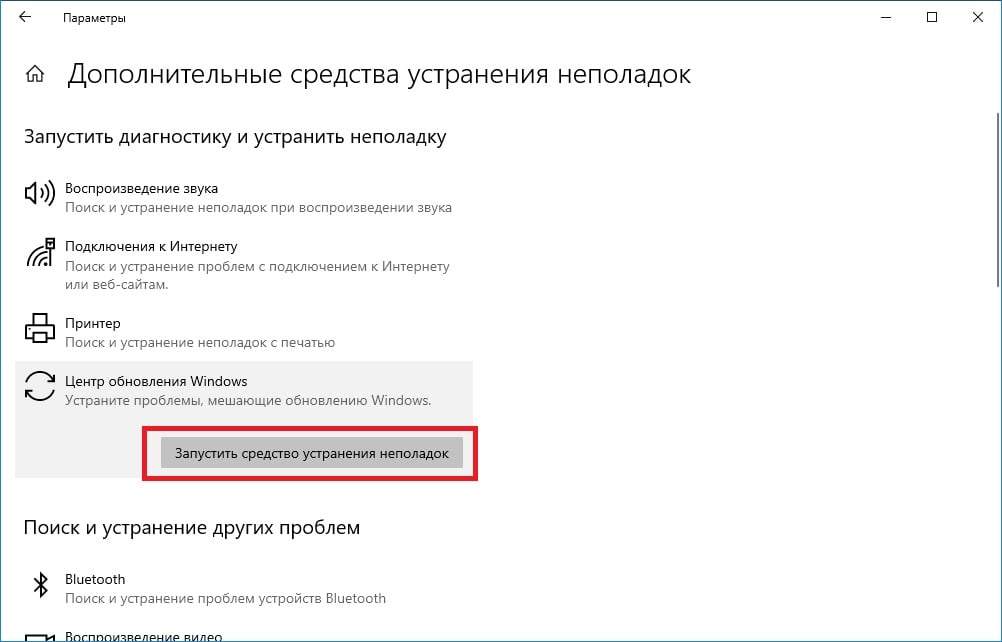
- опуститесь в самый низ окошка и кликните на пункт «Дополнительные средства устранения неполадок»;
- найдите в списке средств «Центр обновления Windows» и выберите его ЛКМ;
- кликните на кнопку «Запустить средство устранения неполадок»;
- следуйте инструкциям на экране, чтобы устранить потенциальные проблемы с обновлением в своей системе.
Как только закончите, закройте все окна, перезагрузите компьютер и проверьте наличие ошибки 0x80242016.
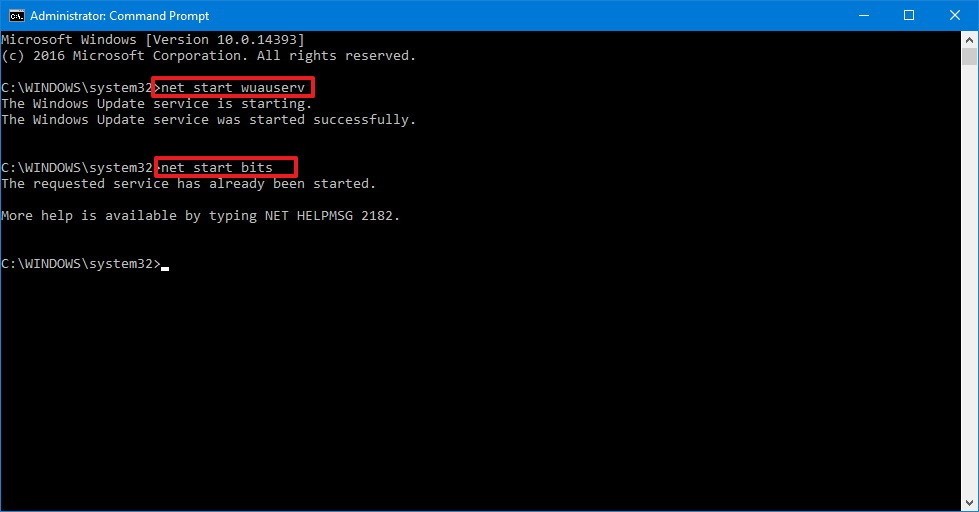
Метод №2 Перезапуск служб Центра обновления
Некоторые службы Центра обновления могут по той или иной причине прекратить свою работу. В таком случае пользователю необходимо запустить службы вручную, воспользовавшись Командной строкой (от администратора, разумеется) либо системным компонентом «Службы». К Центру обновления относятся следующие службы:
- Фоновая интеллектуальная служба передачи (BITS)
- Службы криптографии
- Центр обновления Windows
- Установщик модулей Windows
Чтобы запустить службу, вам нужно сделать на своем ПК следующее:
- нажмите на клавиатуре WIN+R, чтобы открыть диалоговое окошко «Выполнить»;
- пропишите в пустой строке значение «CMD» и нажмите комбинацию CTRL+SHIFT+ENTER;
- открыв консоль, выполните в ней ряд следующих команд:
- SC config wuauserv start=auto
- SC config bits start=auto
- SC config cryptsvc start=auto
- SC config trustedinstaller start=auto
- завершив ввод команд, закройте Командную строку и перезагрузите компьютер.
Заполучив контроль над системой, откройте Центр обновления и проверьте наличие ошибки 0x80242016.
Проблемы с Центром обновлениям могут возникать по причине повреждения одного или нескольких компонентов последнего. Дабы устранить полученные повреждения, необходимо провести так называемый «сброс компонентов». Данная операция выполняется как в ручном, так и в автоматическом режиме. Мы рассмотрим оба варианта.
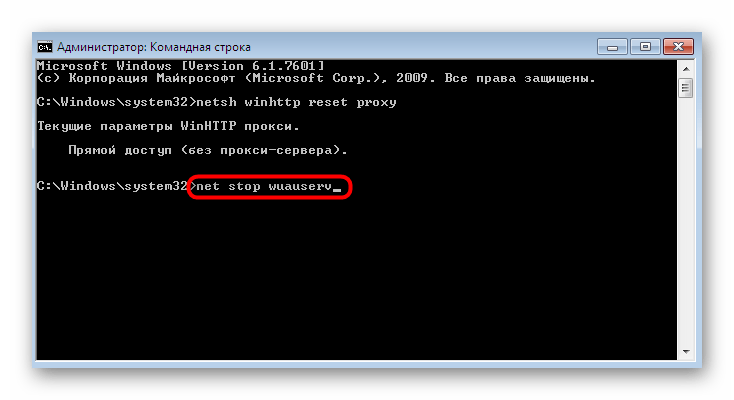
Ручной сброс компонентов Центра обновления
Сброс компонентов Центра обновления вручную происходит через ввод множества команд в Командной строке. Разумеется, Командная строка запускается, само собой, от имени администратора.
- Нажмите комбинацию WIN+R, чтобы вызвать окошко «Выполнить»;
- вставьте в пустую строку «CMD» и нажмите комбинацию CTRL+SHIFT+ENTER;
- вызвать консоль, выполните в ней следующий набор команд:
- net stop bits
- net stop wuauserv
- net stop cryptsvc
- Del “%ALLUSERSPROFILE%Application DataMicrosoftNetworkDownloaderqmgr*.dat”
- Ren %Systemroot%SoftwareDistributionDataStore DataStore.bak
- Ren %Systemroot%SoftwareDistributionDownload Download.bak
- Ren %Systemroot%System32catroot2 catroot2.bak
- sc.exe sdset bits D:(A;;CCLCSWRPWPDTLOCRRC;;;SY)(A;;CCDCLCSWRPWPDTLOCRSDRCWDWO;;;BA)(A;;CCLCSWLOCRRC;;;AU)(A;;CCLCSWRPWPDTLOCRRC;;;PU)
- sc.exe sdset wuauserv D:(A;;CCLCSWRPWPDTLOCRRC;;;SY)(A;;CCDCLCSWRPWPDTLOCRSDRCWDWO;;;BA)(A;;CCLCSWLOCRRC;;;AU)(A;;CCLCSWRPWPDTLOCRRC;;;PU)
- cd /d %windir%system32
- regsvr32.exe atl.dll
- regsvr32.exe urlmon.dll
- regsvr32.exe mshtml.dll
- regsvr32.exe shdocvw.dll
- regsvr32.exe browseui.dll
- regsvr32.exe jscript.dll
- regsvr32.exe vbscript.dll
- regsvr32.exe scrrun.dll
- regsvr32.exe msxml.dll
- regsvr32.exe msxml3.dll
- regsvr32.exe msxml6.dll
- regsvr32.exe actxprxy.dll
- regsvr32.exe softpub.dll
- regsvr32.exe wintrust.dll
- regsvr32.exe dssenh.dll
- regsvr32.exe rsaenh.dll
- regsvr32.exe gpkcsp.dll
- regsvr32.exe sccbase.dll
- regsvr32.exe slbcsp.dll
- regsvr32.exe cryptdlg.dll
- regsvr32.exe oleaut32.dll
- regsvr32.exe ole32.dll
- regsvr32.exe shell32.dll
- regsvr32.exe initpki.dll
- regsvr32.exe wuapi.dll
- regsvr32.exe wuaueng.dll
- regsvr32.exe wuaueng1.dll
- regsvr32.exe wucltui.dll
- regsvr32.exe wups.dll
- regsvr32.exe wups2.dll
- regsvr32.exe wuweb.dll
- regsvr32.exe qmgr.dll
- regsvr32.exe qmgrprxy.dll
- regsvr32.exe wucltux.dll
- regsvr32.exe muweb.dll
- regsvr32.exe wuwebv.dll
- netsh winsock reset
- net start bits
- net start wuauserv
- net start cryptsvc
- закройте Командную строку и перезагрузите ПК.
Ни в коем случае не меняйте символы в командах, иначе они попросту не сработают. Кроме того, не нужно выполнять команды в случайном порядке, а только в том, в котором они указаны выше.
Автоматический сброс компонентов Центра обновления
В данном варианте вам практически не придется работать: создать текстовый файл, вставить в него скрипт от одного из Интернет-умельцев, переделать текстовик в BAT-файл и выполнить его от имени администратора. Звучит как что-то сложное, но все совсем не так — и сейчас мы это вам докажем.
- Нажмите ПКМ на Рабочий стол и выберите пункты «Создать→Текстовый документ»;
- откройте только что созданный текстовик и вставьте в него следующий скрипт:
:: Run the reset Windows Update components.
:: void components();
:: /*************************************************************************************/
:components
:: —— Stopping the Windows Update services ——
call :print Stopping the Windows Update services.
net stop bitscall :print Stopping the Windows Update services.
net stop wuauservcall :print Stopping the Windows Update services.
net stop appidsvccall :print Stopping the Windows Update services.
net stop cryptsvccall :print Canceling the Windows Update process.
taskkill /im wuauclt.exe /f
:: —— Checking the services status ——
call :print Checking the services status.sc query bits | findstr /I /C:»STOPPED»
if %errorlevel% NEQ 0 (
echo. Failed to stop the BITS service.
echo.
echo.Press any key to continue . . .
pause>nul
goto :eof
)call :print Checking the services status.sc query wuauserv | findstr /I /C:»STOPPED»
if %errorlevel% NEQ 0 (
echo. Failed to stop the Windows Update service.
echo.
echo.Press any key to continue . . .
pause>nul
goto :eof
)call :print Checking the services status.
sc query appidsvc | findstr /I /C:»STOPPED»
if %errorlevel% NEQ 0 (
sc query appidsvc | findstr /I /C:»OpenService FAILED 1060″
if %errorlevel% NEQ 0 (
echo. Failed to stop the Application Identity service.
echo.
echo.Press any key to continue . . .
pause>nul
if %family% NEQ 6 goto :eof
)
)call :print Checking the services status.
sc query cryptsvc | findstr /I /C:»STOPPED»
if %errorlevel% NEQ 0 (
echo. Failed to stop the Cryptographic Services service.
echo.
echo.Press any key to continue . . .
pause>nul
goto :eof
):: —— Delete the qmgr*.dat files ——
call :print Deleting the qmgr*.dat files.del /s /q /f «%ALLUSERSPROFILE%Application DataMicrosoftNetworkDownloaderqmgr*.dat»
del /s /q /f «%ALLUSERSPROFILE%MicrosoftNetworkDownloaderqmgr*.dat»:: —— Renaming the softare distribution folders backup copies ——
call :print Deleting the old software distribution backup copies.cd /d %SYSTEMROOT%
if exist «%SYSTEMROOT%winsxspending.xml.bak» (
del /s /q /f «%SYSTEMROOT%winsxspending.xml.bak»
)
if exist «%SYSTEMROOT%SoftwareDistribution.bak» (
rmdir /s /q «%SYSTEMROOT%SoftwareDistribution.bak»
)
if exist «%SYSTEMROOT%system32Catroot2.bak» (
rmdir /s /q «%SYSTEMROOT%system32Catroot2.bak»
)
if exist «%SYSTEMROOT%WindowsUpdate.log.bak» (
del /s /q /f «%SYSTEMROOT%WindowsUpdate.log.bak»
)call :print Renaming the software distribution folders.
if exist «%SYSTEMROOT%winsxspending.xml» (
takeown /f «%SYSTEMROOT%winsxspending.xml»
attrib -r -s -h /s /d «%SYSTEMROOT%winsxspending.xml»
ren «%SYSTEMROOT%winsxspending.xml» pending.xml.bak
)
if exist «%SYSTEMROOT%SoftwareDistribution» (
attrib -r -s -h /s /d «%SYSTEMROOT%SoftwareDistribution»
ren «%SYSTEMROOT%SoftwareDistribution» SoftwareDistribution.bak
if exist «%SYSTEMROOT%SoftwareDistribution» (
echo.
echo. Failed to rename the SoftwareDistribution folder.
echo.
echo.Press any key to continue . . .
pause>nul
goto :eof
)
)
if exist «%SYSTEMROOT%system32Catroot2» (
attrib -r -s -h /s /d «%SYSTEMROOT%system32Catroot2»
ren «%SYSTEMROOT%system32Catroot2» Catroot2.bak
)
if exist «%SYSTEMROOT%WindowsUpdate.log» (
attrib -r -s -h /s /d «%SYSTEMROOT%WindowsUpdate.log»
ren «%SYSTEMROOT%WindowsUpdate.log» WindowsUpdate.log.bak
):: —— Reset the BITS service and the Windows Update service to the default security descriptor ——
call :print Reset the BITS service and the Windows Update service to the default security descriptor.sc.exe sdset wuauserv D:(A;;CCLCSWLOCRRC;;;AU)(A;;CCDCLCSWRPWPDTLOCRSDRCWDWO;;;BA)(A;;CCDCLCSWRPWPDTLCRSDRCWDWO;;;SO)(A;;CCLCSWRPWPDTLOCRRC;;;SY)S:(AU;FA;CCDCLCSWRPWPDTLOCRSDRCWDWO;;WD)
sc.exe sdset bits D:(A;;CCLCSWLOCRRC;;;AU)(A;;CCDCLCSWRPWPDTLOCRSDRCWDWO;;;BA)(A;;CCDCLCSWRPWPDTLCRSDRCWDWO;;;SO)(A;;CCLCSWRPWPDTLOCRRC;;;SY)S:(AU;FA;CCDCLCSWRPWPDTLOCRSDRCWDWO;;WD)
sc.exe sdset cryptsvc D:(A;;CCLCSWLOCRRC;;;AU)(A;;CCDCLCSWRPWPDTLOCRSDRCWDWO;;;BA)(A;;CCDCLCSWRPWPDTLCRSDRCWDWO;;;SO)(A;;CCLCSWRPWPDTLOCRRC;;;SY)S:(AU;FA;CCDCLCSWRPWPDTLOCRSDRCWDWO;;WD)
sc.exe sdset trustedinstaller D:(A;;CCLCSWLOCRRC;;;AU)(A;;CCDCLCSWRPWPDTLOCRSDRCWDWO;;;BA)(A;;CCDCLCSWRPWPDTLCRSDRCWDWO;;;SO)(A;;CCLCSWRPWPDTLOCRRC;;;SY)S:(AU;FA;CCDCLCSWRPWPDTLOCRSDRCWDWO;;WD):: —— Reregister the BITS files and the Windows Update files ——
call :print Reregister the BITS files and the Windows Update files.cd /d %SYSTEMROOT%system32
regsvr32.exe /s atl.dll
regsvr32.exe /s urlmon.dll
regsvr32.exe /s mshtml.dll
regsvr32.exe /s shdocvw.dll
regsvr32.exe /s browseui.dll
regsvr32.exe /s jscript.dll
regsvr32.exe /s vbscript.dll
regsvr32.exe /s scrrun.dll
regsvr32.exe /s msxml.dll
regsvr32.exe /s msxml3.dll
regsvr32.exe /s msxml6.dll
regsvr32.exe /s actxprxy.dll
regsvr32.exe /s softpub.dll
regsvr32.exe /s wintrust.dll
regsvr32.exe /s dssenh.dll
regsvr32.exe /s rsaenh.dll
regsvr32.exe /s gpkcsp.dll
regsvr32.exe /s sccbase.dll
regsvr32.exe /s slbcsp.dll
regsvr32.exe /s cryptdlg.dll
regsvr32.exe /s oleaut32.dll
regsvr32.exe /s ole32.dll
regsvr32.exe /s shell32.dll
regsvr32.exe /s initpki.dll
regsvr32.exe /s wuapi.dll
regsvr32.exe /s wuaueng.dll
regsvr32.exe /s wuaueng1.dll
regsvr32.exe /s wucltui.dll
regsvr32.exe /s wups.dll
regsvr32.exe /s wups2.dll
regsvr32.exe /s wuweb.dll
regsvr32.exe /s qmgr.dll
regsvr32.exe /s qmgrprxy.dll
regsvr32.exe /s wucltux.dll
regsvr32.exe /s muweb.dll
regsvr32.exe /s wuwebv.dll:: —— Resetting Winsock ——
call :print Resetting Winsock.
netsh winsock reset:: —— Resetting WinHTTP Proxy ——
call :print Resetting WinHTTP Proxy.if %family% EQU 5 (
proxycfg.exe -d
) else (
netsh winhttp reset proxy
):: —— Set the startup type as automatic ——
call :print Resetting the services as automatics.
sc.exe config wuauserv start= auto
sc.exe config bits start= delayed-auto
sc.exe config cryptsvc start= auto
sc.exe config TrustedInstaller start= demand
sc.exe config DcomLaunch start= auto:: —— Starting the Windows Update services ——
call :print Starting the Windows Update services.
net start bitscall :print Starting the Windows Update services.
net start wuauservcall :print Starting the Windows Update services.
net start appidsvccall :print Starting the Windows Update services.
net start cryptsvccall :print Starting the Windows Update services.
net start DcomLaunch:: —— End process ——
call :print The operation completed successfully.echo.Press any key to continue . . .
pause>nul
goto :eof
:: /*************************************************************************************/
- пробежитесь глазами по скрипту и убедитесь, что ничего в нем не было нарушено;
- нажмите на кнопку «Файл» в строке меню окна Блокнота и выберите пункт «Сохранить как…»;
- назовите файл «UpdSerReset» и измените его расширение с «.txt» на «.bat»;
Заметка: если вы не видите расширений файлов, то вам необходимо активировать опцию «Расширения имен файлов» в параметрах Проводника Windows (вкладка «Вид»).
- выберите в качестве расположения свой Рабочий стол и нажмите на кнопку «Сохранить»;
- кликните на файл «UpdSerReset.bat» ПКМ и выберите пункт «Запуск от имени администратора»;
- подождите несколько секунд, после чего нажмите на любую кнопку, когда в Командной строке появится соответствующее сообщение;
- перезагрузите компьютер.
Описанный выше процесс должен исправить ошибку 0x80242016, если она была вызвана повреждениями компонентов Центра обновления. Если же ничего не изменилось, то давайте двигаться дальше.
Метод №4 Запуск SFC и DISM
Ошибка 0x80242016 может возникнуть в процессе обновления из-за поврежденных системных файлов, хранилища компонентов или образа Windows 10 в целом. Так или иначе проблема довольно серьезная, однако ее можно исправить, задействовав такие утилиты, как SFC и DISM.
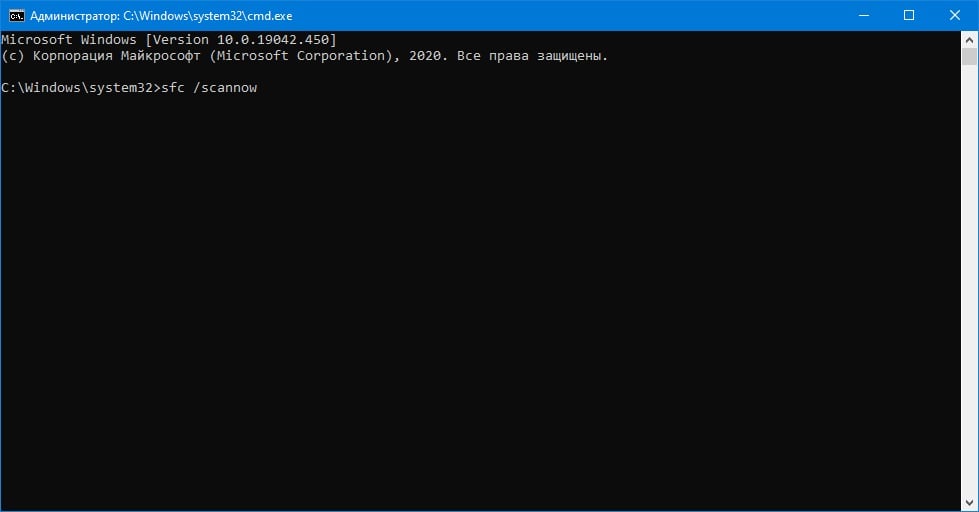
- Откройте Командную строку от имени администратора, как это было показано во втором методе;
- вставьте в консоль команду «sfc /scannow» (без кавычек) и нажмите ENTER;
- подождите окончания выполнения команды и ознакомьтесь с результатами работы SFC;
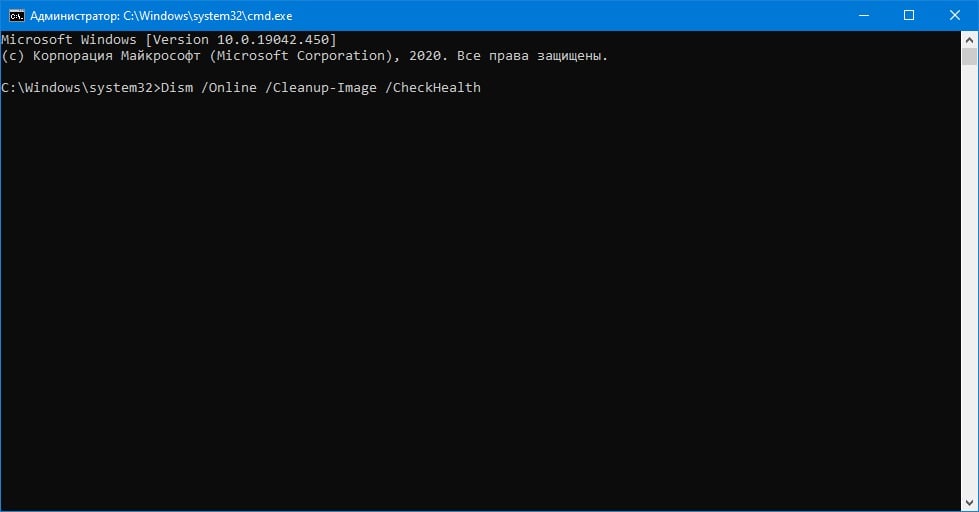
- перезагрузите компьютер и снова вызовите Командную строку;
- поочередно выполните следующий набор команд:
- DISM /Online /Cleanup-Image /CheckHealth
- DISM /Online /Cleanup-Image /ScanHealth
- DISM /Online /Cleanup-Image /RestoreHealth
- ознакомьтесь с результатами работы DISM и перезагрузите ПК еще раз.
Вы практически наверняка избавитесь от ошибки 0x80242016 после использования SFC и DISM, если обе утилиты нашли в ОС Windows 10 какие-то повреждения и устранили их.
Метод №5 Коррекция параметров поисковой системы
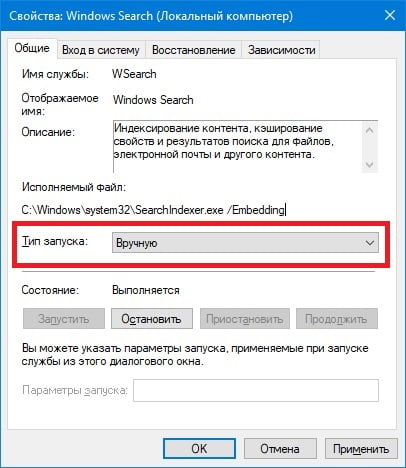
Пользователи инсайдерских превью-билдов Windows 10 утверждают, что им удалось избавиться от ошибки 0x80242016, внеся некоторые изменения в параметры службы «Windows Search». Данная служба отвечает за индексирование контента, кэширование свойств и результатов поиска для файлов, электронной почты и другого контента в операционной системе. На вашем ПК установлена такая же версия Windows? Тогда попробуйте сделать следующее:
- нажмите на клавиатуре WIN+R для вызова окошка «Выполнить»;
- вставьте в пустую строку окна значение «services.msc» и нажмите ENTER;
- найдите в списке службу «Windows Search» и дважды кликните на нее ЛКМ;
- выберите в типе запуска службы значение «Вручную»;
- нажмите на кнопки «Применить» и «OK»;
- перезагрузите свой ПК.
Зайдите в Центр обновления Windows 10 и проверьте наличие ошибки 0x80242016.
К сожалению, если никакие из вышеуказанных методов не помогли вам с ошибкой 0x80242016, то вы практически наверняка имеете дело с серьезными повреждениями ОС, которые не решаются обычными способами. В таком случае вам придется либо возвращать ПК в исходное состояние (запускается через Параметры), либо полностью переустанавливать Windows.
If you are trying to update your Windows and get the error’ 0x80242016, failed to update Windows’, read this article for tips, tricks, and instructions to fix it.

Windows is known for its many quirks and errors; one of the most common ones is error 0x80242016. This error usually pops up when you’re trying to install a new update, which can be highly frustrating.
If you see the error code 0x80242016 when trying to install updates on your Windows 10 or Windows 11 computer, it means that the update installation has failed.
This error can occur for a number of reasons, including incorrect registry values, corrupted system files, or incompatible hardware. This article will show you how to fix the «0x80242016 – failed to install» error.
If you are trying to install a program on your Windows computer and getting the error code ‘0x80242016’, don’t worry. You can fix this issue pretty easily. In this article, we will show you how to do that. Just follow the instructions given below, and you should be good to go.
Table of Contents
- What Is Error Code 0x80242016 in Windows?
- What Causes 0x80242016 – Failed to Install?
- How to Fix Error 0x80242016 – Failed to Install
- Method 1. Try To Install the Update in Clean Boot Mode
- Method 2. Run the Windows Update Troubleshooter
- Method 3. Run the System File Checker (SFC Scan)
- Method 4. Run the DISM Command
- Method 5. Reset Windows Update Components
- Method 6. Temporarily Disable Your Antivirus
- Method 7. Disable Proxy Connection
- Method 8. Start the Required Windows Services
- Method 9. Download and Install Windows Updates Manually
- TL;DR
- Conclusion
What Is Error Code 0x80242016 in Windows?
If you’re seeing this error, the state of your update after the post-reboot operation is unexpected, according to Windows Update error 0x80242016. The error logs may contain the message WU_E_UH_POSTREBOOTUNEXPECTEDSTATE.
Users who receive this error code may miss essential updates such as bug fixes and other enhancements. It is critical to keep your system up to date to avoid potential security concerns and take advantage of new features.
As a result, it’s critical to remove this error code and successfully install fresh Windows updates. This post is for you if you are experiencing the same issue code and cannot resolve it.
What Causes 0x80242016 – Failed to Install?
There are a number of potential causes for the 0x80242016 error, including:
- Incorrect Registry Values: The Windows Registry is a database that stores information about the configuration of your computer. Sometimes, the values in the registry can become corrupted, which can cause problems with installing updates.
- Corrupted System Files: If any of the system files on your computer are corrupt, it can cause problems with installing updates.
- Incompatible Hardware: In some cases, the hardware on your computer may be incompatible with the update you’re trying to install.
- Proxy: If you’re using a proxy server to connect to the Internet, it can sometimes cause problems with installing updates.
- Third-party antivirus: In some cases, third-party antivirus software can interfere with the installation of updates.
- Temporary Files: When installing updates, temporary files are created on your computer. If these files become corrupt, it can cause problems with the update process.
These are only some of the potential causes for the 0x80242016 error. In order to fix this error, you’ll need to troubleshoot each of these potential causes to determine which one is causing the problem on your computer.
How to Fix Error 0x80242016 – Failed to Install
If you see the 0x80242016 error, there are a few potential fixes you can try.
Summary: How to fix Windows Update Error 0x80242016
- Install the update in clean boot
- Run Windows Update troubleshooter.
- Run DISM and SFC scans.
- Reset Windows Update components.
- Temporarily Disable third-party antivirus.
- Disable your Proxy connection.
- Restart relevant Windows services.
- Download and install updates manually.
Let’s discuss these in detail below:
Method 1. Try To Install the Update in Clean Boot Mode
The first thing you can try is to install the update in clean boot mode. This will disable all non-essential programs and services on your computer, which can help to fix the problem.
To enter clean boot mode, follow these steps:
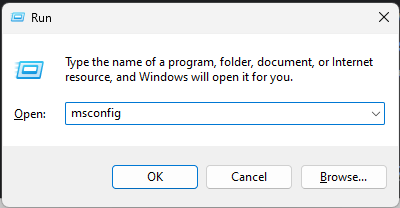
- Press the Windows key + R keys on your keyboard to bring up the Run utility in a new window.
- Type in «msconfig» without quotation marks and press the Enter key on your keyboard. This will launch the System Configuration window.

- Switch over to the Services tab. Make sure that you check the Hide all Microsoft services box. This is going to ensure that you only see third-party services.

- After hiding all system services, click the Disable all button to disable every third-party service on your device.

- Click the Apply button and restart your PC. When you boot next, your system will only initiate essential services.
- Restart your computer. You’ll be in a clean boot state with only official Microsoft services running. See if you’re able to update Windows after making this change.
Method 2. Run the Windows Update Troubleshooter
If you’re still seeing the 0x80242016 error, the next thing you can try is to run the Windows Update troubleshooter. This can help to fix problems with installing updates.
To run the troubleshooter, follow these steps:
- Open the Search bar in your taskbar by clicking on the magnifying glass icon. You can also bring it up with the Windows + S keyboard shortcut.
- Type Control Panel in the search box. When you see it in the results, click on it to launch the application.

- Search for Troubleshoot using the input field on the top right, and then click on the Troubleshooting header from the search results.

- Click on the View all link in the left-side pane. This is going to take you to a new page with every available troubleshooter displayed.

- Scroll down and locate the Windows Update troubleshooter. Click on it once, and then wait for the troubleshooter to launch in a different window.

- Click Next to begin the Windows Update problem analysis. If the troubleshooter can diagnose any problem, it will attempt to fix the issue. You can see a full report at the end of the troubleshooting process.

Method 3. Run the System File Checker (SFC Scan)
If you’re still seeing the 0x80242016 error, the next thing you can try is to run the System File Checker (SFC scan). This will scan your system for corrupted files and replace them if necessary.
To run the SFC scan, follow these steps:
- Open the search bar in your taskbar by clicking on the magnifying glass icon. Press Windows + S on your keyboard as a shortcut.
- Type Command Prompt in the search box. When you see it in the results, right-click on it and choose Run as Administrator. If you’re using a local account that doesn’t have administrator permissions, click here to learn how to grant admin access.

- When the User Account Control prompt (UAC) shows up, click Yes to allow the app to launch with administrative permissions.
- Type in the following command and press Enter to execute it: sfc /scannow

- Wait for the System File Checker to finish scanning your computer. In the case of a discrepancy, the utility will restore system files and fix all errors related to them.
Method 4. Run the DISM Command
If you’re still seeing the 0x80242016 error, you can try to run the DISM command. This will fix any problems with your Windows Update component store.
To run the DISM command, follow these steps:
- Open the search bar in your taskbar by clicking on the magnifying glass icon. You can also bring it up with the Windows + S keyboard shortcut.
- Type Command Prompt in the search box. When you see it in the results, right-click on it and choose Run as Administrator.
- When prompted by the User Account Control (UAC), click Yes to allow the app to launch with administrative permissions.
- Type in the following command and press Enter to execute it: DISM.exe /Online /Cleanup-image /Restorehealth

After you execute the command, wait for the process to finish. Upon completion, close the Command Prompt window and restart your device to see if the 0x80242016 error code has been fixed.
Method 5. Reset Windows Update Components
Another way to fix this error is to reset the Windows Update components. This will clear the download cache and fix any problems with the update component store.
To reset Windows Update components, follow these steps:
- Open the Search bar in your taskbar by clicking on the magnifying glass icon. You can also bring it up with the Windows + S keyboard shortcut.
- Type Command Prompt in the search box. When you see it in the results, right-click on it and choose Run as Administrator.
- First, you need to stop 4 services that may be running on your device. To do this, input the commands below in the following order, pressing the Enter key on your keyboard after each line:
- net stop wuauserv
- net stop cryptSvc
- net stop bits
- net stop msiserver

- After this, you need to rename 2 system folders. Renaming them creates a backup in case something goes wrong during the new folder generation. Similarly to the previous step, press Enter after inputting these commands:
- ren C:WindowsSoftwareDistribution SoftwareDistribution.old
- ren C:WindowsSystem32catroot2 catroot2.old

- The last step is restarting all the services you turned off previously. This can be done from the Command Prompt as well, just press Enter after each command:
- net start wuauserv
- net start cryptSvc
- net start bits
- net start msiserver
- Close the Command Prompt interface and try to run a Windows Update. You may need to restart your computer for the changes to apply.
Method 6. Temporarily Disable Your Antivirus
Some users have reported that they were able to fix the 0x80242016 error by temporarily disabling their antivirus software. Once you’ve disabled your antivirus, try to install the update again. If it works, you can add an exception for Windows Update in your antivirus settings.
To disable your antivirus, follow these steps:
- Right-click on an empty space in your taskbar and choose Task Manager from the context menu.
- Switch to the Startup tab using the header menu located at the top of the window. Here, find your antivirus application from the list and select it by clicking on it once.
- Click on the Disable button now visible in the bottom-right of the window. This will disable the application from launching when you start your device.

- Restart your computer and see if you’re able to upgrade Windows.
Method 7. Disable Proxy Connection
If you’re using a proxy server to connect to the Internet, it can sometimes cause problems with installing updates. To fix this, you can try to disable your proxy connection and then install the update again.
To disable your proxy connection, follow these steps:
- Open the search bar in your taskbar by clicking on the magnifying glass icon. You can also bring it up with the Windows + S keyboard shortcut.
- Type in Internet Options and click on the first search result. Switch to the Connections tab once the pop-up window shows up, and then click on LAN Settings.


- Once in the Local Area Network (LAN) Settings window, make sure that the Use a proxy server for your LAN option is NOT turned on. If the option is ticked, your issue may be related to the proxy server, so make sure to turn it off.

- Click OK. Check if the 0x80242016 error reappears after disabling this feature in Windows.
Method 8. Start the Required Windows Services
The 0x80242016 error may be caused by a Windows service that isn’t running. To fix this, you can try to start the relevant Windows services.
To start the required Windows services, follow these steps:
- On your keyboard, press the Windows + R keys. This will launch the Run application.
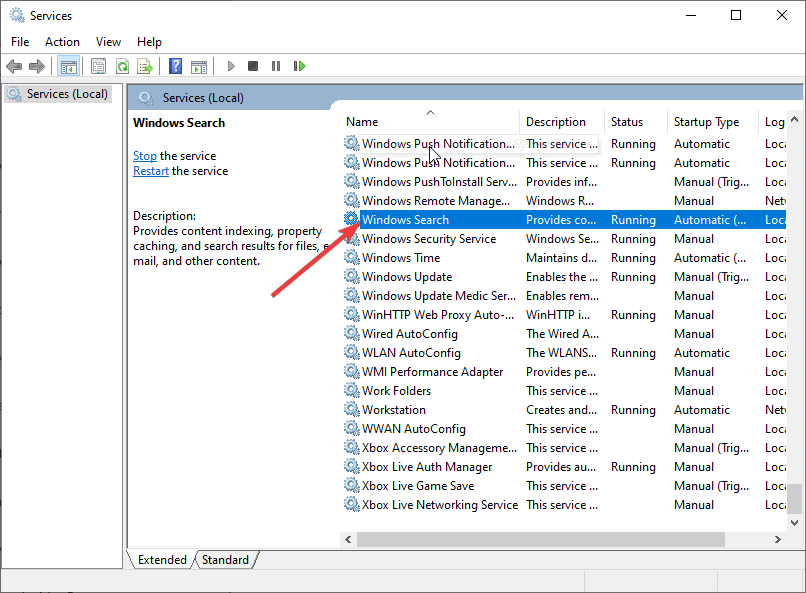
- Without quotation marks, type «services.msc» and hit the Enter key on your keyboard. The Services application will be launched as a result of this.

- Scroll down until you see the Windows Update service in the alphabetical list. Right-click on it, and then choose Properties from the context menu.

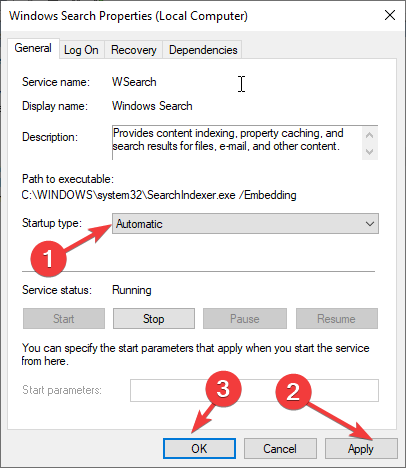
- Use the drop-down menu to change the Startup type to Enabled. When done, click Apply, close the pop-up window, and reboot your computer.
Method 9. Download and Install Windows Updates Manually
As a last resort, you can try to download and install updates manually. To do this, you’ll need to download the updates from the Microsoft Update Catalog website.
Once you’ve downloaded the updates, double-click on each one to install them.
TL;DR
- The Windows Update error 0x80242016 happens when you try to update Windows, but something goes wrong after the reboot.
- To fix it, you will need to ensure that your computer meets the minimum system requirements for installing the update. If it does not, then you will need to upgrade your computer before proceeding.
- Try resetting the Windows Update components. This process will stop the Windows Update service, delete temporary update files, and re-register the required services.
- Next, run some general troubleshooting commands like the SFC and DISM scans. These can help fix problems with Windows updates. Make sure to use an elevated command prompt!
- Use the Windows Update troubleshooter! It can help you get rid of error code 0x80242016.
- Try disabling unessential third-party services, as well as your proxy server.
- If Windows Update error 0x80242016 keeps happening, manually download Windows updates from Microsoft and install them yourself. Just run the update files and follow the on-screen instructions.
Conclusion
We hope the above methods helped you fix the Windows Update errors caused by error code 0x80242016. Windows updates, including the newest feature update in the latest version, should work on your Windows PC now!
Updating Windows has never been easier now that Windows Update error 0x80242016 is gone. But do you want to learn more about how to keep your Windows computer (and other devices) up-to-date with the latest technology? If so, we recommend reading our other blog posts on the subject!
One More Thing
Looking for more tips? Check out our other guides in our Blog or visit our Help Center for a wealth of information on how to troubleshoot various issues.
Sign up for our newsletter and access our blog posts, promotions, and discount codes early. Plus, you’ll be the first to know about our latest guides, deals, and other exciting updates!
Recommended Articles
» How To Fix Windows 10 Update Status Stuck on Pending
» What to Do When Windows Update Keeps Failing on Windows
» Solved: Windows Update Service Not Running
Feel free to reach out with questions or requests you’d like us to cover.
Содержание
- Ошибка 0x80242016 при обновлении Windows 10 до версии 22h2: как решить проблему
- Что такое ошибка 0x80242016 и почему она возникает?
- Как исправить ошибку 0x80242016?
- Вывод
- 0x80242016: Ошибка обновления Windows 10 до версии 22h2
- Что такое ошибка 0x80242016?
- Как исправить ошибку 0x80242016?
- Общий итог
- 0x80242016 ошибка обновления Windows 10 до версии 22h2
- Что вызывает ошибку обновления Windows 10 до версии 22h2?
- Как исправить ошибку обновления Windows 10 до версии 22h2?
- 1. Установить все необходимые обновления
- 2. Проверить наличие поврежденных или устаревших драйверов
- 3. Очистить диск
- 4. Изменить настройки безопасности
- Итог
Ошибка 0x80242016 при обновлении Windows 10 до версии 22h2: как решить проблему
Обновление операционной системы — необходимая процедура, которую проводят многие пользователи, чтобы улучшить работу устройства и получить новые функции. Однако иногда при обновлении Windows 10 до версии 22h2 возникает ошибка 0x80242016. В этой статье мы расскажем, как ее можно устранить.
Что такое ошибка 0x80242016 и почему она возникает?

Ошибка 0x80242016 является одной из распространенных ошибок Windows Update. Она возникает, когда обновление не удается установить из-за того, что какие-то файлы были повреждены или отсутствуют. В частности, это может произойти, если установлены программы или драйверы, которые мешают обновлению, или если не хватает места на жестком диске.
Также причиной ошибки может быть проблема с подключением к интернету или неисправность самого приложения Windows Update. К счастью, в большинстве случаев данную проблему можно решить, применив несколько простых действий.
Как исправить ошибку 0x80242016?

Существует несколько способов устранения ошибки 0x80242016. Рассмотрим наиболее эффективные из них:
- Удалите программы или драйверы, которые могут мешать обновлению. Для этого выполните следующие действия: перейдите в «Параметры» > «Система» > «Приложения и функции» и найдите приложения или драйверы, которые вы считаете ненужными. Нажмите на них правой кнопкой мыши и выберите «Удалить».
- Очистите место на жестком диске. Минимальное требование для установки обновления Windows 10 версии 22h2 — 32 Гб свободного места на жестком диске. Если вам не хватает места, удалите ненужные файлы и папки или переместите их на внешний жесткий диск.
- Проверьте подключение к интернету. Убедитесь, что вы подключены к интернету, и что ваше подключение стабильно. Для этого попробуйте открыть любой сайт в браузере. Если подключение не стабильно, попробуйте перезагрузить маршрутизатор и компьютер.
- Обновите приложение Windows Update. Это можно сделать, перейдя в «Параметры» > «Обновление и безопасность» > «Windows Update» > «Дополнительные параметры» > «Получить обновления для других продуктов Microsoft».
- Используйте инструмент устранения ошибок Windows Update. Microsoft выпустила специальный инструмент, который помогает устранять различные проблемы при обновлении Windows. Скачайте и запустите его, следуя инструкциям на экране.
Вывод
Ошибка 0x80242016 при обновлении Windows 10 до версии 22h2 — не приятная ситуация, однако ее можно устранить, если следовать рекомендациям, описанным выше. Выполнение этих простых действий поможет вам решить проблему и обновить вашу операционную систему.
0x80242016: Ошибка обновления Windows 10 до версии 22h2
Обновление операционной системы — это важный этап обеспечения надежности и безопасности устройства. Однако некоторые обновления могут вызвать ошибки, которые могут быть сложными для обнаружения и исправления. Одной из таких ошибок является 0x80242016, которая может возникнуть при обновлении Windows 10 до версии 22h2.
Что такое ошибка 0x80242016?
Ошибка 0x80242016 — это одна из наиболее частых проблем, которые пользователи Windows 10 сталкиваются при установке обновлений. Эта ошибка возникает, когда процесс обновления системы прерывается по какой-то причине и не может быть завершен.

Проблемы с обновлением Windows могут быть вызваны распространенными причинами, такими как наличие вирусов, перегруженность диска или проблемы с сертификатами. Также возможно, что драйверы устройств на компьютере несовместимы с обновлениями.
Как исправить ошибку 0x80242016?

Исправление ошибки 0x80242016 может потребовать нескольких методов решения проблемы. Попробуйте следующие решения, чтобы исправить ошибку:
- Перезагрузите компьютер: иногда простая перезагрузка может помочь устранить ошибку 0x80242016.
- Проверьте наличие вирусов: проведите проверку на вирусы вашей системы, возможно, некоторые вирусы предотвращают обновление операционной системы.
- Очистите жесткий диск: если жесткий диск перегружен, то это может сказаться на процессе обновления операционной системы. Очистите ненужные файлы и программы, чтобы освободить место на жестком диске.
- Обновите драйверы: если драйверы устройств устарели или несовместимы с обновлением, то это может привести к ошибке 0x80242016. Обновите драйверы для вашего компьютера, прежде чем обновлять операционную систему.
Если вы уже попробовали вышеуказанные методы, но ошибка все еще возникает, то обратитесь к поддержке Microsoft для получения дополнительной помощи.
Общий итог
Ошибка 0x80242016 может возникнуть при обновлении Windows 10 до версии 22h2. Она может быть вызвана различными причинами, такими как проблемы с вирусами, перегруженностью диска или несовместимостью драйверов. Решить проблему можно путем перезагрузки компьютера, проверки наличия вирусов и очистки жесткого диска или обновления драйверов. Если эти методы не помогают, но ошибка все еще возникает, то необходимо обратиться к поддержке Microsoft для получения дополнительной помощи.
0x80242016 ошибка обновления Windows 10 до версии 22h2
Windows 10 является одним из самых популярных операционных систем в мире. Microsoft регулярно выпускает обновления, которые значительно улучшают стабильность и функциональность системы. Однако, некоторые пользователи столкнулись с ошибкой обновления Windows 10 до версии 22h2 — 0x80242016.
Что вызывает ошибку обновления Windows 10 до версии 22h2?
Ошибка обновления Windows 10 до версии 22h2 — 0x80242016 может быть вызвана различными причинами:
- Поврежденные или устаревшие драйверы;
- Недостаток места на жестком диске;
- Отсутствие необходимых обновлений для совместимости;
- Неправильно настроенные настройки безопасности.
Как исправить ошибку обновления Windows 10 до версии 22h2?

Существует несколько способов устранения ошибки обновления Windows 10 до версии 22h2 — 0x80242016:
1. Установить все необходимые обновления
Прежде чем обновляться до версии 22h2, убедитесь, что у вас установлены все необходимые обновления. Для этого выполните следующие действия:
- Откройте «Параметры» -> «Обновление и безопасность»;
- Нажмите «Проверить наличие обновлений».
2. Проверить наличие поврежденных или устаревших драйверов

Некоторые драйверы могут быть устаревшими или поврежденными, что может вызывать ошибку обновления Windows 10 до версии 22h2 — 0x80242016. Чтобы проверить наличие поврежденных драйверов и установить их, выполните следующие действия:
- Откройте «Диспетчер устройств»;
- Найдите устройства с ошибками и обновите соответствующие драйверы.
3. Очистить диск
Недостаток места на жестком диске может привести к ошибке обновления Windows 10 до версии 22h2 — 0x80242016. Чтобы очистить диск, выполните следующие действия:
- Откройте «Параметры» -> «Система» -> «Хранилище» -> «Очистить диск»;
- Выберите необходимые категории и нажмите «Очистить файлы».
4. Изменить настройки безопасности
Неправильно настроенные настройки безопасности могут вызвать ошибку обновления Windows 10 до версии 22h2 — 0x80242016. Чтобы изменить настройки безопасности, выполните следующие действия:
- Откройте «Параметры» -> «Обновление и безопасность» -> «Защита от вирусов и угроз» -> «Дополнительные параметры защиты»;
- Выберите нужный уровень безопасности и нажмите «Применить».
Итог
Ошибка обновления Windows 10 до версии 22h2 — 0x80242016 может быть вызвана различными причинами, включая поврежденные драйверы, недостаток места на жестком диске, неправильно настроенные настройки безопасности и отсутствие необходимых обновлений для совместимости. Чтобы исправить ошибку, необходимо установить все необходимые обновления, проверить наличие поврежденных или устаревших драйверов, очистить диск и изменить настройки безопасности. Эти действия помогут устранить проблему и успешно обновить Windows 10 до версии 22h2.
With pre-set Windows settings, users generally receive updates automatically but the process doesn’t go well always. People keep encountering errors every now and then which prevent the operating system from installing any rollout. Similar fatal codes may also occur when you initiate the update process manually. Error 0x80242016 is one such issue that you may experience while attempting to install updates automatically or manually. Even if the system finishes downloading the update files, the error may arrive during the installation.
Windows 10 update error code 0x80242016 may also appear with another dreadful code that says WU_E_UH_POSTREBOOTUNEXPECTEDSTATE. According to some tech experts, the issue usually takes place due to Windows search service. Since there is no say from the officials, we can’t decide on that particular cause. Therefore, you might need to try out different workarounds to find out what really works for your system. Before trying out advanced resolutions, make sure your PC is connected to a stable and active internet connection.
Here is how to fix Windows 11/10 update error code 0x80242016 –
1] Reboot Windows and initiate the update process again
Some of the update errors get fixed automatically when you restart the PC and start the process afresh. To reboot the device, here are the steps to follow –
- Save all ongoing tasks.
- Once on the desktop screen, press – Alt + f4.
- From the appearing dialog box, click the drop-down list and select – Restart.
- Click – OK.

When the system powers up, try to reinstall the update.
For Windows 10
- Press – Windows + I.
- Click – Update & Security.
- Move to the right of the dedicated settings page.
- Click – Check for updates.
- Download available updates and install them.
For Windows 11
- Open Settings app.
- From left column, choose – Windows Update.
- Shift to right.
- Click – Check for updates.
2] Reset Windows update to fix 0x80242016
Plenty of services are needed to make the Windows update process work error-free. When the system finds any of the required services unavailable, issues like 0x80242016 may evolve that obstruct the installation of the latest update. Thus, restarting the services is necessary. While doing so, you will have to reset associate components too in order to make it more effective.
- Press – Windows + S.
- Type in – cmd.exe.
- Hit – Ctrl + Shift + Enter.
- When User Account Control prompt for your consent, click – Yes.
- Copy the following commands in turn and paste them into the elevated Command Prompt. Make sure to press Enter after each line –
net stop wuauserv
net stop cryptSvc
net stop bits
net stop msiserver
ren C:WindowsSoftwareDistribution SoftwareDistribution.old
ren C:WindowsSystem32catroot2 Catroot2.old
net start wuauserv
net start cryptSvc
net start bits
net start msiserver
- Close the Command Prompt.
- Restart Windows.
- After getting back to operation, retry the installation process.
3] Disable Windows search service
If Windows search service crashes time and again, Windows 11/10 update error code 0x80242016 may occur while installing the LCU patch. To overcome the issue, disable the service and then try again.
- Press Windows key and type services.msc.
- Hit – Enter.
- When the dedicated window shows up, look for Windows Search.
- Double-click the same to bring forth its properties.
- Set the Startup type to Disabled.
- Click Apply followed by OK.
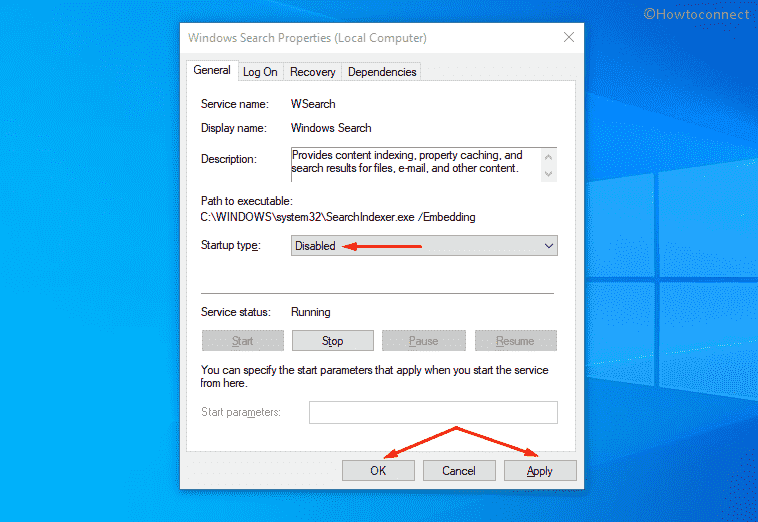
- Reboot your computer.
4] Run DISM along with System File Checker
When the system fails to read a file that is required to complete the installation process of Windows update, unexpected errors may evolve. To eliminate the corruption of system elements moreover recover missing ones, System File Checker is the ultimate choice. But the utility sometimes fails to resolve the corruption, in such a case, you will have to run DISM tool to make System File Checker work again. Therefore, it will be wise to execute DISM first and then SFC scan.
- Click the search icon from the taskbar.
- Type – cmd.
- From the right side of the result flyout, click – Run as administrator.
- To approve User Account Control, hit – Yes.
- In the appearing black pane, insert the following commands one by one and hit Enter after each–
dism /online /cleanup-image /scanhealth
dism /online /cleanup-image /checkhealth
dism /online /cleanup-image /restorehealth
- After executing the above commands, type in
sfc /scannowin the same black pane. - Press – Enter.
- Wait and let the scanning process hits 100%.
- Once done, close Command Prompt and reboot the PC.
- When the system powers up, initiate the update again.
5] Make use of Windows update troubleshooter to fix 0x80242016
Microsoft included a dedicated troubleshooter in Windows 10 and 11 that solves update-related errors. When you run the utility, it will go through all associated files to detect what is giving rise to error code 0x80242016. If the issue is not complicated enough, the troubleshooter will offer an automatic fix too.
For Windows 10
- Press – Windows + I.
- Click – Update & Security.
- From the left sidebar, pick – Troubleshoot.
- Move to right-pane and then click – Additional troubleshooters.
- Select – Windows update.
- From the expanded tray, click – Run the troubleshooter.
- Keep following on-screen instructions.
- When the utility comes with a resolution after scanning the system, click – Apply this fix.
For Windows 11
- Right-click on Start button and choose – Settings.
- Choose – Troubleshoot present on the right pane.
- From next page, click – Other troubleshooters.
- Click – Run present alongside Windows update.
6] Download standalone package manually
The system oftentimes ends up downloading broken update files and when you try to install the same, numerous error codes arise. Such a situation usually emerges when you use update assistant to install a CU patch. If this is the cause behind error code 0x80242016, download the standalone package manually and then try to install it.
- Visit the webpage of Microsoft Update Catalog using any of your preferred web browsers.
- Click the search bar of the website.
- Insert the KB number that is failing to install moreover giving the update error.
- Click – Search.
- From the appearing search result, find the suitable version that goes with your PC specs.
- Click Download present next to the compatible package.
- Doing so will bring forth a new window.
- Hit the link that ends with msu.
- If prompted, opt for Save File and then click – OK.
- Visit the directory where the system stores downloaded items.
- Double-click the msu file you got.
- To allow User Account Control, click – Yes.
- Comply with on-screen instructions to finish the process.
7] Unplug USB peripherals and retry the installation process
External hardware like printer, mouse, keyboard, or scanner oftentimes found to cause preventing Windows update. The exact reason behind this abnormal behavior is yet to be known. However, you can easily solve this kind of issue by disconnecting the peripherals.
First of all, unplug all the USB cords that are used to make connections between the accessories and Windows 11/10 PC. After that, check for updates and try to install the available patches. Once the system ends up installing the patch without error code 0x80242016, connect all the peripherals one after another.
8] Turn off security suit for a while
Active antimalware programs oftentimes misconstrue update files and assume them as vulnerable threats. That’s why the security suite prevents them from entering into the system. However, this doesn’t necessarily mean that the update you are trying to download is malware itself.
If you are getting Windows 11/10 update error code 0x80242016 just because your antimalware program is misreading the update files, disable the antivirus program. Though keeping the security suite disabled for always is not recommended at all, you have to bring back the same in action after installing the update successfully.
Disable built-in Firewall to get rid of 0x80242016
- Press – Windows key.
- In the search bar, insert – firewall.cpl.
- Hit – Enter.
- From the left sidebar of the newly appeared page, click – Turn Windows Defender Firewall on or off.
- Tick the checkbox of Turn off Windows Defender Firewall (not recommended) option for both Private network settings and Public network settings.
- Click – OK.
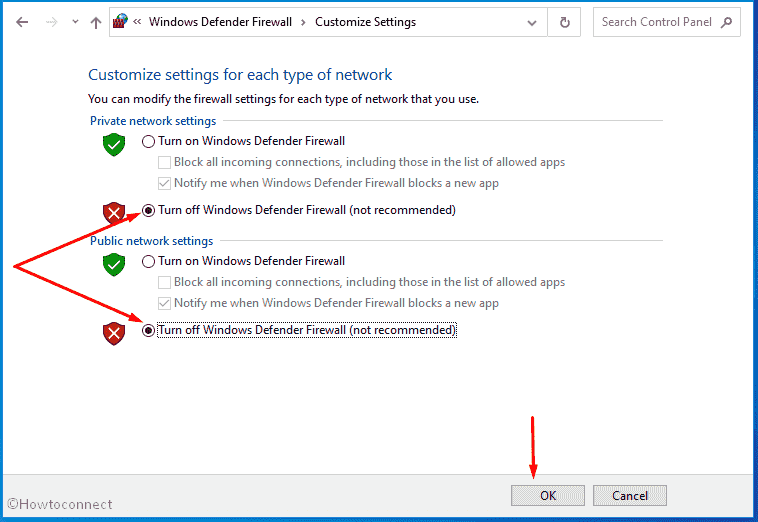
Turn off or uninstall third-party security suite
Before uninstalling the antivirus program, disable the same to check whether it helps to fix update error. The process of doing so may vary from software to software but most of the options should remain the same or in different words with similar meaning.
- Click the up arrow symbol from the notification bar.
- Right-click the icon of installed antimalware.
- Choose Disable or the one that has a similar meaning.
- If asked, set a time slot after which the program will be enabled automatically.
After disabling the program, try installing the problematic update and see if the error appears anymore. If yes, uninstall the program completely to get rid of any interruption caused by the tool.
- In Windows search, type – appwiz.cpl.
- Press – Enter.
- When the Programs and Features window shows up, find the third-party antivirus program installed on your Windows 10.
- Right-click the same and then choose – Uninstall.
- Comply with on-screen instructions to finish the removal process.
9] Check whether Date & Time is correct
If the date and time of your Windows 10 PC are incorrect, the system can trigger update error code 0x80242016. Hence, make sure that you configured them correctly. To do so –
- Click Start button.
- Type in – control panel.
- Hit – Enter.
- Set the View by option to Category.
- Opt for – Clock and Region.
- From the right pane of the consequent page, hit – Date and Time.
- Jump into Internet Time tab.
- Click – Change settings.
- Check the box present before Synchronize with an Internet time server.
- Hit – Update now.
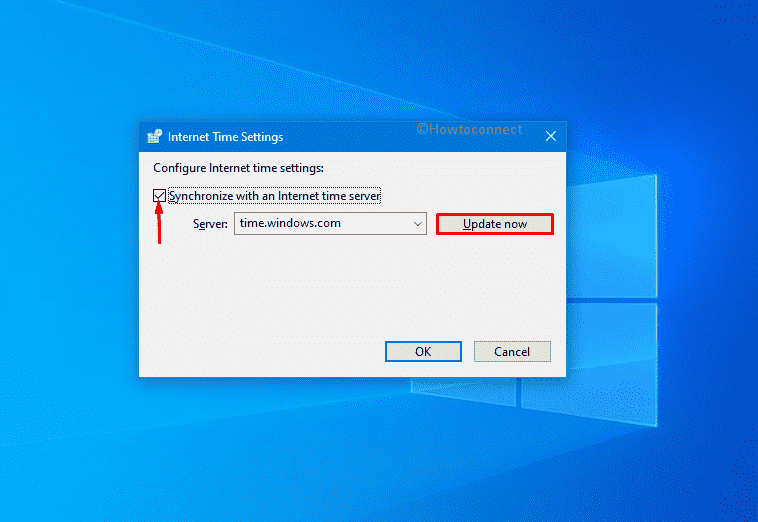
- Finally, click – OK.
10] Start Windows with clean boot to resolve 0x80242016
Many times third-party programs or services cause abnormalities in the system which later ends up with unexpected error codes. To avoid any issue caused by those components, make a suitable environment where the system starts with basic elements only. This way, no conflict will take place moreover you can install Windows updates without any hitch.
- Click the search icon present on the taskbar.
- Type – msconfig.exe.
- Hit – Enter.
- When System Configuration turns up, select the radio button set alongside Selective startup.
- Also, uncheck – Load startup items.
- Shift to Services tab.
- Tick the checkbox set before Hide all Microsoft services.
- Click – Disable all.
- Move to the Startup tab.
- Click the link – Open Task Manager.
- When the dedicated window prompts, right-click on a program listed there and choose – Disable.
- Repeat the same for all startup programs.
- Close Task Manager.
- Get back to System Configuration window.
- Click Apply and then OK.
- Restart the PC to start clean boot.
Methods list:
1] Reboot Windows and initiate the update process again
2] Reset Windows update
3] Disable Windows search service
4] Run DISM along with System File Checker
5] Make use of Windows update troubleshooter
6] Download standalone package manually
7] Unplug USB peripherals and retry the installation process
8] Turn off security suit for a while
9] Check whether Date & Time is correct
10] Start Windows with clean boot
That’s all!!!
Repair any Windows problems such as Blue/Black Screen, DLL, Exe, application, Regisrty error and quickly recover system from issues using Reimage.
Several users have reported that they have been receiving error code 0x80242016 while attempting to run Windows update on Windows 10. While the exact cause is not clear we will be giving you some advice on things to try that in most cases will help you solve the issue. Let’s get started with fixing that nasty 0x80242016 error on your Windows 10 device shall we?
Step 1: Clean Boot
After some time, the amount of programs and services on your computer will reach a high number, and this does not matter in most cases, however there can be one program between them which are causing the Windows update issues, therefore we going to try to do a clean boot.
- Press the Windows + R keys at the same time on your keyboard, a Run Window will appear, then type “msconfig” and hit enter
or open start and type msconfig and then click on msconfig
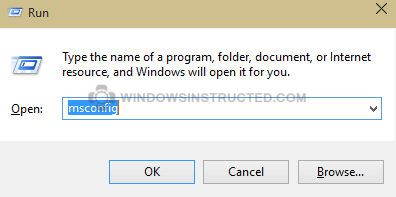
Then choose Selective Startup
Then make sure only Load System Servicesis checked.
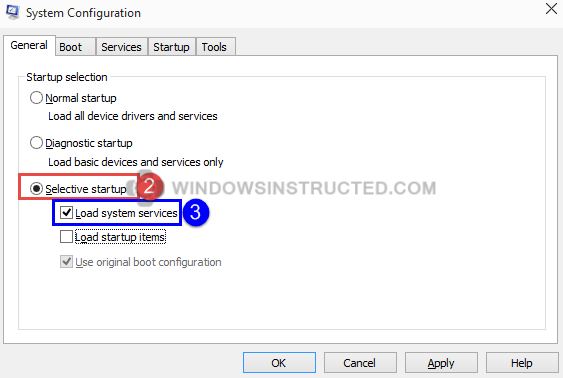
Now click on the Services tab
Check the box: “Hide all Microsoft Services”
Click the button: “Disable All”
Click on OK and reboot your system when prompted.
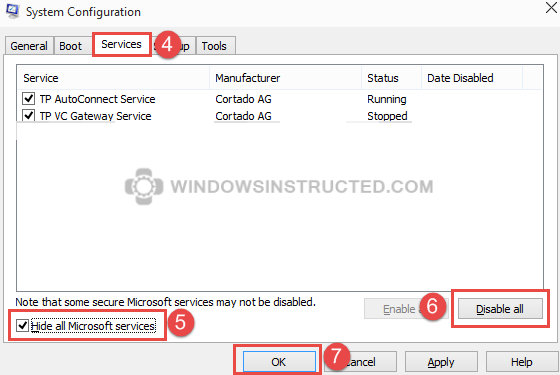
Try to apply the Windows Updates again, if it now works then install them all. After you finished this make sure to repeat step 1 above and then choose Normal Startup.
Step 2: Check for Corrupted System File
Windows uses just like all your programs a lot of files to make everything happen on your operating system, if these become corrupted / damaged weird things can happen on your system, it is therefore advised to first scan and see if you have any of these corrupted files on your system.
System File Checker scans the system and finds and replaces corrupted system files with the correct one.
- On your keyboard press the Windows + X key at the same time, or right-click the Windows icon in your task bar
Or open start and type CMD, then right-click command prompt and choose Run as Administrator - Now click on Command Prompt (Admin)
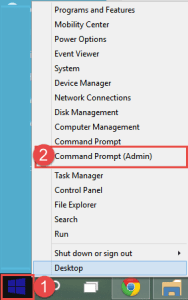
Once Command Prompt has started, click the Window, and type “SFC /scannow” (without the “) and hit enter

Wait for this process to complete.
If you get a message that everything succeeded then try to run Windows Update again, if you get an error message which contains that corrupted files were found but cannot be repaired then please try to use a Restore Point
Step 3: Automatic Windows Update Troubleshooter
1. Press the Windows key on your keyboard and then type Troubleshooting (or open Start and type Troubleshooting)
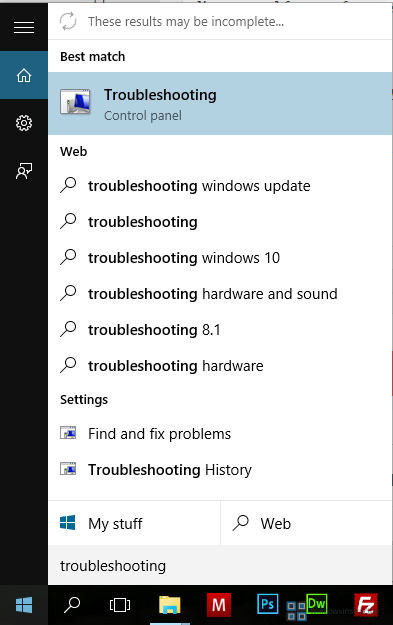
2. Then click View All in the left pane
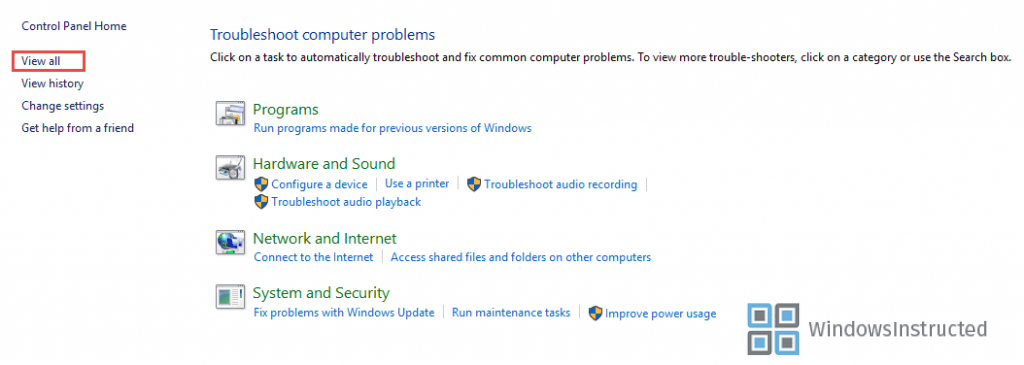
3. Find and click or tap on Windows update
4. Click on Advanced and check Apply repairs automatically and Run as Administrator
5. Then click on Next and follow the on-screen instructions to complete the troubleshooting.
Once you’ve done this, and the troubleshooting process has completed check if you can run Windows Updates once again.
Step 3: Resetting the Windows Update Components
In most cases the downloaded data is just corrupted and removing the already downloaded Windows Update data could solve the Windows Update Error 0x80242016 you’ve been receiving. Please do follow these steps very carefully as typo’s could lead to problems.
-
Open Elevated Command Prompt by following one of two methods:
- Press the Windows + X at the same time, then choose Command Prompt (admin)
- Press the Windows + W key at the same time and then type ” cmd ” right-click
Command Prompt and choose Run as Administrator
- Enter the following command: “net stop wuauserv” and hit enter.
- Enter the following command: “net stop cryptSvc” and hit enter.
- Enter the following command: “net stop bits” and hit enter.
- Enter the following command: “net stop msiserver” and hit enter.
- Enter the following command: “ren C:WindowsSoftwareDistribution SoftwareDistribution.old” and hit enter.
- Enter the following command: “ren C:WindowsSystem32catroot2 catroot2.old” and hit enter.
- Enter the following command: “net start wuauserv” and hit enter.
- Enter the following command: “net start cryptSvc” and hit enter.
- Enter the following command: “net start bits” and hit enter.
- Enter the following command: “net start msiserver” and hit enter.
- Reboot your system.
We hope these steps solved your issue. If you’re still experiecing problems, then feel free to comment on this article and we will try to help you
If there’s one streaming platform that has taken over the world in a flash, that’s…
In today’s rapidly evolving business environment, it is essential that all businesses understand the importance…
Image Source What is Open Source Security? Open source software is now an integral part…
So, you are a small business owner and you are looking for the best software…