Содержание
-
-
- 0.0.0.1 Дмитрий Щетков запись закреплена
-
- 1 Блог ленивого админа
- 1.1 Добавить комментарий Отменить ответ
- 2 Устройство не готово, возможно, открыта дверца

Дмитрий Щетков запись закреплена
Помогите пожалуйста. Проснулся утром, заглянул в планшет, а там вай-фай не работает, залез в диспетчер устройств, а там вот такое:Broadcom Serial Bus Driver over UART Bus Enumerator
Запуск этого устройства невозможен. (Код 10)
<Устройство не готово>
Устройство не готово: возможно, открыта дверца.
Проверьте наличие диска в устройстве %hs, а также положение дверцы устройства.
Блог ленивого админа
Windows 2000 (да-да, именно он) выдает юзеру периодические сообщения — «Устройство не готово; возможно отрыта дверца. Проверьте наличие диска в устройстве А, а также положение дверцы устройства».

Сообщение довольно странное и надоедливое, выскакивает при каждом выключении компа, переставлять и ковырять систему на этом чудо-девайсе мне не дали, поэтому было решено отключить у устройствах и в BIOS дисковод Флоппи 🙂
В биосе на Floppy Drive A поставить disable. И он пропадет из диспетчера задач сам. Решилась проблема, но сомнения остались. Перезагрузился, и пока все были на обеде проверил машинку CureIt. Он нашел там двух гаденышей в TEMP Trojan.DownLoader4 или еще какой-то троянец. Обоих успешно снес и мне полегчало 🙂
Добавить комментарий Отменить ответ
Этот сайт использует Akismet для борьбы со спамом. Узнайте как обрабатываются ваши данные комментариев.

Устройство не готово, возможно, открыта дверца
 При подключении съемного устройства, в частности flash накопителя, системный процесс taskhost.exe выдает ошибку:
«Устройство не готово, возможно, открыта дверца. Проверьте наличие диска в устройстве А; а также положение дверцы устройства».
Несмотря на то, что в системе на страже стоит антивирусная программа Касперского, первое подозрение пало на вирусы. Хоть и работают в лаборатории Касперского «светлые головы», но из антивируса Касперского не надо делать панацею от всех бед. Даже самый хороший антивирус может пропустить вредоносный код. Поэтому предлагаю проверить систему другой антивирусной программой.
Вступите в группу, и вы сможете просматривать изображения в полном размере
На чтение 7 мин. Просмотров 14.3k. Опубликовано 03.09.2019
Если вы получаете код ошибки ERROR_NOT_READY ‘ с описанием Устройство не готово , выполните действия по устранению неполадок, перечисленные в этой статье, чтобы исправить это.
Содержание
- ERROR_NOT_READY: Фон
- Как исправить ошибку 0x80070015 device Устройство не готово ’
- Решение 1. Проверьте подключение привода
- Решение 2. Закройте программы, используя диск
- Решение 3. Запустите средство устранения неполадок оборудования и устройств
- Решение 4. Удалите и переустановите драйвер контроллера USB
- Решение 5 – Назначьте букву диска для вашего внешнего диска
- Решение 6 – Установите последние версии драйверов в режиме совместимости
- Решение 7. Запустите полное сканирование системы
- Решение 8 – Ремонт вашего реестра
- Решение 9 – Обновите свою ОС
- Решение 10. Чистая загрузка компьютера
- Решение 11. Проверьте диск на наличие ошибок
ERROR_NOT_READY: Фон
Код ошибки ERROR_NOT_READY , также известный как ошибка 0x80070015, обычно возникает, когда пользователи пытаются сохранить данные на своем диске, особенно когда они хотят создать резервную копию своих файлов и папок. Ошибка 0x80070015 влияет на все версии Windows.
Microsoft объясняет, что есть три основные причины, которые вызывают ошибку «Устройство не готово»: диск пуст, диск уже используется или имеется серьезный сбой оборудования из-за поврежденных или несовместимых драйверов устройств USB-контроллеров.
Есть также случаи, когда ошибка «Устройство не готово» также появляется, когда пользователи пытаются запустить программы, проверенные UAC.
Как исправить ошибку 0x80070015 device Устройство не готово ’
Решение 1. Проверьте подключение привода
Эта ошибка часто возникает на внешних дисках, поэтому убедитесь, что устройство правильно подключено к вашему компьютеру. Вы также можете отключить и снова подключить его, чтобы установить соединение. Вы также можете временно отключить ненужные периферийные устройства и снова подключить их после восстановления доступа к накопителю.
Решение 2. Закройте программы, используя диск
Ошибка «Устройство не готово» также может возникать, если привод использует активные программы. В результате закройте все приложения и программы, использующие накопитель, и повторите команду, чтобы проверить, не устранила ли это проблему.
Решение 3. Запустите средство устранения неполадок оборудования и устройств
Windows поставляется с собственным встроенным средством устранения неполадок оборудования, которое может устранять общие проблемы, приводящие к неисправности оборудования.
Вот как использовать эту функцию в Windows 10:
- Перейдите в «Пуск»> введите «настройки»> дважды щелкните первый результат, чтобы открыть страницу
- Перейдите в раздел «Обновление и безопасность»> выберите «Устранение неполадок» в левой панели> выберите «Оборудование и устройства»> «Запустить средство устранения неполадок».

Чтобы использовать встроенное средство устранения неполадок оборудования в старых версиях Windows, выполните следующие действия.
- Перейдите в «Пуск»> введите «панель управления»> дважды щелкните первый результат, чтобы запустить панель управления
- Перейдите в раздел «Оборудование и звук»> «Просмотр устройств и принтеров»> щелкните правой кнопкой мыши проблемный диск> нажмите «Устранение неполадок» в раскрывающемся меню.

- Подождите, пока устранение неполадок завершится> повторите попытку компьютера, чтобы проверить, доступен ли ваш диск.
Стоит отметить, что некоторые производители внешних накопителей предлагают собственные специализированные средства устранения неполадок. Если ошибка «Устройство не готово» по-прежнему сохраняется, перейдите на веб-сайт изготовителя накопителя и проверьте, есть ли какие-либо средства устранения неполадок накопителя. В этом случае загрузите и установите средство устранения неполадок и запустите его, чтобы починить накопитель.
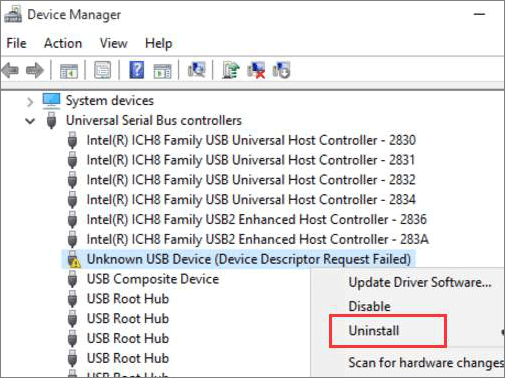
Решение 4. Удалите и переустановите драйвер контроллера USB
- Нажмите клавишу Windows + X> выберите Диспетчер устройств.
- Найдите и раскройте «Контроллеры универсальной последовательной шины» в окне диспетчера устройств.
- Щелкните правой кнопкой мыши «Контроллеры универсальной последовательной шины»> нажмите «Удалить». Вы также можете удалить драйверы по отдельности.

- Перезагрузите компьютер и убедитесь, что это действие решило проблему.
Решение 5 – Назначьте букву диска для вашего внешнего диска
- Нажмите клавишу Windows + R, чтобы открыть окно «Выполнить»>, введите diskmgmt.msc , чтобы открыть консоль управления дисками.
- Щелкните правой кнопкой мыши на внешнем диске, чтобы открыть меню диска.
- Нажмите «Изменить буквы диска и пути»> нажмите кнопку «Изменить»

- Нажмите переключатель «Назначить следующую букву диска»> выберите раскрывающийся список для просмотра доступных букв диска
- Выберите нужную букву диска для назначения внешнему диску> нажмите «ОК». Появится предупреждающее сообщение> нажмите «ОК».
Решение 6 – Установите последние версии драйверов в режиме совместимости
Установите последнюю версию драйвера для USB с веб-сайта производителя накопителя и попробуйте установить его в режиме совместимости с Windows 8, чтобы запустить программу с настройками из предыдущей версии Windows.
- Загрузите драйвер с сайта производителя.
- Щелкните правой кнопкой мыши файл установки драйвера> выберите Свойства
- Нажмите на вкладку Совместимость> установите флажок «Запустить эту программу в режиме совместимости для» и выберите Windows 8 из раскрывающегося меню.
- После завершения установки перезагрузите компьютер и повторите команду.
Решение 7. Запустите полное сканирование системы
Вредоносные программы могут вызвать различные проблемы на вашем компьютере, в том числе ошибки. Выполните полное сканирование системы, чтобы обнаружить любые вредоносные программы, работающие на вашем компьютере. Вы можете использовать встроенные в Windows антивирусные программы, Защитник Windows или сторонние антивирусные решения.
Вот как выполнить полное сканирование системы в Windows 10 Creators Update:
- Перейдите в «Пуск»> введите «защитник»> дважды щелкните Защитник Windows, чтобы запустить инструмент
- В левой панели выберите значок щита

- В новом окне выберите опцию Advanced Scan

- Установите флажок «Полная проверка», чтобы запустить полную проверку системы на наличие вредоносных программ.

Решение 8 – Ремонт вашего реестра
Самый простой способ восстановить реестр – использовать специальный инструмент, такой как CCleaner. Не забудьте сначала сделать резервную копию реестра, если что-то пойдет не так. Если вы не установили очиститель реестра на свой компьютер, ознакомьтесь с нашей статьей о лучших очистителях реестра для использования на ПК.
Вы также можете использовать средство проверки системных файлов Microsoft для проверки повреждений системных файлов. Однако эта утилита доступна только в Windows 10. Вот как запустить сканирование SFC:
1. Перейдите в Пуск>, введите cmd >, щелкните правой кнопкой мыши Командную строку> выберите Запуск от имени администратора.

2. Теперь введите команду sfc/scannow

3. Дождитесь завершения процесса сканирования и перезагрузите компьютер. Все поврежденные файлы будут заменены при перезагрузке.
Решение 9 – Обновите свою ОС
Убедитесь, что на вашем компьютере установлены последние обновления ОС Windows. В качестве напоминания, Microsoft постоянно выпускает обновления для Windows, чтобы улучшить стабильность системы и устранить различные проблемы.
Чтобы получить доступ к разделу Центра обновления Windows, вы можете просто ввести «обновление» в поле поиска. Этот метод работает на всех версиях Windows. Затем перейдите в Центр обновления Windows, проверьте наличие обновлений и установите доступные обновления.

Решение 10. Чистая загрузка компьютера
Чистая загрузка запускает Windows, используя минимальный набор драйверов и программ запуска, чтобы устранить конфликты программного обеспечения, которые могут возникнуть при установке программы или обновлении или просто при запуске программы.
Вот как чистить загрузку вашего компьютера с Windows 10:
- Введите Конфигурация системы в поле поиска> нажмите Enter
- На вкладке Службы > установите флажок Скрыть все службы Microsoft > и нажмите Отключить все .

3. На вкладке Запуск > нажмите Открыть диспетчер задач .
4. На вкладке Автозагрузка в Диспетчере задач> выберите все элементы> нажмите Отключить .

5. Закройте Диспетчер задач .
6. На вкладке «Запуск» диалогового окна «Конфигурация системы»> нажмите «ОК»> перезагрузите компьютер.
Убедитесь, что ошибка «Устройство не готово» сохраняется.
Вот как чистить загрузку вашего ПК с Windows 7:
- Перейдите в Пуск> введите msconfig> нажмите ENTER.
- Перейдите на вкладку Общие> нажмите Выборочный запуск.
- Снимите флажок Загрузить элементы автозагрузки.
- Перейдите на вкладку «Службы»> установите флажок «Скрыть все службы Microsoft»> нажмите «Отключить все»> нажмите «ОК».
- Перезагрузите компьютер при появлении запроса> проверьте, сохраняется ли проблема.
Решение 11. Проверьте диск на наличие ошибок
В Windows 10 вы можете запустить проверку диска с помощью командной строки.
Запустите командную строку от имени администратора и введите команду chkdsk C:/f , а затем нажмите Enter. Замените C буквой раздела вашего жесткого диска.

В качестве быстрого напоминания, если вы не используете параметр/f, chkdsk отображает сообщение о том, что файл должен быть исправлен, но не исправляет никаких ошибок. Команда chkdsk D:/f обнаруживает и устраняет логические неполадки, затрагивающие ваш диск. Для устранения физических проблем также запустите параметр/r.

В Windows 7 перейдите на жесткий диск> щелкните правой кнопкой мыши диск, который вы хотите проверить> выберите Свойства> Инструмент. В разделе «Проверка ошибок» нажмите «Проверить».

Итак, мы надеемся, что хотя бы одно из этих решений помогло вам исправить код ошибки «Устройство не готово».Как всегда, если вы сталкивались с другими решениями для решения этой проблемы, вы можете помочь сообществу Windows, перечислив действия по устранению неполадок в комментариях ниже.
|
При выключении компа или при перезагрузке вылетает сообщение «устройство не готово, возможно открыта дверца…» похоже на шутку, какик могла вытворять прога для создания мессаг. |
|
|
Administrator Сообщений: 3843 |
Скорее всего у тебя в BIOS выставлен неправильно тип для дисковода — 5.25 дюйма. в этих дисководах требовалось закрыть «дверцу» чтобы читалась дискета. Либо вообще дисковод отключи в BIOS. Хочешь быть мудрым? Не желай всего, что видишь; не верь всему, что слышишь; не говори всего, что знаешь; не делай всего, что умеешь, а только то, что полезно. |
|
Как ни странно у меня также. Поставил соседу нов32 с последними обновлениями и у него такаяже херь началася. |
|
|
У меня компьютер начал выдавать сообщение: «Устройство не готово возможно открыта дверца. Проверьте наличие диска в устройстве А, а так же положение дверцы устройства.» |
|
|
Закроой дверцу)))) А если серьезно, давненько правда это было, но тем не менее — словил я вирюгу, так вот он мне тоже на флоп ругался, постоянно выскакивали мессаги типа «устройство не готово», «нет диска в дисководе» |
|
|
Вообще это все решается правильной настройкой BIOS.. |
|
|
31337 Guest |
#7 Это нравится:0Да/0Нет 19.05.2009 07:59:16 Попробуй скинь биос на стандартные настройки. Если флопаря нет — выключи его в биосе. |
«After a major Windows 10 update, I found that I can’t open USB flash drives as well as some other external hard drives. The error message is about the device is not ready. But the hard drive’s light is blinking, I can also see the drive letter in Disk Management. What should I do to access data and quickly fix the error?»
| Workable Solutions | Step-by-step Troubleshooting |
|---|---|
| 1. Recover data from the drive | Select the hard drive which becomes inaccessible on your PC. Click «Scan»…Full steps |
| 2. Check the connection | Plug out the device. After a few seconds, plug it in all the USB ports in turn until the…Full steps |
| 3. Re-install your device driver | Go to Device Manager, right-click the name of your device, select Uninstall…Full steps |
| 4. Run a disk check | Right-click on the drive which you wish to check and select Properties…Full steps |
| 5. Other effective solutions | Run Sfc scan to check for corruptions > Run hardware and device troubleshooter…Full steps |
How to Fix «the device is not ready» Error?
‘The device is not ready is a common Windows 10/8/7 error message related to a flash drive, CD/DVD media, external hard drive, internal HDD, virtual disk manager, or Diskpart. Despite solutions to ‘the device is not ready’ on different devices vary, the reasons behind the occasions are similar to each other. This NOT READY error implies primarily a damaged digital device, hardware failure, compatibility issues, connection issues, or sometimes Windows file system corruption. For instance:
1. Flash drive or external hard drive — Location is not available. The device is not ready
If it’s happening to a removable disk, like a USB stick, flash drive, memory card, or an external HDD, when you try to open it, this device not ready error indicates that the Windows system cannot connect to it. We will usually tell users to check the connection problem in the first place.
2. Internal hard drive — Location is not available. The device is not ready
Displaying the same error message, but if it’s on a local hard drive installed on your computer, it’s likely that something goes wrong with the present drive. Bad sectors, in most situations, are accused of being the key reason to cause the hard drive ‘the device is not ready’.
3. Virtual Disk Manager — The device is not ready
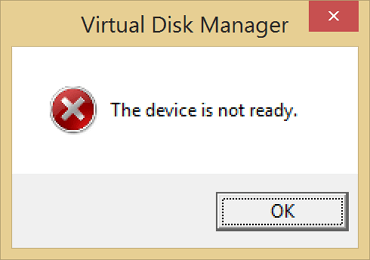
The device not ready error emerges on Virtual Disk Manager when you don’t have the correct permissions or there is a problem mapping the drives between the OS and the VM manager.
4. Diskpart — Dsikpart has encountered an error. The device is not ready
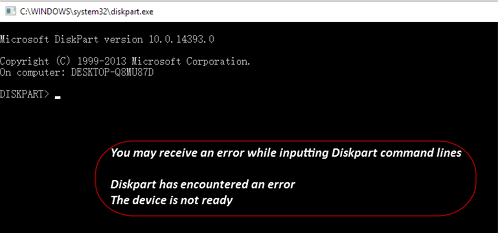
In case your hard disk failed, or the storage controller on the mainboard is corrupted, you will receive the exact error.
All the discussed situations involving ‘the device is not ready’ errors would cause the present internal or external disk inaccessible. As we’ve already analyzed, both hardware and software issues could cause a Windows computer to be unable to read your connected hard drive normally, though it is recognized and showing up on the computer. Do not worry when such an error occurs. Take the right steps to recover data and rectify the problem by following the given troubleshooting methods with ease.
# 1. Recover Data from the Inaccessible Hard Drive
When a hard drive or USB stick is showing the «device is not ready» error, you can no longer access the hard drive data as usual.
Download EaseUS Hard Drive Recovery Software
When this happens, do not hesitate to download EaseUS EaseUS Data Recovery Wizard. It’s the most qualified recovery software that supports accessing hard drive without formatting and recovering data.
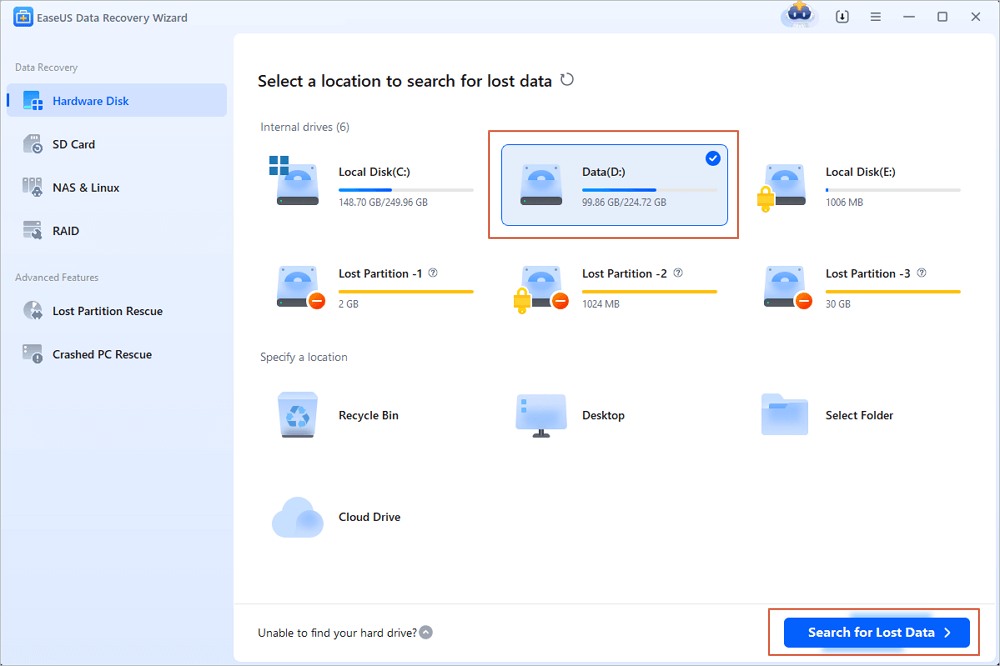
Step 1. Select the hard drive which becomes inaccessible on your PC. Click «Scan» to let EaseUS Data Recovery Wizard scan and find your hard drive data.
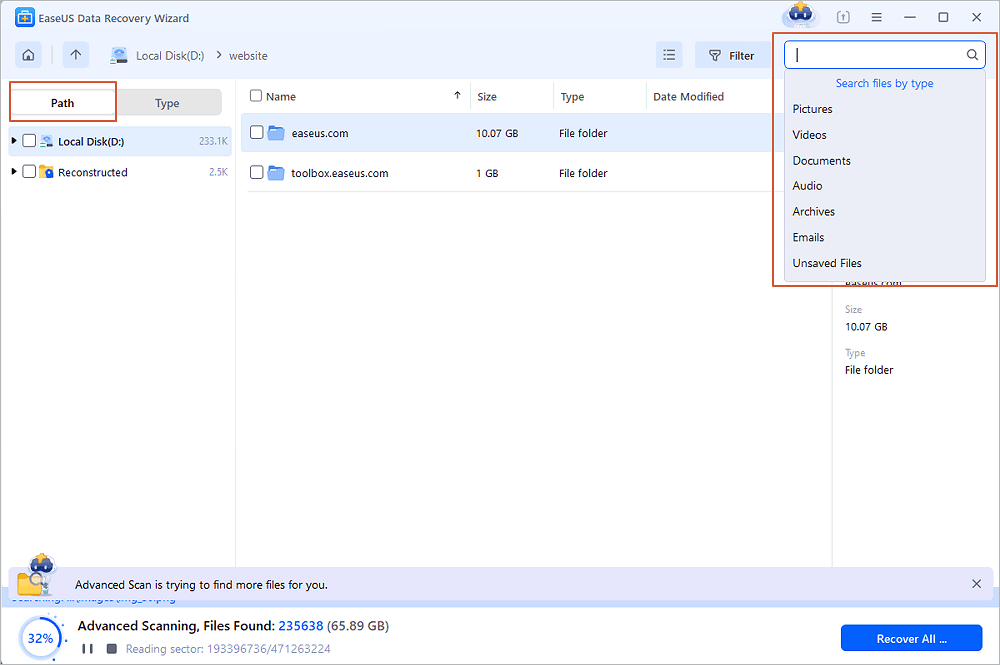
Step 2. After the scan, you can preview and check found files on the scanning result window. The «Deleted Files» and «Other Lost Files» folders contain all your lost files. You can also click «Filter» to quickly find a specific type of file. Then, preview the files and determine which files you want retrieved.
Step 3. Finally, select the items you want to restore and click «Recover». Choose a secure location (a healthy physical drive on your PC or another external storage device) and click «OK» to start recovering all lost data from your inaccessible hard drive.

#2. Try Every Way to Check the Connection
Unnecessary mistakes concerning a loose or poor connection should be avoided in the first place. When you encountered any hard drive stuck in not working properly at the moment, try every way to exclude the connection factor.
- 1) Plug out the device. After a few seconds, plug it in all the USB ports in turn until the external device appears normal in the operating system again.
- 2) Otherwise, change a USB cable that matches the device and connect to the OS again.
- 3) Take the storage device to another computer. If the problem is solved, you should repair the not working USB ports on your own computer.
# 3. Re-install Your Device Driver
On Windows 10/8/7, a common software problem is «the device driver is not installed, is corrupted or missing». Try to re-install the device driver and fix the «device is not ready» warning.
- 1) Go to Device Manager, right-click the name of your device, select Uninstall.
- 2) Keep your device connected. Restart the PC and Windows will attempt to reinstall the driver.
# 4. Run Disk Check to Fix Hardware Issues
Do not forget to perform a disk check to examine disk errors. The «device is not ready» error is very likely resulted from file system errors or bad sectors on the drive, so let the Windows disk check utility help.
- 1) Right-click on the drive which you wish to check and select Properties.
- 2) Click on the Tools tab. Under the Error-checking, click on the Check button. This option will check the drive for file system errors.
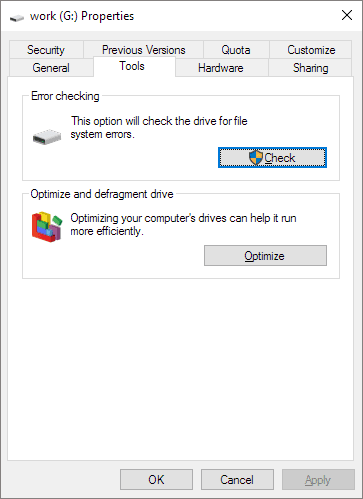
- 3) Follow the wizard to complete the disk error check and restart your computer to repair the errors that were found.
- 4) You can also use CMD to remove bad sectors with administrator privilege.
- 5) In addition, there is a more user-friendly option for you to check and repair bad sectors, meanwhile, with more powerful capabilities. Give it a try.
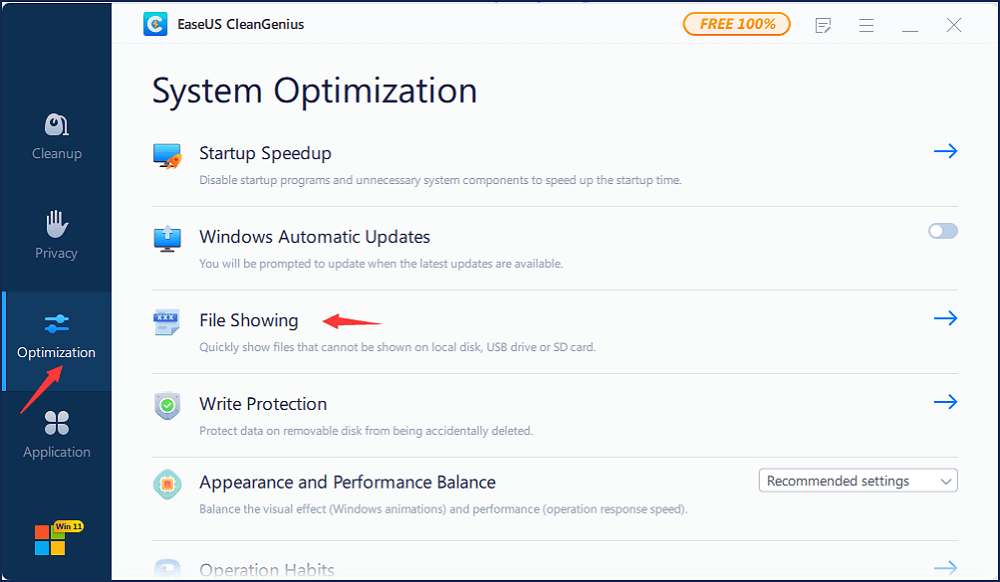
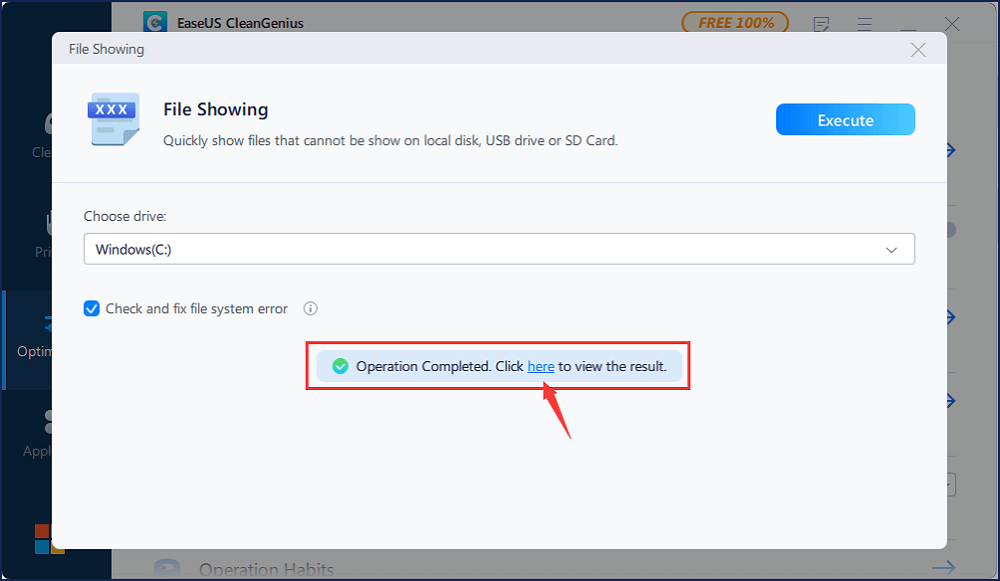
If command line is not your ideal choice, you can apply this command-line alternative tool — EaseUS CleanGenius. Use this one-click tool to fix the file system error on your hard drive.
Step 1. Download EaseUS CleanGenius on your computer for free.
Step 2. Run the software. Click «Optimization» on the left panel, and then choose «File Showing» .
Step 3. Go to «Choose drive» and select the drive with a file system error. Check the «Check and fix file system error» option and click «Execute».
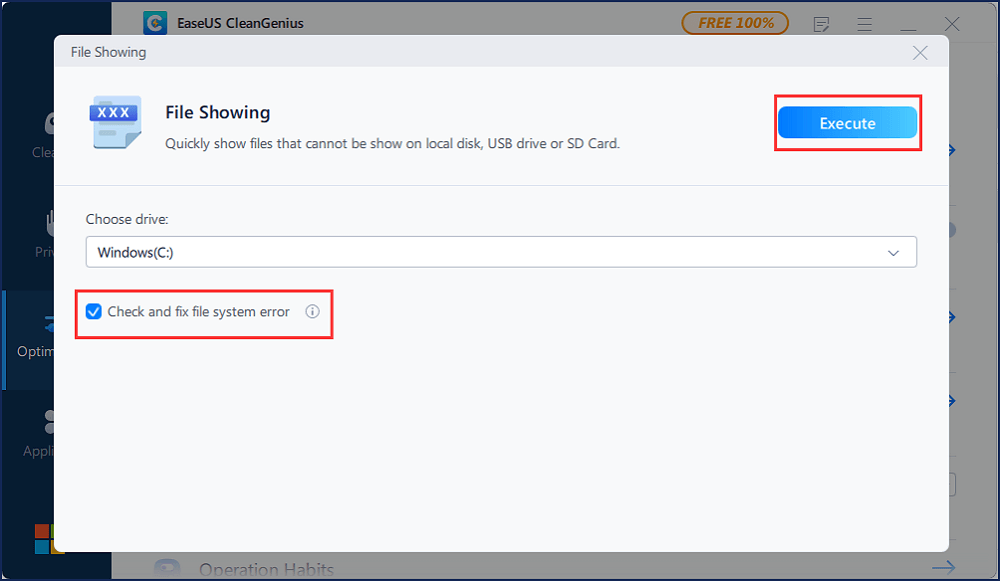
Step 4. Wait the EaseUS CleanGenius completes the repairing process. After that, click the «here» to view the result.
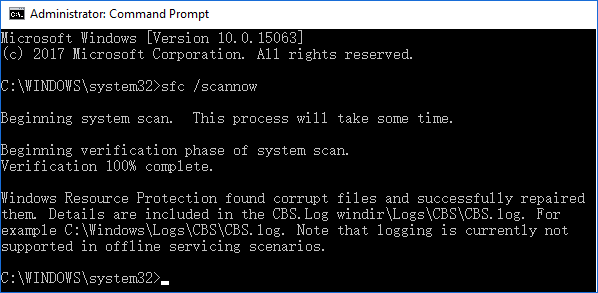
# 5. Run SFC Scan to Check for Corruptions
Essential systems files are responsible for connecting a drive to the OS. It turns out that some incorrect connection and detection problems result from damaged or corrupted system files, and Windows has the System File Checker (SFC) for you to remedy the error addressed here.
- 1) Press Windows + X keys to bring up the menu and choose Command Prompt (Admin)
- 2) In the Command Prompt, type sfc /scannow and hit Enter.
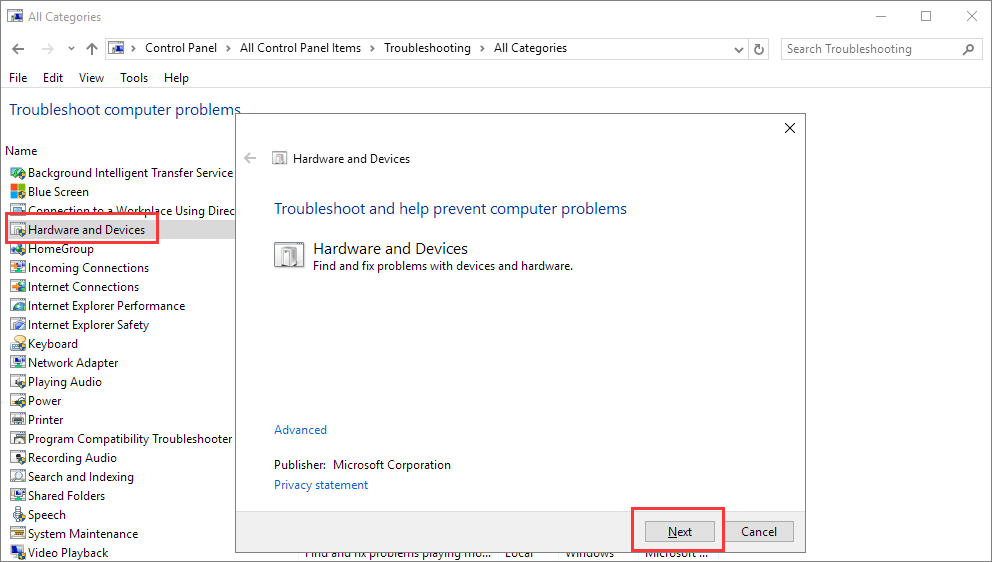
# 6. Run Hardware and Device Troubleshooter
As controller issues are one of the mentioned culprits, you must go through this step to check and repair the bad registry values and any controllers that are not working properly. Windows Hardware and Device Troubleshooter is an inbuilt auto troubleshooting program for you to detect any discrepancies in the hardware and attempt to fix them.
- 1) Navigate to Control Panel > Troubleshooting.
- 2) Click View all on the left pane, and then «Configure a device» under the Hardware and Sound on the right pane.
- 3) Follow the onscreen wizard to let the program check problems.
- 4) Choose «Apply this fix» or «Skip this fix» of your choice. You may require to restart the computer for the fixes to take effect.
# 7. Other Doable Methods Regarding ‘the device are not ready’
As long as the hard drive is marked as ‘Not initialized’, ‘ unallocated’ and ‘Raw’ in Windows Disk Management guided by the error ‘The device is not ready’, the next coming three methods could probably help you out.
- 1) Not initialized: Right-click on the drive partition and choose «Initialize Disk» > Select a GPT or MBR partition style and click «OK».
- 2) Unallocated: Right-click on the unallocated volume and choose «New Simple Volume» > follow the wizard to specify a file system and drive letter to it.
- 3) Raw: Right-click on the Raw drive and choose «Format…» > Choose a proper file system and perform a quick format.
Conclusion
«The device is not ready» is usually accompanied by different heading error messages in various kinds of storage devices. Nevertheless, as we’ve peeked into the fundamental factors, it’s related to very typical hardware and software malfunctioning issues, leading to the same consequence of a not working hard drive.
According to what we outlined in the body part, you got over seven ways to get rid of the ‘the device is not ready’ error, and beforehand data recovery on an inaccessible hard drive is especially recommended in the beginning.
Have you tried all the collected solutions to fix the not-ready device in Windows 10, 8, or 7? We hope that at least one of the given methods has eliminated your worries.
- 1. Recover data from the not ready device
- 2. Try every way to check the connection
- 3. Re-install your device driver
- 4. Run disk check to fix hardware issues
- 5. Run Sfc scan to check for corruptions
- 6. Run Hardware and Device Troubleshooter
- 7. Fix not initialized/unallocated/Raw status in Disk Management
Fix ‘the device is not ready’ Error FAQs
You have learned many ways to fix the «the device is not ready» error, and you can check the following questions and answers to learn more information:
How to fix you need to format the disk in the drive before you can use it?
There are three ways to fix you need to format the disk error on your computer:
- 1. Connect your disk to another computer.
- 2. Run an antivirus program.
- 3. Repair your disk in CMD.
Note: Remember to rescue data from the disk before trying to fix the problem.
How do I check my device connection?
Try everything you can to rule out the connection aspect if you run across a hard disk that is currently trapped in a malfunctioning state.
- 1. Unplug the gadget. Plug it back into each USB port until the external device shows up normally in the operating system again after a few seconds.
- 2. If not, connect to the OS once more using a different USB cable that is compatible with the device.
- 3. Use another computer with the storage device. If the issue has been resolved, you should fix the broken USB ports on your computer.
How to fix the ‘the device is not ready’ error?
There are plenty of methods to fix the ‘the device is not ready’ error:
- 1. Check the device connection on your PC.
- 2. Update or reinstall the device driver on your computer.
- 3. Check hardware problems by running Disk Check.
- 4. Use CMD to check errors.
- 5. Run hardware and device troubleshooter.
- 6. Fix not initialized/unallocated/RAW status in Disk Management.
Can I rescue data from a not-ready hard drive?
You can rescue data from a not-ready hard drive with EaseUS Data Recovery Wizard:
- 1. Plug in your hard drive, and launch EaseUS Data Recovery Wizard.
- 2. Scan the hard drive and find the lost files.
- 3. Recover all the selected files in a safe place.
«After a major Windows 10 update, I found that I can’t open USB flash drives as well as some other external hard drives. The error message is about the device is not ready. But the hard drive’s light is blinking, I can also see the drive letter in Disk Management. What should I do to access data and quickly fix the error?»
| Workable Solutions | Step-by-step Troubleshooting |
|---|---|
| 1. Recover data from the drive | Select the hard drive which becomes inaccessible on your PC. Click «Scan»…Full steps |
| 2. Check the connection | Plug out the device. After a few seconds, plug it in all the USB ports in turn until the…Full steps |
| 3. Re-install your device driver | Go to Device Manager, right-click the name of your device, select Uninstall…Full steps |
| 4. Run a disk check | Right-click on the drive which you wish to check and select Properties…Full steps |
| 5. Other effective solutions | Run Sfc scan to check for corruptions > Run hardware and device troubleshooter…Full steps |
How to Fix «the device is not ready» Error?
‘The device is not ready is a common Windows 10/8/7 error message related to a flash drive, CD/DVD media, external hard drive, internal HDD, virtual disk manager, or Diskpart. Despite solutions to ‘the device is not ready’ on different devices vary, the reasons behind the occasions are similar to each other. This NOT READY error implies primarily a damaged digital device, hardware failure, compatibility issues, connection issues, or sometimes Windows file system corruption. For instance:
1. Flash drive or external hard drive — Location is not available. The device is not ready
If it’s happening to a removable disk, like a USB stick, flash drive, memory card, or an external HDD, when you try to open it, this device not ready error indicates that the Windows system cannot connect to it. We will usually tell users to check the connection problem in the first place.
2. Internal hard drive — Location is not available. The device is not ready
Displaying the same error message, but if it’s on a local hard drive installed on your computer, it’s likely that something goes wrong with the present drive. Bad sectors, in most situations, are accused of being the key reason to cause the hard drive ‘the device is not ready’.
3. Virtual Disk Manager — The device is not ready
The device not ready error emerges on Virtual Disk Manager when you don’t have the correct permissions or there is a problem mapping the drives between the OS and the VM manager.
4. Diskpart — Dsikpart has encountered an error. The device is not ready
In case your hard disk failed, or the storage controller on the mainboard is corrupted, you will receive the exact error.
All the discussed situations involving ‘the device is not ready’ errors would cause the present internal or external disk inaccessible. As we’ve already analyzed, both hardware and software issues could cause a Windows computer to be unable to read your connected hard drive normally, though it is recognized and showing up on the computer. Do not worry when such an error occurs. Take the right steps to recover data and rectify the problem by following the given troubleshooting methods with ease.
# 1. Recover Data from the Inaccessible Hard Drive
When a hard drive or USB stick is showing the «device is not ready» error, you can no longer access the hard drive data as usual.
Download EaseUS Hard Drive Recovery Software
When this happens, do not hesitate to download EaseUS EaseUS Data Recovery Wizard. It’s the most qualified recovery software that supports accessing hard drive without formatting and recovering data.
Step 1. Select the hard drive which becomes inaccessible on your PC. Click «Scan» to let EaseUS Data Recovery Wizard scan and find your hard drive data.
Step 2. After the scan, you can preview and check found files on the scanning result window. The «Deleted Files» and «Other Lost Files» folders contain all your lost files. You can also click «Filter» to quickly find a specific type of file. Then, preview the files and determine which files you want retrieved.
Step 3. Finally, select the items you want to restore and click «Recover». Choose a secure location (a healthy physical drive on your PC or another external storage device) and click «OK» to start recovering all lost data from your inaccessible hard drive.
#2. Try Every Way to Check the Connection
Unnecessary mistakes concerning a loose or poor connection should be avoided in the first place. When you encountered any hard drive stuck in not working properly at the moment, try every way to exclude the connection factor.
- 1) Plug out the device. After a few seconds, plug it in all the USB ports in turn until the external device appears normal in the operating system again.
- 2) Otherwise, change a USB cable that matches the device and connect to the OS again.
- 3) Take the storage device to another computer. If the problem is solved, you should repair the not working USB ports on your own computer.
# 3. Re-install Your Device Driver
On Windows 10/8/7, a common software problem is «the device driver is not installed, is corrupted or missing». Try to re-install the device driver and fix the «device is not ready» warning.
- 1) Go to Device Manager, right-click the name of your device, select Uninstall.
- 2) Keep your device connected. Restart the PC and Windows will attempt to reinstall the driver.
# 4. Run Disk Check to Fix Hardware Issues
Do not forget to perform a disk check to examine disk errors. The «device is not ready» error is very likely resulted from file system errors or bad sectors on the drive, so let the Windows disk check utility help.
- 1) Right-click on the drive which you wish to check and select Properties.
- 2) Click on the Tools tab. Under the Error-checking, click on the Check button. This option will check the drive for file system errors.
- 3) Follow the wizard to complete the disk error check and restart your computer to repair the errors that were found.
- 4) You can also use CMD to remove bad sectors with administrator privilege.
- 5) In addition, there is a more user-friendly option for you to check and repair bad sectors, meanwhile, with more powerful capabilities. Give it a try.
If command line is not your ideal choice, you can apply this command-line alternative tool — EaseUS CleanGenius. Use this one-click tool to fix the file system error on your hard drive.
Step 1. Download EaseUS CleanGenius on your computer for free.
Step 2. Run the software. Click «Optimization» on the left panel, and then choose «File Showing» .
Step 3. Go to «Choose drive» and select the drive with a file system error. Check the «Check and fix file system error» option and click «Execute».
Step 4. Wait the EaseUS CleanGenius completes the repairing process. After that, click the «here» to view the result.
# 5. Run SFC Scan to Check for Corruptions
Essential systems files are responsible for connecting a drive to the OS. It turns out that some incorrect connection and detection problems result from damaged or corrupted system files, and Windows has the System File Checker (SFC) for you to remedy the error addressed here.
- 1) Press Windows + X keys to bring up the menu and choose Command Prompt (Admin)
- 2) In the Command Prompt, type sfc /scannow and hit Enter.
# 6. Run Hardware and Device Troubleshooter
As controller issues are one of the mentioned culprits, you must go through this step to check and repair the bad registry values and any controllers that are not working properly. Windows Hardware and Device Troubleshooter is an inbuilt auto troubleshooting program for you to detect any discrepancies in the hardware and attempt to fix them.
- 1) Navigate to Control Panel > Troubleshooting.
- 2) Click View all on the left pane, and then «Configure a device» under the Hardware and Sound on the right pane.
- 3) Follow the onscreen wizard to let the program check problems.
- 4) Choose «Apply this fix» or «Skip this fix» of your choice. You may require to restart the computer for the fixes to take effect.
# 7. Other Doable Methods Regarding ‘the device are not ready’
As long as the hard drive is marked as ‘Not initialized’, ‘ unallocated’ and ‘Raw’ in Windows Disk Management guided by the error ‘The device is not ready’, the next coming three methods could probably help you out.
- 1) Not initialized: Right-click on the drive partition and choose «Initialize Disk» > Select a GPT or MBR partition style and click «OK».
- 2) Unallocated: Right-click on the unallocated volume and choose «New Simple Volume» > follow the wizard to specify a file system and drive letter to it.
- 3) Raw: Right-click on the Raw drive and choose «Format…» > Choose a proper file system and perform a quick format.
Conclusion
«The device is not ready» is usually accompanied by different heading error messages in various kinds of storage devices. Nevertheless, as we’ve peeked into the fundamental factors, it’s related to very typical hardware and software malfunctioning issues, leading to the same consequence of a not working hard drive.
According to what we outlined in the body part, you got over seven ways to get rid of the ‘the device is not ready’ error, and beforehand data recovery on an inaccessible hard drive is especially recommended in the beginning.
Have you tried all the collected solutions to fix the not-ready device in Windows 10, 8, or 7? We hope that at least one of the given methods has eliminated your worries.
- 1. Recover data from the not ready device
- 2. Try every way to check the connection
- 3. Re-install your device driver
- 4. Run disk check to fix hardware issues
- 5. Run Sfc scan to check for corruptions
- 6. Run Hardware and Device Troubleshooter
- 7. Fix not initialized/unallocated/Raw status in Disk Management
Fix ‘the device is not ready’ Error FAQs
You have learned many ways to fix the «the device is not ready» error, and you can check the following questions and answers to learn more information:
How to fix you need to format the disk in the drive before you can use it?
There are three ways to fix you need to format the disk error on your computer:
- 1. Connect your disk to another computer.
- 2. Run an antivirus program.
- 3. Repair your disk in CMD.
Note: Remember to rescue data from the disk before trying to fix the problem.
How do I check my device connection?
Try everything you can to rule out the connection aspect if you run across a hard disk that is currently trapped in a malfunctioning state.
- 1. Unplug the gadget. Plug it back into each USB port until the external device shows up normally in the operating system again after a few seconds.
- 2. If not, connect to the OS once more using a different USB cable that is compatible with the device.
- 3. Use another computer with the storage device. If the issue has been resolved, you should fix the broken USB ports on your computer.
How to fix the ‘the device is not ready’ error?
There are plenty of methods to fix the ‘the device is not ready’ error:
- 1. Check the device connection on your PC.
- 2. Update or reinstall the device driver on your computer.
- 3. Check hardware problems by running Disk Check.
- 4. Use CMD to check errors.
- 5. Run hardware and device troubleshooter.
- 6. Fix not initialized/unallocated/RAW status in Disk Management.
Can I rescue data from a not-ready hard drive?
You can rescue data from a not-ready hard drive with EaseUS Data Recovery Wizard:
- 1. Plug in your hard drive, and launch EaseUS Data Recovery Wizard.
- 2. Scan the hard drive and find the lost files.
- 3. Recover all the selected files in a safe place.
|
При выключении компа или при перезагрузке вылетает сообщение «устройство не готово, возможно открыта дверца…» похоже на шутку, какик могла вытворять прога для создания мессаг. |
|
|
Administrator Сообщений: 3843 |
Скорее всего у тебя в BIOS выставлен неправильно тип для дисковода — 5.25 дюйма. в этих дисководах требовалось закрыть «дверцу» чтобы читалась дискета. Либо вообще дисковод отключи в BIOS. Хочешь быть мудрым? Не желай всего, что видишь; не верь всему, что слышишь; не говори всего, что знаешь; не делай всего, что умеешь, а только то, что полезно. |
|
Как ни странно у меня также. Поставил соседу нов32 с последними обновлениями и у него такаяже херь началася. |
|
|
У меня компьютер начал выдавать сообщение: «Устройство не готово возможно открыта дверца. Проверьте наличие диска в устройстве А, а так же положение дверцы устройства.» |
|
|
Закроой дверцу)))) А если серьезно, давненько правда это было, но тем не менее — словил я вирюгу, так вот он мне тоже на флоп ругался, постоянно выскакивали мессаги типа «устройство не готово», «нет диска в дисководе» |
|
|
Вообще это все решается правильной настройкой BIOS.. |
|
|
31337 Guest |
#7 Это нравится:0Да/0Нет 19.05.2009 07:59:16 Попробуй скинь биос на стандартные настройки. Если флопаря нет — выключи его в биосе. |

При выключении или перезагрузке компьютера появляется диалоговое окно с заголовком:»Windows — Устройство не готово» и содержанием:»Устройство не готово; возможно, открыта дверца. Проверьте наличие диска в устройстве А:, а также положение дверцы устройства».
Что это такое? Диска А в принципе вообще нет!
Вот что нашла:
или вирус к дисководу обращается, или антивирус разбирайтесь..
На вирусы проверила — ничего.
Возможная причина нелиценз. NOD32
— у меня не линценз., но он глючить начал только два дня назад…
Устройство не готово возможно открыта дверца проверьте наличие диска в устройстве А а так же положение дверцы устройства при установке windows 7 с флешки. Уже отключил флоппи диск в биосе, не помогает
 Александр
31.05.2022
Назначь на букву А виртуальный диск
 Sasha
Sasha
31.05.2022
Ты сделал загрузочным через утилиту rufus или ventoy?
 Гость
Гость
01.06.2022
Буква А в винде назначена на 5 дюймовый дисковод, которые исчезли в начале 90х годов.
Именно у них была «дверца».
Код винды никто не переписывал со времен NT3.0 — его просто обвешивают всё новыми патчами, якобы это новая винда. И за счет этой обвески винда всё тормознее.
флоппи появились в средине 90х. Дверца — не про них.
форматни ситемный раздел, а потом уже ставь на него винду. Думаю, это стоящая винда эту херню тебе пишет
 Пользователь
18.04.2023
в биосе отключите дискету
- Чтобы картинка в виндовс проваднике уже была открыта только в маленьком виде чтобы можно было её не отк Чтобы вот зашёл в проводник а фото много и сразу видно где она а не открывать каждую картинку подскажите как сделать чтобы показывалась она у меня так было я поменял персонализацию и всё.
- При установке инстаграм в эмуляторе андроид — Nox (на Windows) выдает: не поддерживается на вашем устройстве При этом другие приложения устанавливаются без проблем. Мне очень нужен именно инстаграм. Как решить проблему?
- Возможно ли запустить Windows на мобильном устройстве с ARM архитектурой? После просмотра видео по установке Windows 10 на устройство (Raspberry Pi)с архитектурой процессора ARM возникла одна полуутопическая идея. Возможно ли адаптировать данную ОС для смартфона на базе Android для запуска без эмуляторов?
- Проверьте готов ли компьютер к установке windows 10 попробуйте перезапустить программу установки Помогите эта программа не дает устоновить про версию 10
Добавить комментарий
Windows 2000 (да-да, именно он) выдает юзеру периодические сообщения — “Устройство не готово; возможно отрыта дверца. Проверьте наличие диска в устройстве А, а также положение дверцы устройства”.
Сообщение довольно странное и надоедливое, выскакивает при каждом выключении компа, переставлять и ковырять систему на этом чудо-девайсе мне не дали, поэтому было решено отключить у устройствах и в BIOS дисковод Флоппи 
В биосе на Floppy Drive A поставить disable. И он пропадет из диспетчера задач сам. Решилась проблема, но сомнения остались. Перезагрузился, и пока все были на обеде проверил машинку CureIt. Он нашел там двух гаденышей в TEMP Trojan.DownLoader4 или еще какой-то троянец. Обоих успешно снес и мне полегчало