Valorant — игра, которая быстро завоевала популярность и стала печально известной благодаря игровому процессу, который она привносит на соревновательную сцену киберспорта. Пока игра процветает, в ней есть свои проблемы, с которыми часто сталкиваются пользователи. Одна из этих проблем — сообщение об ошибке «Произошла критическая ошибка, процесс должен быть прекращен». Теперь сообщение об ошибке появляется в середине игры, поэтому это не проблема, которая мешает вам запустить игру в целом. Однако причина, по которой игра вылетает в середине игры, может быть более раздражающей.
Системная ошибка Valorant
Как оказалось, есть несколько причин, по которым может появиться сообщение об ошибке. В некоторых случаях проблема может быть связана с разогнанными процессорами или графическим процессором и вызвана ими. Наряду с этим, программное обеспечение, такое как MSI Afterburner и другие, которые часто используются для разгона компонентов вашего ПК, также может быть виновником. Но это еще не все. Ниже мы рассмотрим известные причины более подробно. Поэтому давайте займемся этим.
- Разогнанный процессор или графический процессор. Как выясняется, если вы используете разогнанный процессор или разогнанный графический процессор, это может вызывать у вас случайные сбои. В таком случае исправление будет заключаться в возвращении к базовым часам ваших компонентов до тех пор, пока проблема не будет решена Riot.
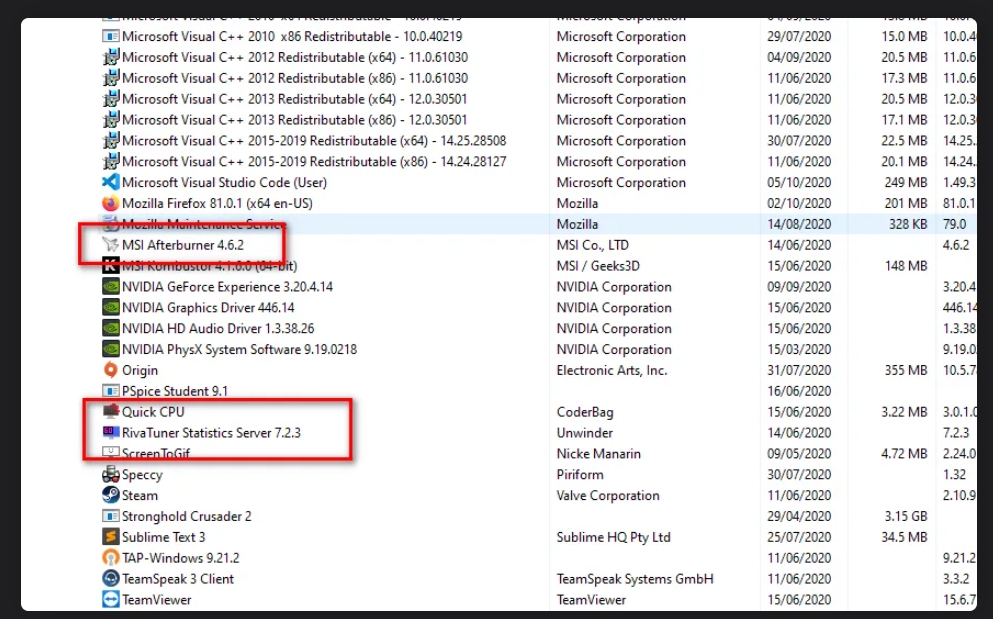
- MSI Afterburner и Rivatuner. В некоторых случаях проблема также может быть вызвана различным программным обеспечением для разгона, работающим в фоновом режиме. Даже если у вас нет разогнанного компьютера, наличие такого программного обеспечения на вашем диске может вызвать проблему. В результате вам придется удалить оба этих приложения со своего компьютера в игру, чтобы остановить сбой.
- Настройки запуска игры — в некоторых случаях сообщение об ошибке может быть вызвано настройками запуска игры. Эти настройки хранятся в файле, известном как GameSettings.ini. Чтобы обойти эту проблему, вам придется изменить некоторые значения внутри файла.
- Устаревшие драйверы дисплея. Проблема также может быть вызвана, если вы используете устаревшие драйверы дисплея. Известно, что устаревшие драйверы вызывают различные проблемы, и это также может иметь место здесь. Поэтому, чтобы исправить это, вам нужно будет загрузить и установить последние версии драйверов, доступных для вашего графического процессора.
- Недостаточные разрешения. Наконец, последнее возможное сообщение об ошибке — это запуск игры с недостаточными разрешениями. В некоторых случаях некоторые фоновые службы могут мешать игре, что приводит к ее сбою. Следовательно, чтобы решить эту проблему, вам нужно будет запустить игру и другие ее зависимости от имени администратора.
Теперь, когда мы закончили с потенциальными причинами проблемы, мы можем перейти к различным решениям, которые вы можете реализовать, чтобы решить проблему. Итак, для всего этого продолжайте.
Метод 1: запустить игру от имени администратора
Первое, что вам следует сделать при появлении сообщения об ошибке, — запустить игру от имени администратора. Это предотвратит любые фоновые службы, которые могут ему мешать, и в результате ваша игра не вылетит, если это является причиной проблемы. Важно отметить, что запуск только ярлыка или самой игры не поможет, вы должны убедиться, что другие зависимости также работают от имени администратора. В дополнение к этому, вы должны убедиться, что служба VGC также работает в окне «Службы». Для этого просто следуйте приведенным ниже инструкциям:
- Прежде всего, нажмите клавишу Windows + R, чтобы открыть диалоговое окно «Выполнить».
- Затем в диалоговом окне «Выполнить» введите services.msc и нажмите Enter.
- В окне «Службы» найдите службу VGC. Чтобы упростить эту задачу, нажмите V, чтобы перейти к службам, начиная с нажатого символа.
Служба VGC
- Щелкните правой кнопкой мыши службу и перейдите в Свойства.
- В окне «Свойства» убедитесь, что для параметра «Тип запуска» установлено значение «Автоматический» и служба работает.
Свойства службы VGC
- Нажмите Применить, а затем нажмите ОК, чтобы сохранить изменения. Закройте окно служб на этом этапе.
- После этого перейдите в каталог Valorant и перейдите в Riot Games> VALORANT> live> ShooterGame> Binaries> Win64 path.
- Там щелкните правой кнопкой мыши файл VALORANT-Win64-Shipping и перейдите в Свойства.
- Перейдите на вкладку «Совместимость» и установите флажок «Запускать эту программу от имени администратора».
Запуск программы от имени администратора
- Нажмите Применить, а затем нажмите ОК.
- После этого вы должны сделать то же самое для ярлыка на рабочем столе. Если у вас нет ярлыка, просто перейдите в Riot Games> Riot Client. Там выполните те же действия для RiotClientServices.
- Наконец, перейдите в каталог Riot Games> Valorant> live и сделайте то же самое для файла VALORANT.
- Посмотрите, решит ли это проблему.
Метод 2: обновить драйвер графического процессора
Другой способ избавиться от указанного сообщения об ошибке — убедиться, что драйвер графического процессора в вашей системе обновлен. Это может помочь, если в вашем случае проблема вызвана устаревшим драйвером. Об этом сообщил пользователь, столкнувшийся с аналогичной проблемой; следовательно, это может сработать и для вас. Пользователи часто сталкиваются с множеством проблем, когда их драйверы дисплея не обновлены, особенно с такими проблемами, как сбои в игре. Таким образом, следуйте приведенным ниже инструкциям, чтобы обновить драйверы:
NVIDIA
- Если вы используете графические карты NVIDIA и у вас установлен GeForce Experience, то обновить драйверы очень просто.
- Откройте для себя GeForce Experience. Как только он загрузится, перейдите на вкладку Драйверы.
- Если доступно обновление, вы увидите кнопку «Загрузить».
Драйверы GeForce Experience
- Щелкните по нему, чтобы начать загрузку последнего обновления.
- Если у вас не установлен GeForce Experience, вы можете перейти на Сайт NVIDIA для проверки и загрузки обновлений.
AMD
- В случае AMD вы можете использовать программное обеспечение AMD Radeon.
- Щелкните правой кнопкой мыши на рабочем столе и выберите вариант AMD Radeon вверху.
Открытие настроек AMD Radeon
- Когда откроется окно AMD Radeon, перейдите на вкладку Система.
Настройки AMD Radeon
- Загрузите и установите любое доступное обновление.
- Если у вас не установлен AMD Radeon, используйте Сайт AMD вместо.
Метод 3: изменить настройки запуска игры
Вы также можете решить проблему, изменив настройки запуска игры. Эти настройки хранятся в файле GameSettings.ini в каталоге Valorant. В этом файле хранится ваша базовая конфигурация, которая будет использоваться при запуске игры. Вам нужно будет внести некоторые изменения, чтобы увидеть, решит ли это проблему. Следуйте инструкциям ниже:
- Прежде всего, откройте диалоговое окно «Выполнить», нажав клавиши Windows + R.
- Затем введите% AppData% в диалоговом окне «Выполнить» и нажмите Enter.
- Откроется окно проводника Windows.
- Вернитесь и перейдите в локальный каталог.
Папка AppData
- Оттуда перейдите в каталог ShooterGame> Saved> Config> WindowsClient.
- Откройте файл GameUserSettings.ini.
Настройки пользователя Valorant
- Там измените значение DefaultMonitorIndex с 0 на -1. После этого также измените значение LastConfirmedMonitorIndex с 0 на -1.
- Сохраните изменения и закройте файл.
- Посмотрите, решит ли это проблему.
- Если это не решит проблему, вы можете просто отменить изменения, внесенные на шаге 7.
Метод 4: удалите MSI Afterburner и Rivatuner
Как оказалось, в некоторых случаях проблема может быть вызвана определенными инструментами разгона, которые либо работают в фоновом режиме, либо просто установлены в вашей системе. Для некоторых пользователей проблема решалась, когда они закрывали утилиты. Однако для других проблема будет сохраняться, если они не удалят утилиты из своей системы. Следовательно, вам также придется удалить инструменты с вашего ПК, если они у вас установлены. Для этого следуйте инструкциям ниже:
- Прежде всего, откройте меню «Пуск» и найдите панель управления.
- Когда откроется окно Панели управления, выберите параметр «Удалить программу» в разделе «Программы и компоненты».
Панель управления
- Это приведет вас к списку всех установленных приложений в вашей системе.
- Найдите MSI Afterburner и Rivatuner, если они у вас установлены. Если на вашем компьютере установлены другие аналогичные утилиты, обязательно удалите их.
Удаление MSI Afterburner и Rivatuner
- Дважды щелкните приложения, чтобы начать удаление.
- После этого снова откройте игру, чтобы узнать, решена ли проблема.
Метод 5: вернуться к базовым частотам
Если ваш процессор или графический процессор разогнан, вам придется вернуться к базовым частотам, чтобы решить эту проблему. Как оказалось, игра не так стабильна с некоторыми разогнанными CPU или GPU. Вот почему вы часто сталкиваетесь со случайными сбоями во время игры. Одним из способов решения этой проблемы было бы ограничение FPS до очень стабильного предела, что могло бы спасти вас от сброса настроек по умолчанию. Однако, если это не сработает, вам придется вернуться к значениям часов по умолчанию. Если вы разогнали свой графический процессор с помощью MSI Afterburner, вернуться будет очень легко. Все, что вам нужно сделать, это удалить профили, расположенные в каталоге Program Files (x86)> MSI Afterburner> Profiles. Это удалит ваши настройки.
Вы можете использовать различные сторонние утилиты, такие как CPU-Z или GPU-Z, чтобы узнать базовые частоты вашего процессора и графического процессора по умолчанию, чтобы проверить их после того, как вы удалили разгон.
Метод 6: обновить BIOS
Наконец, если ни одно из вышеперечисленных решений не работает для вас, возможно, проблема связана с прошивкой BIOS. В таком сценарии вам нужно будет просто установить последнее обновление, доступное для вашего BIOS, а затем посмотреть, сохраняется ли проблема. Об этом сообщил пользователь, который столкнулся с тем же сообщением об ошибке, и обновление BIOS позволило обойти эту проблему. Обновление BIOS может отличаться в зависимости от вашего производителя. Однако производители часто предоставляют инструкции на своих веб-сайтах, и все, что требуется для достижения желаемого результата, — это простой поиск в Google. https://appuals.com/how-to-fix-the-geforce-experience-not-finding-games-problem-on-windows/
После обновления BIOS откройте игру, чтобы проверить, решена ли проблема.

Ошибка, которая появляется за пределами границ Riot Games, — это критическая системная ошибка. Так что если у вас возникла эта проблема, не волнуйтесь, потому что здесь вы узнаете, как исправить «Произошла критическая ошибка, и процесс должен быть завершен» Valorant!
Причина критической ошибки в Valorant
Эта критическая системная ошибка может появиться в основном при попытке запустить или поиграть в Valorant в середине игры. В этом случае виноваты ни Riot Games, ни игра Valorant. Критическая системная ошибка означает, что ваш компьютер или, точнее, ваша операционная система Windows столкнулась с ошибкой и закрыла Valorant, чтобы спасти ваш компьютер от любого вреда.
Существует ряд проблем, которые могли привести к возникновению критической ошибки во время игры в Valorant. Но беспокоиться не о чем, так как далее мы рассмотрим все проблемы вместе с решениями, чтобы вы могли исправить эту критическую системную ошибку Valorant и продолжить игру с лучшими скинами ножей!
КАК ИСПРАВИТЬ КРИТИЧЕСКУЮ СИСТЕМНУЮ ОШИБКУ В VALORANT
ОБНОВИТЕ СВОЙ ПК С ОС WINDOWS
Первое решение, которое вы можете попробовать для устранения критической системной ошибки Valorant, — установить последние обновления на ваш ПК с Windows. Microsoft продолжает выпускать обновления безопасности и благополучия для пользователей Windows PC. Поэтому если критическая ошибка возникла из-за вашей ОС Windows, обновление может исправить ее. Вот как можно обновить ПК с Windows:
- Нажмите клавиши Windows Key+I, чтобы открыть Настройки ПК
- Выберите Обновление и безопасность, который находится последним
- Нажмите на Проверить наличие обновлений
- Если есть доступные обновления Windows, нажмите на Установить
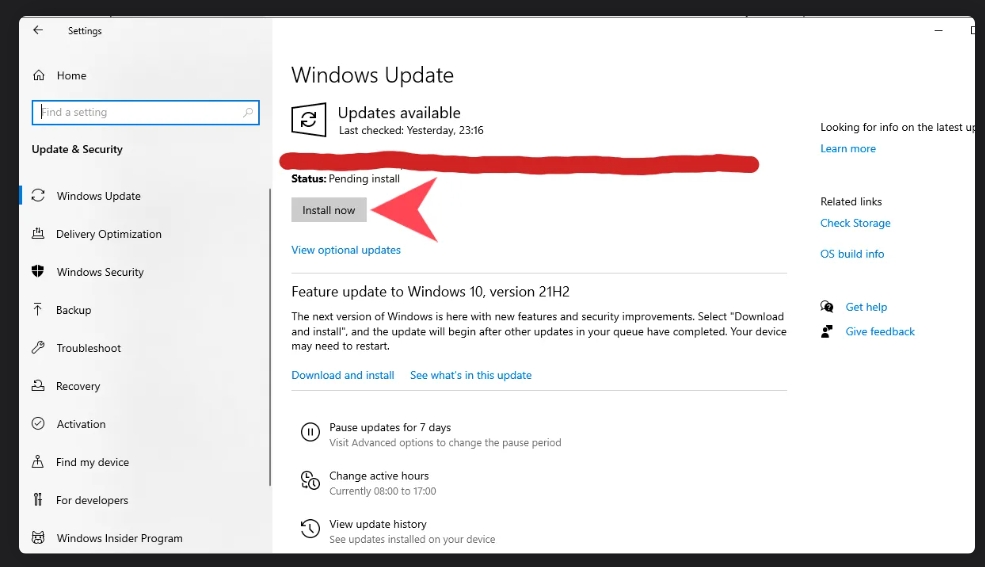
Выполните все необходимые действия, обновите ПК Windows, и, скорее всего, вам также придется перезагрузить ПК. Теперь попробуйте снова поиграть в Valorant с лучшим скином Вандала и посмотрите, появится ли критическая ошибка снова. Если она появилась, следуйте приведенным ниже решениям, чтобы узнать, сможете ли вы исправить эту ошибку.
ОБНОВИТЕ ДРАЙВЕРЫ ВИДЕОКАРТЫ
Второе решение, которое вы можете попробовать для исправления критической системной ошибки Valorant, — установить последние обновления драйверов видеокарты. Вам следует часто обновлять драйверы вашей графической карты, так как они исправляют и обеспечивают меньшее количество сбоев в игре. Вот как вы можете традиционно обновить свои графические драйверы:
- На вкладке Поиск найдите Панель управления и выберите первый вариант.
- Нажмите на Оборудование и звук и выберите Диспетчер устройств
- Найдите опцию «Адаптеры дисплея» и дважды щелкните по ней.
- Щелкните правой кнопкой мыши на вашей видеокарте и нажмите на Обновить драйвер
- Выберите Автоматический поиск драйверов и выполните все необходимые действия.
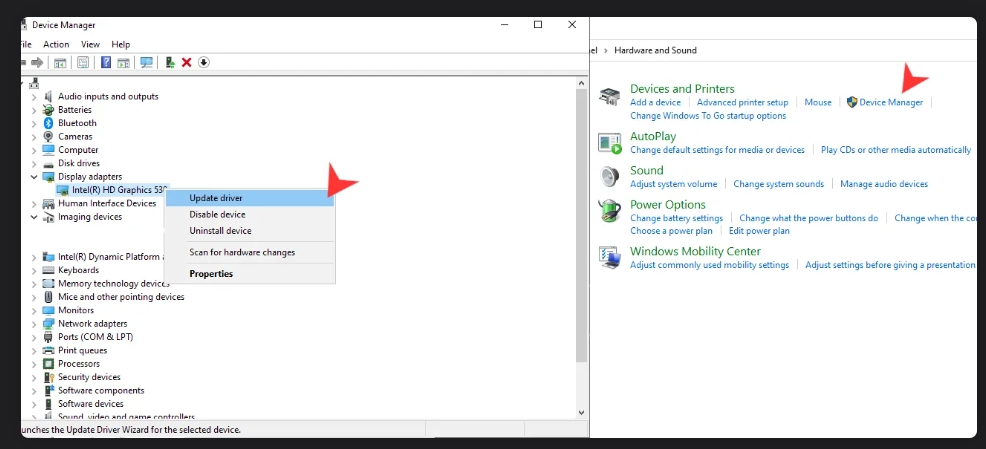
Существует также вероятность того, что ваш компьютер не найдет нужного обновления драйверов видеокарты, поэтому вам, возможно, придется обновлять драйверы вручную. В зависимости от того, какую видеокарту вы используете, будь то видеокарта AMD или NVIDIA, вот где вы можете скачать нужные драйверы:
- AMD Graphics Card Drivers Update — https://www.amd.com/en/support
- NVIDIA Graphics Card Drivers Update — https://www.nvidia.com/Download/index.aspx
- Intel Graphics Card Drivers Update — https://www.intel.com/content/www/us/en/support/products/80939/graphics.html
Вы можете попробовать загрузить нужные обновления драйверов из уважаемых приложений для видеокарты, таких как AMD Radeon Software. После обновления драйверов видеокарты вы сможете свободно войти в Valorant с лучшими скинами Phantom! Хотя если критическая ошибка появится снова, то проблема может быть более серьезной.
ЗАПУСТИТЕ VALORANT ОТ ИМЕНИ АДМИНИСТРАТОРА
Следующее решение для устранения этой критической системной ошибки — запустить Valorant от имени администратора. Не предоставление Valorant специальных привилегий на ПК может быть причиной возникновения критической ошибки. Вот как вы можете открыть Valorant от имени администратора:
- Найдите папку установки Valorant
- Перейдите по следующему пути к папке: Riot Games -> VALORANT -> live -> ShooterGame -> Binaries -> Win64
- Найдите файл «VALORANT-Win64-Shipping».
- Щелкните по нему правой кнопкой мыши и выберите Свойства
- Выберите вкладку Совместимость
- Установите флажок Запускать эту программу от имени администратора на вкладке Совместимость
- Нажмите на Применить, затем OK
- Valorant Critical System Error Fix Run Valorant As Administrator
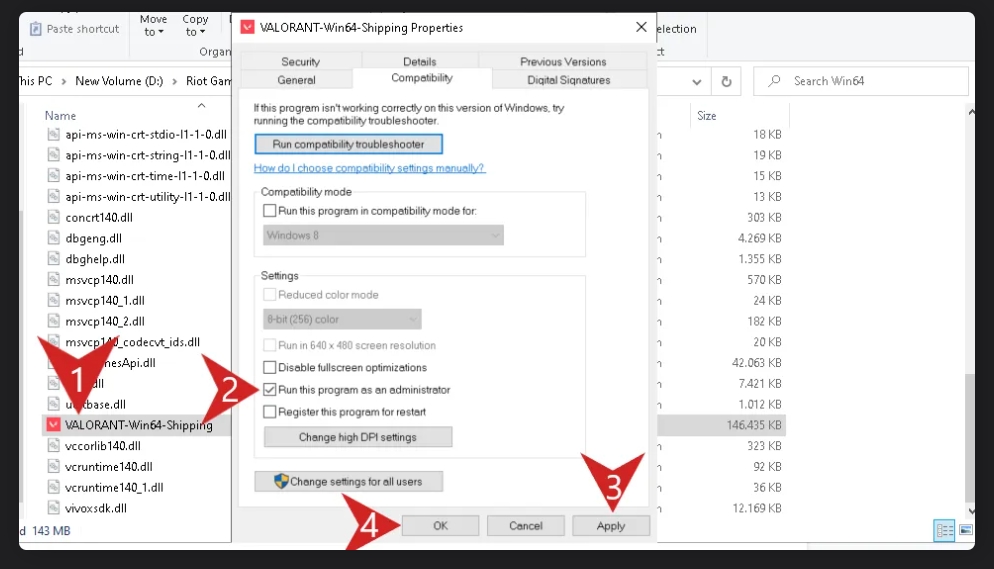
Попробуйте открыть Valorant сейчас и посмотрите, не возникнет ли критическая системная ошибка снова. Если нет, то вы можете играть с Вандалом или Фантомом! Хотя если вы снова столкнетесь с проблемой в игре, у вас еще есть множество решений, которые вы можете попробовать.
ИЗМЕНИТЬ НАСТРОЙКИ ФАЙЛА ЗАПУСКА VALORANT
Хотя это более сложное решение, вы можете исправить критическую ошибку Valorant, если измените настройки запуска игры в его файлах. Они диктуют, как Valorant открывается с самого начала, поэтому вот как вы можете изменить настройки запуска игры для Valorant:
- Нажмите клавиши Windows Key + R, чтобы открыть диалоговое окно «Выполнить».
- Введите «%AppData%» и нажмите на Enter в диалоговом окне «Выполнить».
- Вернитесь на 1 папку назад и откройте папку Local
- Откройте папку VALORANT и в правом верхнем углу найдите файл GameUserSettings.ini
- Дважды щелкните по файлу GameUserSettings.ini и откройте его с помощью Блокнота
- Измените значения «DefaultMonitorIndex» и «LastConfirmedDefaultMonitorIndex» в .ini файле с 0 на -1
- Сохраните и закройте файл
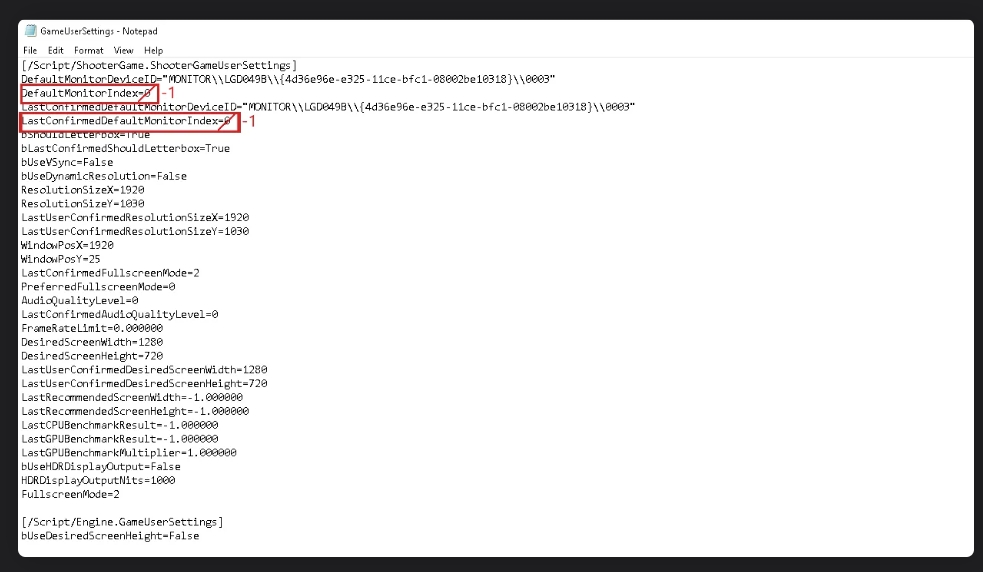
УДАЛИТЬ ПРИЛОЖЕНИЯ ДЛЯ РАЗГОНА
Valorant не воспринимает разгон ПК как нечто хорошее. И из-за разогнанного процессора вы можете получить критическую системную ошибку в Valorant. В этом случае вам придется отменить разгон и удалить приложения, такие как MSI Afterburner, которые выполняют разгон.
Чтобы удалить эти приложения для разгона, введите «Добавить или удалить программы» в строке поиска ниже и откройте первый вариант. Найдите приложения, которые делают разгон вашего GPU, например MSI Afterburner, выберите их и удалите MSI Afterburner и любые другие приложения для разгона, например RivaTuner.
Valorant Critical System Error Fix Overclocking Apps Uninstall MSI Afterburner
Отключите другие функции, которые могут удерживать разогнанный процессор на вашем ПК. Попробуйте открыть и начать играть в Valorant с лучшими агентами, чтобы посмотреть, появится ли у вас сообщение о критической ошибке. Если да, то у вас еще остались некоторые решения, которые вы можете попробовать.
ИЗМЕНИТЬ ТИП ЗАПУСКА СЛУЖБЫ VGC
Античитерская система Valorant’s Riot Vanguard временами работает не лучшим образом. Задачи Valorant и Vanguard могли перехватить ваш ПК, вызвав появление критической системной ошибки. Вам придется изменить тип запуска службы Riot Vanguard VGC, чтобы попытаться исправить эту ошибку, и вот как это сделать:
- Откройте диалоговое окно «Выполнить», нажав клавиши Windows + R.
- Введите «services.msc» и нажмите Enter, чтобы открыть окно Службы
- Найдите службу «vgc».
- Когда вы найдете ее, щелкните правой кнопкой мыши и выберите Свойства
- Измените параметр Тип запуска на Автоматический
- Нажмите на Пуск, Применить, а затем OK
- Valorant Critical System Error Fix VGC Service
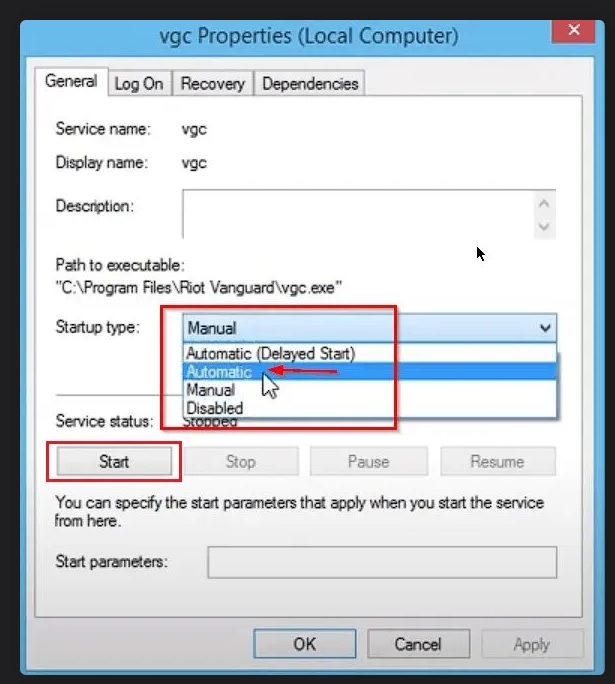
Теперь служба VGC из античита должна работать правильно. Если вы все еще получаете сообщение о критической системной ошибке, последнее решение, которое вы можете попробовать, это.
ВОСПОЛЬЗОВАТЬСЯ СИСТЕМОЙ ВОССТАНОВЛЕНИЯ VALORANT
Некоторые игроки предпочитают полностью удалить и переустановить Valorant, но они не знают, что в игре есть система ремонта. Вот как вы можете использовать систему ремонта Valorant, чтобы исправить эту критическую системную ошибку:
- Перейдите на официальный сайт Riot Games Valorant.
- Войдите в систему и снова скачайте игру
- Откройте установочный файл Valorant и нажмите на опцию Дополнительно
- Найдите и выберите точное место и папку, в которую вы скачали Valorant
- Нажмите на кнопку Установить, и Valorant попытается восстановить все поврежденные файлы.
- Valorant Исправление критических системных ошибок Восстановление системы
Подождите немного, пока игра сделает свое волшебство, и перезагрузите ПК. Попробуйте снова поиграть в игру и посмотрите, сохраняется ли ошибка. Если да, то вам следует
СВЯЗАТЬСЯ СО СЛУЖБОЙ ПОДДЕРЖКИ RIOT GAMES
Служба поддержки Riot существует для того, чтобы помочь каждому игроку Valorant справиться с любой ошибкой или игровой проблемой, с которой он может столкнуться. Они могут попросить вас предоставить конкретные файлы и дать конкретные решения для устранения этой критической системной ошибки. Вы можете связаться со службой поддержки Riot, отправив тикет здесь.
Видео
Update March 2023: Closing MSI Afterburner will fix the error. You can close it fully via Task Manager through the steps below.
- Open Task Manager.
- Search For MSI Afterburner.

- And Click On Del Button.
- That’s it.
Is the Valorant a critical error has occurred issue not letting you launch this sporty FPS? You’re definitely not alone in the endeavor that you’re suffering from. Thousands of other players have been met with a similar fate where the game just refuses to budge from its position.
Key Highlights
- Because of faulty game configuration files, people can have trouble launching and playing Valorant.
- Running the game with administrator privileges can resolve the issue. Do this by right-clicking the game icon and selecting “Run as administrator.”
- Check if your graphics drivers are up to date and keep them updated to ensure the best possible experience.
- Double-check if the Riot Vanguard service is stopped or disabled. Valorant will simply not launch with the VGC service not running.
- Many people have found that tweaking the compatibility settings fixes their issues. Follow the steps in the guide if you don’t know how to.
- Most people don’t realize that using Valorant’s game installer can also repair the game. If you’ve deleted the installer app, it can be downloaded again and used to repair the game files.
- In 2023, many are reporting that closing MSI Afterburner or RivaTuner fixes it.
- Finally, if nothing else works, you have to uninstall the game and all the related applications, such as the Riot Games client, and then reinstall it.
The good news is that you can actually resolve the issue yourself and the process doesn’t even take more than a couple of minutes.
- A Similar Guide From eXputer: Valorant Error Code 57 – Vanguard Not Initialized
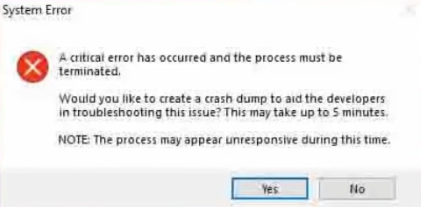
What we have at our disposal here is primarily a launch issue in essence. Valorant fails to start up and immediately crashes when you try launching it on your Windows PC. After the abrupt shutdown, a prompt appears on the screen and says, “A critical error has occurred and the process must be terminated Valorant.” You’re left feeling helpless as you try playing the game repeatedly but the same issues carve the title’s demise.
Since the particular bother surfaces during the launch phase for the famous FPS, the error is also referred to as Valorant crashing on startup. Terming it that way makes it easier to address the problem rather than restating that lengthy text on the error prompt. Now, people frequently ask what exactly is it that’s causing the title to behave this way. From what we can gather, a bevy of reasons come across as plausible for the issue at hand.
6 Ways to Fix Valorant Crashing on Startup
Since the Valorant a critical error has occurred issue can result due to many reasons, we’re going to touch base on each of them in the breakdown of the total number of fixes ahead. Be sure to follow the methods diligently for the best results.
- Please note that the instructions outlined below take confidence that you’ve already tried restarting your PC a couple of times. If not, we suggest getting to it straight away.
Start Valorant With Administrator Privileges
One of the first things that you should try after experiencing the Valorant a critical error has occurred issue is all about providing the game with administrator privileges. Running the game as an administrator means that you get to launch it uninterruptedly without the constraints of special admin privileges.
To do this, look for the game using the Window Search bar by typing in “Valorant.” The application should appear at the top of the search results and present you with different options on the right-hand side of the page. Click on “Run as administrator” and move forward with anything that entails from here on out.
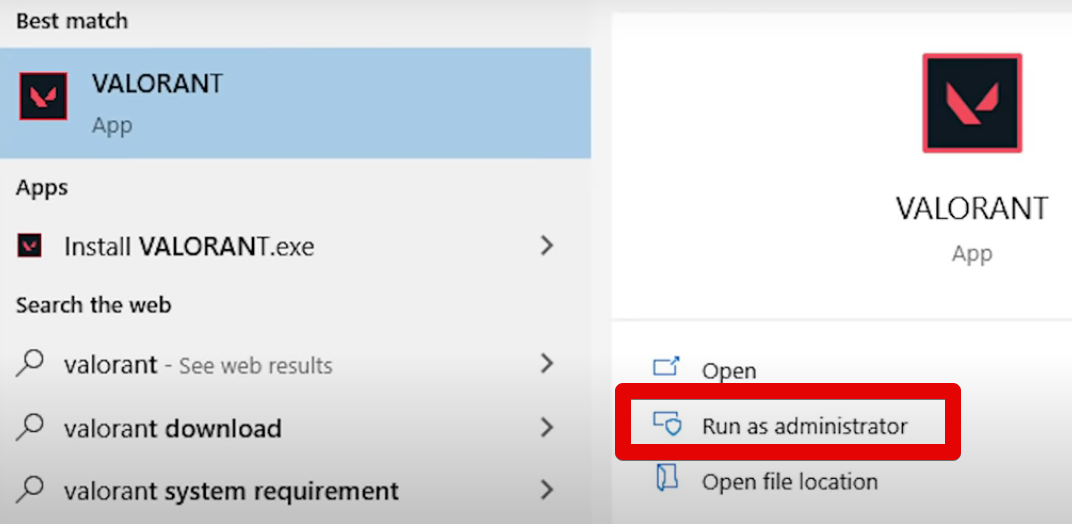
The game should launch on your Windows 10 PC now if everything has gone well. Go ahead with the log-in screen and see if Valorant connects to the relevant servers. If running the title as an administrator has still done nothing for the startup issue, you need to try more complicated fixes—all of which we’ll be getting to from here on out.
Get Your Graphics Drivers Up to Speed
Updating your graphics drivers to the latest version is a must-do if you plan on having the best possible experience with your installed games. Otherwise, a plethora of issues can surface, including Valorant crashing on startup. It’s just a viable prospect of PC gaming and a heavy constituent of smooth performance. We definitely don’t recommend missing out on something as crucial as this.
To update your graphics drivers, you need to take a look at what manufacturer you’ve got the graphics drivers installed of on your PC. Go into the Device Manager section of the device, followed by expanding the “Display adapters” option. Once done, you’ll be able to confirm what drivers your PC has been shipped with.
On a side note, we will be leaving website links for two of the most popular graphics card manufacturers to help you quickly achieve the task at hand. If your particular graphics driver does not relate to these two companies, feel free to look for the one specific to you online.
- AMD Drivers and Support.
- Official NVIDIA GeForce Drivers.
After updating your graphics drivers, try launching the title to see if it loads up properly now. There’s a strong likelihood that the game should run as intended, given that we’ve got one of our essential system components up to speed with the rest of the PC. However, if the pertinent hassle still doesn’t budge from its position, keep on reading to try more potential fixes.
Optimize the Startup of the “vgc” Service
VGC is a dedicated service and an acronym for Riot Vanguard. This process will become pretty prevalent on those PCs that have Valorant installed, given its importance for running the FPS properly. The crucial program at hand actually makes it possible for the title to run smoothly and undergo a number of necessary processes.
Out of everything that VGC does for the free-to-play shooter, it also lets it connect to multiplayer servers and establish a stable connection, just so you. However, its mainly concerned with booting up Valorant properly which is exactly what we require to resolve the Valorant a critical error has occurred error.
We are going to double-check whether the “vgc” service is up and running on your system or it’s simply out of order. More often times than not, many players have had the service stopped or disabled, and that’s just downright unworkable for the game itself.
Let’s dive into the tutorial for enabling VGC without any further ado. Make sure to implement the provided instructions correctly for the best results.
- The first step is to fire up the Services application on your Windows PC. You can do that by searching for it through the Windows Start menu. The following screenshot depicts what to do. Don’t forget to run it as an administrator though.
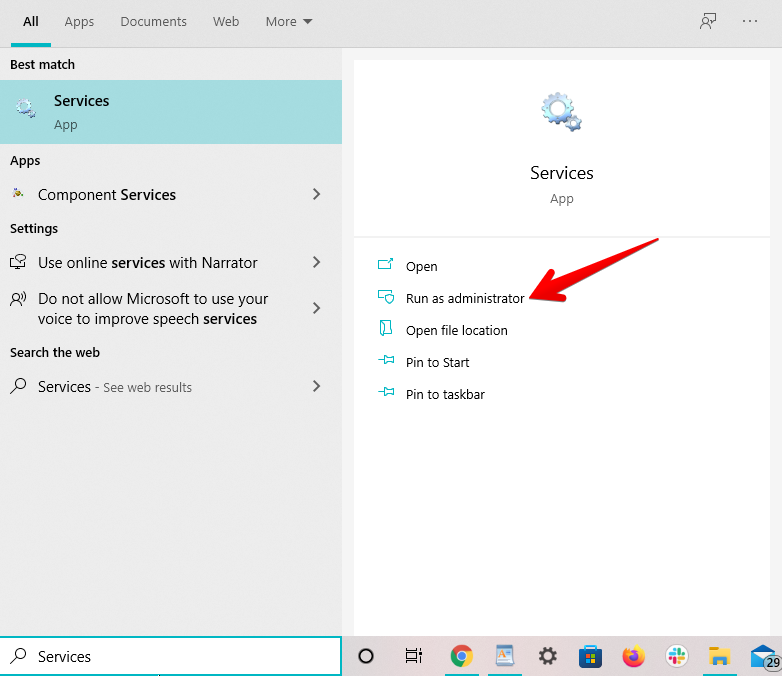
Launching the “Services” app as an administrator - You will now be shown to a screen where tons of services will be listed. You will have to look for VGC here so don’t hesitate in scrolling down. The services are arranged in alphabetical order so scrolling down to the services whose names are starting with the letter “V” will be helpful. Once you’ve found it, right-click the service and select “Properties” to get to the next step.

Accessing the Properties of the VGC Service - The rest of the work is pretty much clockwork. You now have to click on the bar beside “Startup” and that should open up a drop-down menu. Select “Automatic” from there and click on “Start.” This should kickstart the service if it had been stopped earlier.
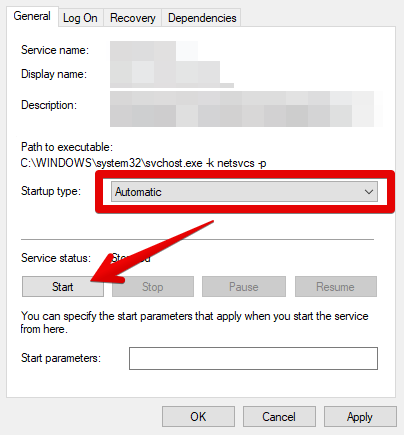
Starting the VGC Service - You now have to simply click on “OK” to finalize the process. Close the window afterward to complete this solution attempt.

Finalizing the Process
That’s about it for this potential fix. By making sure that “vgc” is running on your Windows PC, you’re genuinely increasing your chances of booting up the game just fine. We advise you restarting the device as well before trying to launch the game again. If you’ve managed to solve the problem now, cheers! But in the case that the problem still manages to be a bother, time to look into more solutions.
Tweak the Compatibility of the Valorant Setup File
The vast majority of troubled Valorant players have been able to get their copy of the game working after implementing this potential solution. Therefore, tweaking the compatibility of the title’s setup file comes across as the most definitive fix to the Valorant a critical error has occurred issue. It appears that after tweaking the game’s setup in the sense that we run it in compatibility mode, the FPS is fixed instantly.
Try replicating the following instructions verbatim and confirm whether it’s something that helps you start playing again. The following steps are going to take it from here.
- The first step is to fire up the File Explorer system utility on your Windows PC. This can be done effortlessly through the Windows Start menu or from the Taskbar if you have it pinned there.
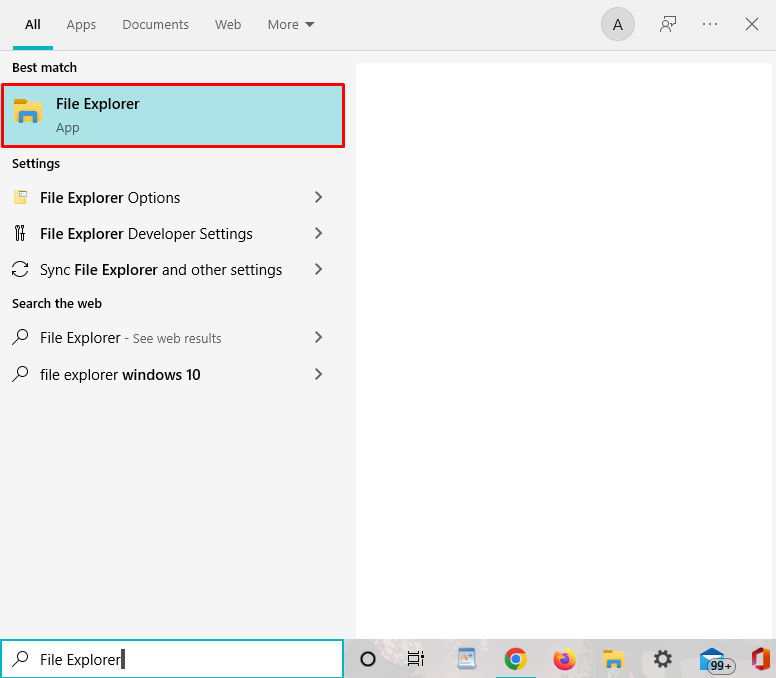
Opening the “File Explorer” App on Windows 10 - Opening the File Explorer app should prompt you to look for the “Riot Games” folder. We suggest opening up your Local Drive (C:) to accomplish the objective at hand.
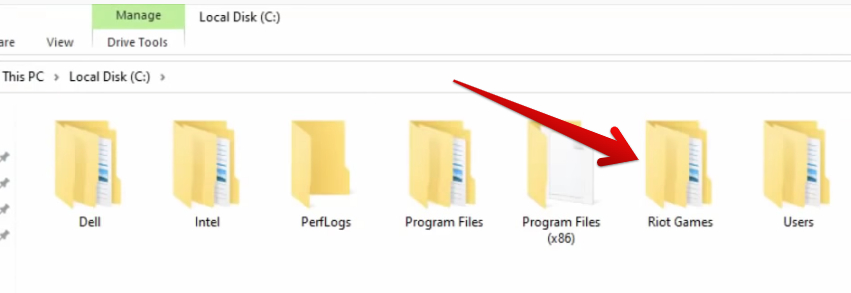
Opening the “Riot Games” Folder - After getting into the Riot Games folder, the next directory to get into will be “VALORANT.” Follow the visual illustration of the screenshot below to get this done on the go.

Opening the “VALORANT” Folder - Get going forward by selecting the “live” folder that’s inside the VALORANT directory.
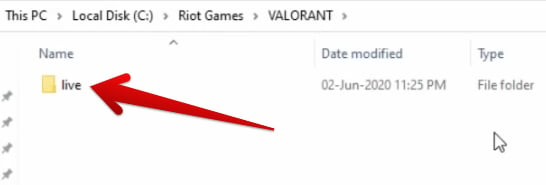
Selecting the “live” Folder - The next step is to click on the “ShooterGame” folder. Check out the screenshot below if you’re after more information.

Clicking on the “ShooterGame” Folder - Right after that, your task is to select the “Binaries” folder.

Selecting the “Binaries” Folder - Entering the “Binaries” folder will lead you to click on “Win64.” This should be fairly easy to do.

Selecting the “Win64” Folder Next - Great going so far. To get to the next step, you have to scroll down the list of present entries until you find the main setup file of Valorant. As soon as you finally dig out, perform a right-click on the file and fire up its “Properties.”

Opening the “Properties” of the VALORANT Setup File - As soon as you open the “Properties” of the Valorant setup file, the first thing that you’ll need to do is head over to the “Compatibility section.” Check out the screenshot below and learn how to do this.
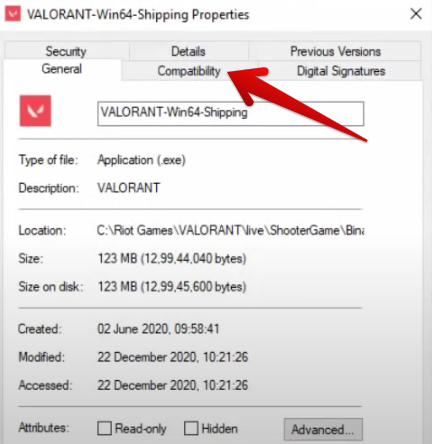
Switching to the Compatibility Tab - Clicking on the “Compatibility” tab will finally lead you where we have been meaning to get to for 9 steps now. This is the area that you will use to first render the game into compatibility mode for Windows 8. Check the box beside the relevant statement and you’ll get that done painlessly. Next up, click on “Run this program as an administrator” as well before you finalize the process. Apply the changes and select “OK” afterward.
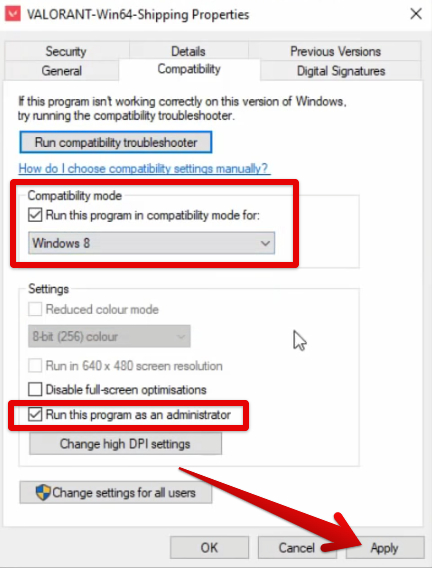
Optimizing the VALORANT Setup File
That’s all there is to optimizing the setup file of the well-established FPS.
Repair Valorant Using the Game’s Installer
Many Valorant players—even experienced ones—might find it surprising to discover that the base Valorant installer software can be used to repair the game as well. The developer has certainly made the installer program multi-faceted in this regard, given the inclusion of this utilitarian functionality.
You first need to get your hands on the Valorant installer though in the case that you want to get started with fixing this startup issue in Valorant.
If you’ve still got the Valorant installer application lying around on your PC, fire it up right away. Otherwise, read the steps given below to not only download the Valorant installer but to learn how to repair the game as well.
- Head over to the official Valorant website to sign in and initiate the download of the installer program.
- Once you’ve downloaded the installer, launch it on your PC. When it starts up, you’ll see that there is an option called “Advanced Options” right below the main “Install” button. Click on it to continue.

Downloading the Valorant Installer - The next step is to select the exact file location of Valorant and select it from within the installer. The Valorant application should be inside the “Riot Games” folder. Once you’ve found it, further the process by selecting it and letting it repair. This can last for 5-10 minutes.
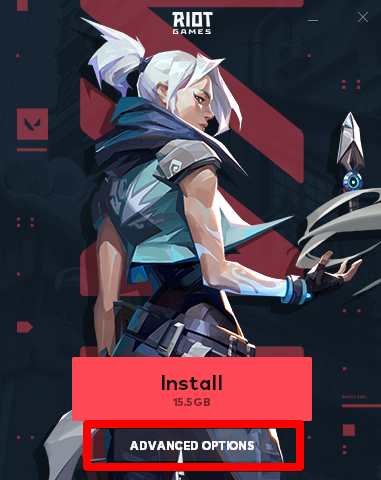
Valorant Installer Advanced Options - As soon as the repair process concluded, click on the Windows Start menu and restart your PC. When the device is back on, launch Valorant again to see if repairing it has done the trick.
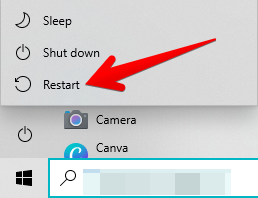
Restarting the Windows 10 PC
You should be good to go now, so try launching the game now and see whether the “a critical error has occurred and the process must be terminated Valorant” issue has been resolved. In the case that you still have to put up with this irksome bother, keep on reading to try the final solution we’ve got for you in this guide.
Reinstall the Title Thoroughly
An uninstall oftentimes works like a charm for fixing various game-related issues and Valorant is no exception. It did the job for the Destiny 2 Crashing PC error, not to mention several others as well. The reinstallation strategy even helps make amends with the How to Make Valorant Completely Stop Crashing affair, which pertains to Valorant indeed but has a different rooted source.
Therefore, if you have Valorant as a standalone executable application, delete it from your Windows PC. In addition, the same practice goes for the relatively recent Riot Games desktop client that houses all the games coming from the US developer.
It features one of the nicer UI elements we’ve seen as compared to well-grounded entities like Steam and the Epic Games Launcher.
You can easily uninstall applications by heading over to “Add or remove programs” from the Windows Search bar. As soon as you have all things Valorant uninstalled from your device, get the title back on your PC by re-downloading it. We realize that this can get tedious and troublesome, but it’s your only shot left at fixing the game once and for all.
Therefore, wait until Valorant or the Riot Games desktop client has been fully installed. As soon as you’re prompted that the installation has been completed, fire up the game to see whether it finally launches now.
There’s a strong likelihood that you won’t be putting up with this issue moving forward. It’s time to celebrate if you’ve finally found the fix to this otherwise long-standing problem.
-
Other Valorant Error Guides covered on eXputer:
- Fixing Valorant Platform Error
- Valorant Crashing Fix
- Valorant Error Code 39
- Valorant Error Code Van 68
- Valorant Error Code Van 6
- Valorant Error Code 57 – Vanguard Not Initialized
Was this article helpful?
Thanks! Do share your feedback with us. ⚡
How could we improve this post? Please Help us. ✍
Some PC gamers are reporting the issue whereby when you start or while playing exclusively Riot Games like VALORANT, War or Warships or League of Legends on Windows 11 or Windows 10 computer, the game crashes with the error prompt indicating A critical error has occurred and the process must be terminated. This post provides the most suitable solutions to this issue.
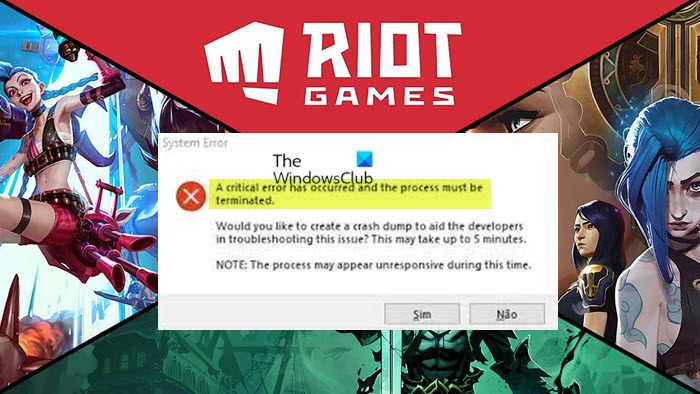
What is a critical system error?
A critical error is a serious computer error that forces the program to stop and it becomes impossible for the running program, operating system or software to continue working normally. This error might cause the computer to reboot or freeze.
When this system error is triggered on your gaming computer, a an error prompt with the following full message is displayed:
A critical error has occurred end the process must be terminated.
Would you like to create a crash dump to aid the developers in troubleshooting this issue? This may take up to 5 minutes.
NOTE: The process may appaer unresponsive during this time.
What is a Windows crash dump?
A system crash (also known as a “bug check” or a “Stop error”) occurs when Windows can’t run correctly. The dump file that is produced from this event is called a system crash dump. They can hog gigabytes of hard drive storage. Windows only automatically delete crash dump files when HDD space is limited. However, users can also erase crash dumps with cleanup utilities.
Investigations reveal the following are the most common culprit of this error;
- Overclocked CPU or GPU
- MSI Afterburner and Rivatuner
- Game Launch Settings
- Outdated Display Drivers
- Insufficient Permissions
Read: Valorant Crashing Mid Game or on Startup
If you are getting the A critical error has occurred and the process must be terminated when you start or while playing any Riot games like VALORANT, War or Warships or League of Legends on your Windows 11/10 system, you can try our recommended fixes below in no particular order to resolve the issue and get back to playing your favorite game on your rig.
- Run the game with admin privilege
- Change game settings
- Remove the Config and Logs Folders
- Update graphics adapter driver
- Revert overclocking (if applicable)
- Reinstall the game
- Update BIOS
Let’s see the description of the listed solutions.
1] Run the game with admin privilege
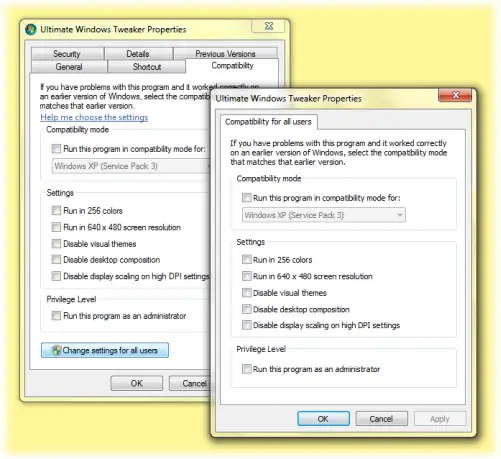
Some affected PC gamers reported that every other thing being equal, they were able to resolve the A critical error has occurred and the process must be terminated issue on their Windows 11/10 gaming system by simply running the game as an administrator but make sure the VGC service is started and set as Automatic Startup Type prior to the task.
2] Change game settings
The issue in highlight can also be resolve by altering the game launch settings stored in the GameSettings.ini file in the Valorant or League of Legends directory as the case may be. Essentially, the file stores your basic configuration that is to be used whenever you launch the game on your PC.
To change game launch settings, do the following:
- Press Windows key + R to invoke the Run dialog.
- In the Run dialog box, type environment variable below and hit Enter.
%appdata%
- In the File Explorer window that opens, click the up facing arrow to go back a step.
- Now, double-click the Local folder.
- Next, navigate to ShooterGame > Saved > Config > WindowsClient directory.
- Next, open up the GameUserSettings.ini file with any Text Editor.
- In the open file, change the value of DefaultMonitorIndex from 0 to -1.
- After that, change the LastConfirmedMonitorIndex value from 0 to -1.
- Save the changes and close the file.
See if the issue is resolved when you launch or while playing the game. Otherwise, try the next solution.
Read: Fix RADS Error on League of Legends on Windows PC
3] Remove the Config and Logs Folders
Another viable solution to this Riot Games-specific issue you are currently facing is deleting the Config and Logs folders within the LoL or Valorant folder. To perform this task, do the following:
- Press Windows key + E to open File Explorer.
- Navigate to the default directory path below:
C:Program FilesRiot Games
- At the location, open the game folder and delete the mentioned folders.
- Exit File Explorer.
4] Update graphics adapter driver
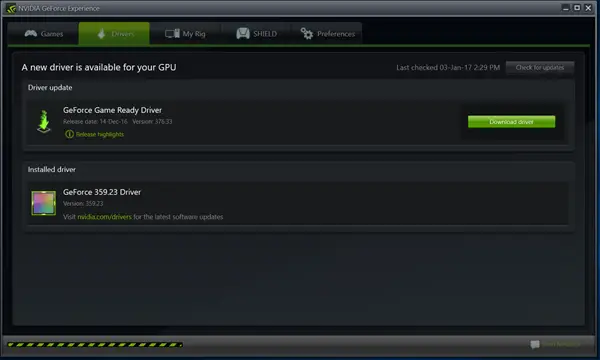
Depending on the GPU in use AMD or NVIDIA, this solution simply requires you to make use of the AMD Radeon software or the GeForce Experience app installed for NVIDIA graphic cards and update your graphics adapter driver on your Windows 11/10 gaming rig.
Read: Fix Valorant Graphics Driver Crashed error on Windows PC
5] Revert overclocking (if applicable)
This solution requires you stop overclocking your CPU or GPU. So, if you have overclocked your PC, you can simply reverse the change depending on the overclocking software in use like MSI Afterburner and Rivatuner. Generally, launch the software and look for the option to stop the overclocking or simply uninstall the software altogether. Once done, restart your computer and see if the issue is resolved. Otherwise, proceed with the next solution.
6] Reinstall the game
If youre still encountering the error, this possible solution simply requires you to download and then run the Hextech Repair Tool. Once you download and install the tool, run the tool with administrative privileges, then follow the on-screen instructions to repair/reinstall the LoL game. Alternatively, you ca use a third-party software uninstaller to uninstall the game, and then proceed to the official Riot Games website and redownload and install the latest version of the game. Afterwards, check if the problem persists. If so, proceed with the next solution.
7] Update BIOS
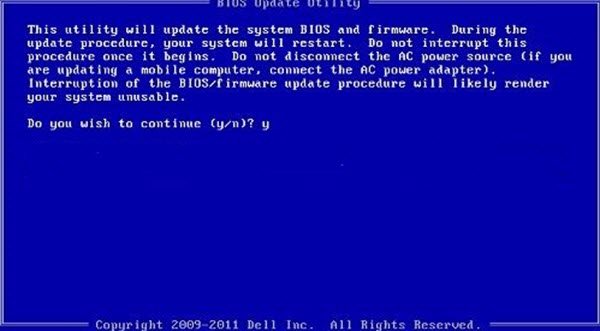
At this point, if the issue you’re currently facing is still unresolved on your Windows 11/10 gaming device, then you can try updating the BIOS and firmware on your system.
Using tools from OEMs is the easiest way to do so. All OEM manufacturers have utilities that help you easily update, BIOS, firmware, and drivers. Search for yours and download it from the official site only. This is the safest way to update the BIOS.
- If you own a Dell laptop you can head over to Dell.com, or you could use Dell Update Utility.
- ASUS users can download the MyASUS BIOS update utility from the Microsoft Store.
- ACER users can go here. Enter your Serial Number/SNID or search for your product by Model, select BIOS/Firmware, and click the Download link for the file you want to download.
- Lenovo users can use the Lenovo System Update Tool.
- HP users can use the bundled HP Support Assistant.
Hope this helps!
Why does my computer say critical process died?
The critical process died issue is basically caused when a critical component of Windows detects that data has been modified when it should not have been. This element could be a bad driver, a memory error, etc. Most of the time, this error occurs all of a sudden when users are working on their PCs.
Критическая ошибка возникает в тот момент, когда система не может справиться с игрой. То есть, если игра будет работать, то системе может быть нанесен критический ущерб. Разберемся, почему так происходит, что с этим делать и будет ли от всей этой ситуации плохо.
a critical error has occurred valorant
Проблема может появиться после того, как вы разогнали процессор, после того, как установили какое-нибудь неправильное программное обеспечение и так далее. Мы разберем все известные способы решения проблемы a critical error has occurred valorant.
Причины ошибки
Перечислим основные причины, по которым появляется эта ошибка.
- Недавно вы разогнали процессор или графический проц. Причем такое может появиться, даже если вы не трогали видеокарту. Сам по себе разгон лучше делать в случае, если вы прекрасно разбираетесь в этом. В противном случае есть вероятность нанести критический урон всем комплектующим.
- Установили MSI Afterburner. По какой-то причине к этой проблеме приписывают Rivatuner, но он редко провоцирует проблему. С программой от MSI у вас могут начаться какие-то проблемы с диском. Какие-то — потому что всегда разные.
- Неправильные настройки для запуска Valorant. Они находятся в определенном файле и вряд ли могли повредиться самостоятельно. Эта проблема часто решается переустановкой Valorant.
- Устаревшие драйвера. И не только видеокарты. Придется обновить абсолютно всё, что можно обновить.
- У вас нет разрешения для игры. Проблема решается очень просто, буквально в пару кликов.
Методы решения
Стоит запомнить, что любая проблема имеет под собой явление, из-за которого она произошла. Если вы неправильно разогнали процессор, то это будет проблемой, а решением будет исправление ситуации на ту, которая позволит запустить игру без критической нагрузки на систему.
Запускаем игру от имени администратора
Нажимаем сочетание клавиш «Win + R». В командной строке пишем «Services.msc». У нас открывается окно «Службы». Теперь нам нужно:
- Найти vgc
- Кликнуть по ней правой кнопкой мыши и нажать на «Свойства».
- Теперь на месте, где написано «вручную», надо выбрать триггер на «Автоматически».
- Нажимаем «Применить».
- Теперь зайдите в папку с валорантом и пройдите по этому пути:
Riot GamesVALORANTliveShooterGameBinariesWin64 path
- В папке откройте файл VALORANT-Win64-Shipping.
- Откройте его свойства и нажмите на «Совместимость».
- Там поставьте «Запускать эту программу от имени администратора».
- Теперь нужно сделать тоже самое для ярлыка на рабочем столе.
Обновляем драйвера
Если вы слышали про драйвера видеокарты, то наверняка хотя бы раз вы их устанавливали и точно постоянно напоминаете себе об обновлении. Сейчас вам стоит узнать модель своей материнской платы (можно через бесплатную программу AIDA64). Гуглите её название, идете на сайт производителя и скачиваете оттуда все драйвера на звуковую карту, для отображения дисплея, для USB… Для всего. Устанавливаете их, а потом проверяете, будет ли работать валорант или снова появится сообщение о критической ошибке.
AMD
Если же вы никогда в жизни не ставили драйвера даже для видеокарты, то для обладателей видеокарты от AMD есть программа — AMD Catalyst. Там вы сможете поставить обновление драйверов на автоматическую установку. В помощью этой программы можно выставить оптимальные настройки графики, но мы рекомендуем играть на минимальных.
NVIDIA
Если же вы владелец видеокарты от NVIDIA, то мы рекомендуем установить GeForce Experience. В ней также можно поставить автоматическое обновление, а также подобрать оптимальный драйвер для вашей нагрузки.
Изменяем настройки запуска
Итак. Здесь тоже будет много шагов. Сперва нам надо зайти в основную папку Valorant.
- Открываем Win + R.
- Вводим в командной строке «AppData».
- Готово. Теперь идем в каталог с файлами — ShooterGameSavedConfigWindowsClient.
- Открываем файл с настройками.
- Ищем строчку «DefaulMonitorIndex». По умолчанию значение будет на 0, ставим -1. Значение ниже, а именно «LastConfirmedMonitorIndex» ставим с 0 на -1.
- Сохраняем изменения. Закрываем файл.
- Если проблема осталась, то меняем всё обратно.
Возвращаемся к дефолтному сеттингу комплектующих
Если пользователь ПК разгоняет свой компьютер, то это хорошо. Но ещё лучше, если он прекрасно понимает с чем связан разгон, с чем нельзя переусердствовать и прочее. Надо уметь это делать. Если вы «перекрутили» некоторые параметры, то стоит вернуть их обратно. Иначе будет беда.
Также, если у вас установлены MSI Afterburner или Rivatuner, то стоит удалить их. Хотя бы попробовать. Установить заново вы их в любом случае сможете. Если это решит проблему, то программы лучше не устанавливать. Либо ставить их на более мощном железе.
После снятия параметров разгона посмотрите, насколько сильно упала производительность. Сделать это можно через CPU Expert или в том же AIDA64, в которой просто нужно посмотреть на загруженность. Также это можно посмотреть в диспетчере задач, где легко оценить производительность по загрузу на CPU и оперативную память.
Обновляем BIOS
Если вы не самый опытный компьютерщик, то мы рекомендуем вам в этом пункте обратиться к более опытному специалисту. Обновить BIOS не сложно, а вот последствия неправильного обновления могут потребовать несколько часов на восстановление системы. Что нужно сделать?
- Зайти на сайт производителя своей материнской платы.
- Скачать последнее обновление для BIOS.
- Следовать четкой инструкции по установке.
- После успешной установки проверить, сохранилась ли проблема.
Если проблема решилась, то это замечательно. Теперь вы снова можете играть, а если нет, то:
- Освободите максимум места на диске, где установлена Valorant. Иногда это помогает.
- Почистите все свои комплектующие. Желательно штучно и вручную, а не пылесосом или продувкой сжатым воздухом.
- Посмотрите, нет ли на компьютере какого-нибудь серьезного вируса, который сильно «подогревает» систему.
