CentOS7 or Ubuntu 16
1.
WordPress uses ftp to install themes and plugins.
So the ftpd should have been configured to create-directory
vim /etc/pure-ftpd.confg
and if it is no then should be yes
# Are anonymous users allowed to create new directories?
AnonymousCanCreateDirs       yes
lastly
sudo systemctl restart pure-ftpd
2.
Maybe there is an ownership issue with the parent directories.
Find the Web Server user name and group name if it is Apache Web Server
apachectl -S
it will print
...
...
User: name="apache" id=997
Group: name="apache" id=1000
on Ubuntu it is
User: name=»www-data» id=33 not_used
Group: name=»www-data» id=33 not_used
then
sudo chown -R apache:apache directory-name
3.
Sometimes it is because of directories permissions.
So try
sudo chmod -R 755 directory-name
in some cases 755 does not work. (It should & I do not no why) so try
sudo chmod -R 777 directory-name
4.
Maybe it is because of php safe mode.
So turn it off in the root of your domain
vim php.ini
then add
safe_mode = Off
NOTE:
For not entering FTP username and password each time installing a theme we can configure WordPress to use it directly by adding
define('FS_METHOD','direct');
to the wp-config.php file.
Исправление ошибки, которая возникает при обновлении WordPress плагинов.
Ошибка выводится следующая:
При обновлении (название плагина) произошла ошибка: Не удалось создать директорию.
Общий вид ошибки может выглядеть так (в вашем случае будут указаны ваши плагины):
Процесс обновления начался. На некоторых серверах он может занять какое-то время — пожалуйста, наберитесь терпения.
Включение режима обслуживания…
Обновление плагина BackWPup (1/5)
Загрузка обновления с https://downloads.wordpress.org/plugin/backwpup.3.4.0.zip…
Извлечение обновления…
При обновлении BackWPup произошла ошибка: Не удалось создать директорию.
Обновление плагина Contextual Related Posts (2/5)
Загрузка обновления с https://downloads.wordpress.org/plugin/contextual-related-posts.zip…
Извлечение обновления…
При обновлении Contextual Related Posts произошла ошибка: Не удалось создать директорию.
Обновление плагина Default Media Uploader View (3/5)
Загрузка обновления с https://downloads.wordpress.org/plugin/default-media-uploader-view.1.0.8.zip…
Извлечение обновления…
При обновлении Default Media Uploader View произошла ошибка: Не удалось создать директорию.
Обновление плагина WordPress Media Library Folders (4/5)
Загрузка обновления с https://downloads.wordpress.org/plugin/media-library-plus.3.3.8.zip…
Извлечение обновления…
При обновлении WordPress Media Library Folders произошла ошибка: Не удалось создать директорию.
Обновление плагина WordPress Media Library Folders Reset (5/5)
Загрузка обновления с https://downloads.wordpress.org/plugin/media-library-plus.3.3.8.zip…
Извлечение обновления…
При обновлении WordPress Media Library Folders Reset произошла ошибка: Не удалось создать директорию.
Отключение режима обслуживания…
В моём случае, суть заключалась в том, что WordPress-у не хватало прав доступа на обновление плагинов. Так произошло из-за смены хостинга. При переносе файлов с одного хостинга на другой они скопировались с неверными правами доступа. У файлов и папок права доступа указаны в цифровом виде хоть и верные (755 и 644), но сам WordPress не понимает этого.
Для исправления прав доступа заходим по ssh на свой VPS сервер. Затем в Терминале вбиваем следующую команду:
chmod -R u=rw,g=r,o=r,a+X /home/имя_пользователя/web/ploshadka.net/public_html/wp-content/
где /home/имя_пользователя/web/ploshadka.net/public_html/wp-content/ — путь до папки wp-content сайта на WordPress. В данном случае путь приведён для системы управления сайтами на Vesta.
Вышеприведённая команда назначает на все папки права доступа 755, а на все файлы 644.
А если нужно сменить права пользователя.
Errors on your WordPress site can slow down your work and create serious inconveniences for both you and your users. For instance, the “Installation failed: could not create directory” message can prevent you from providing a key feature or functionality.
Luckily, resolving this error is fairly simple. By tweaking just a few settings, you can easily get your WordPress plugin or WordPress theme up and running in no time.
In this post, we’ll discuss what causes this error and other issues related to it. Then we’ll walk you through three methods for resolving the “Installation failed: could not create directory” message so that you can complete your installation or update.
Let’s get started!
What Causes the “Installation Failed: Could Not Create Directory.” Error in WordPress
There are three primary situations in which you might encounter the “Installation Failed: Could Not Create Directory.” error in WordPress:
- When installing a theme or plugin via your WordPress dashboard
- During a standard theme or plugin update
- While attempting to upload files to the wp-content directory on your server
The root cause of the problem is the same in each scenario. However, let’s take a look at each of these situations in turn.
Installing a New Theme or Plugin on Your Site
Your WordPress site is made up of two components: a database and various files that are stored on a server in ‘directories.’ When you use WordPress admin to add a theme or plugin to your site, it has to create a new directory in which to save its files.
However, if the plugin or theme you’re attempting to install does not have permission to write in your website’s root directory, it won’t be able to complete this task. That’s when you’ll see an error such as “Installation failed: could not create directory.”
This error is your server’s way of saying that you’re not allowed to make changes to your site’s files by adding the plugin or theme in question. In general, this is a problem that usually occurs on new WordPress sites.
It’s important to note that there is a similar, less common cause for this error. If your server is running out of disk space to store your site’s files, it may show this same message because it has no room for the new plugin or theme. Read this guide to check disk usage in WordPress.
This may be due to old backup files not being deleted, or it may happen because your hosting plan is too small for your site. In the latter case, you’ll want to look into upgrading to another hosting package that provides more storage.
Updating an Existing Theme or Plugin
Sometimes, when attempting to upgrade a WordPress theme or plugin that’s already installed on your site, you may see an error very similar to the one we’ve described above. This one will typically read, “Update failed: could not create directory.”
This problem occurs for the same reasons as the “Installation failed could not create directory.” error. When you update a WordPress plugin or theme, WordPress needs to rewrite its files on your website’s server. If your permissions settings are incorrect or there is not enough free space, the process will not be able to access the right files or upload new ones.
Since the cause of these two issues is the same, the solutions are identical as well. Any methods for resolving the “Installation failed: could not create directory” error listed below should also work for a stalled update.
Uploading Files to the wp-content Directory
Server file permissions are a security feature that hosting providers put to prevent unauthorized parties from making changes to your site or stealing sensitive information.
However, they can sometimes lock you out of your own files if they aren’t set correctly.
This is why, if you try to get around the “Installation failed: could not create directory.” error in your WordPress dashboard by uploading the plugin’s or theme’s files directly to the wp-content directory on your server, you’ll likely still encounter the same problem. The error occurs because of a problem with your server, not your WordPress installation.
This issue may also extend to your wp-content/uploads subdirectory, where all your media files are stored. Adding images, videos, or similar content to your site by saving them to your server follows the same process as installing a new plugin or theme.
If you don’t have permission to write in your root directory, uploading content to wp-content/uploads will still produce the error we’ve been discussing. To fix it, you’ll need to adjust your server’s settings, as we’ll describe shortly.
Diagnosing the “Installation Failed: Could Not Create Directory.” Error in WordPress (2 Methods)
The good news about this error is that it’s relatively easy to fix. Most of the time, correcting your permissions will clear everything right up. However, before you start work on that solution, you may want to make sure that it can solve your problem.
Below, we’ve outlined two methods for determining whether your site is experiencing a permissions-related error.
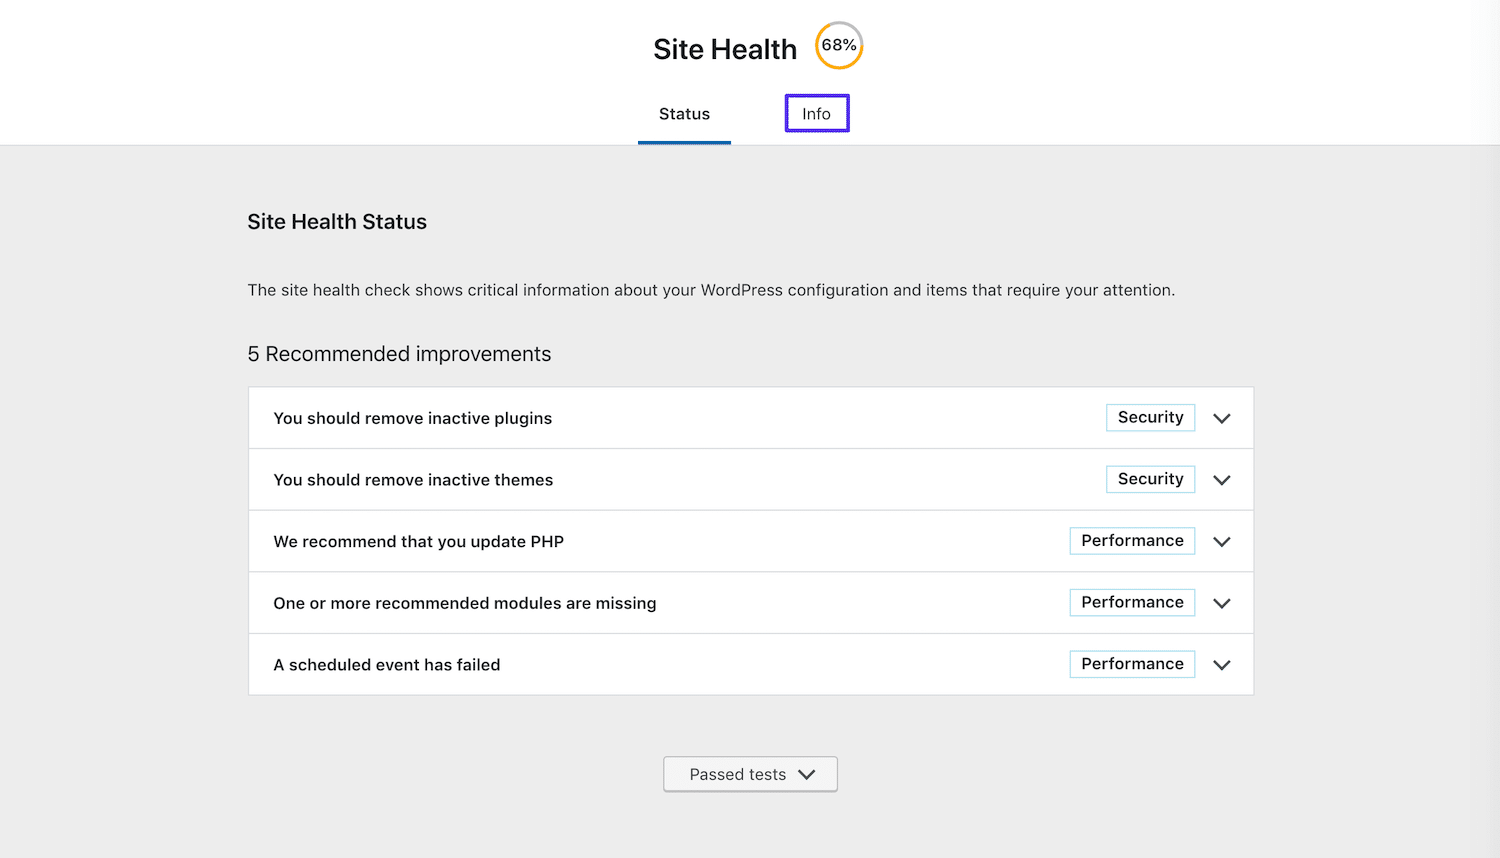
1. Use the WordPress Site Health Tool
WordPress 5.2 introduced the Site Health tool. It contains a wealth of valuable information regarding your WordPress site, such as performance test results, security checks, and WordPress configuration data.
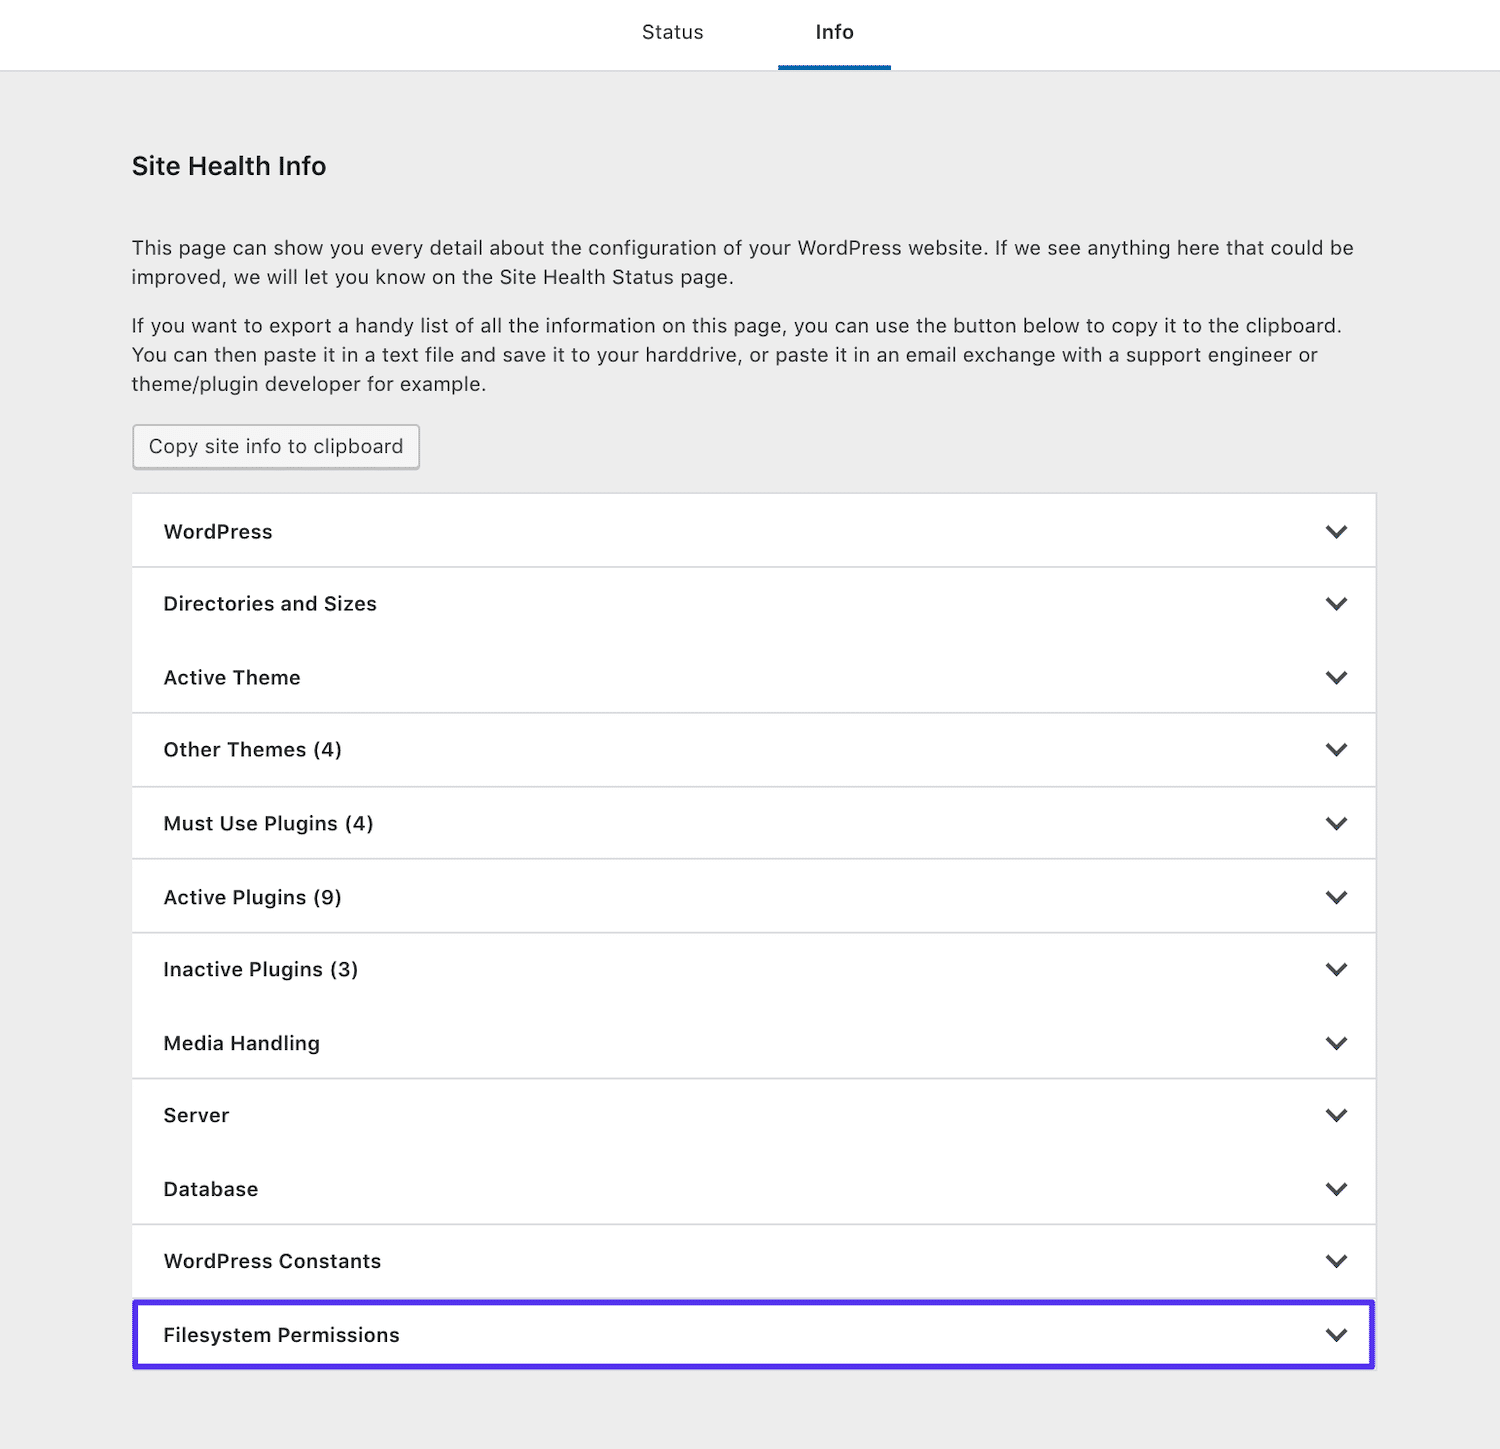
You can access it by navigating to Tools > Site Health in your WordPress dashboard. To check your file permissions settings, you’ll want to click on the Info tab:
Then, scroll down to the last section, which should be labeled Filesystem Permissions:
Here you’ll see a list of crucial WordPress files, including the plugin and theme directories. Ideally, they will all be listed as “Writable”:
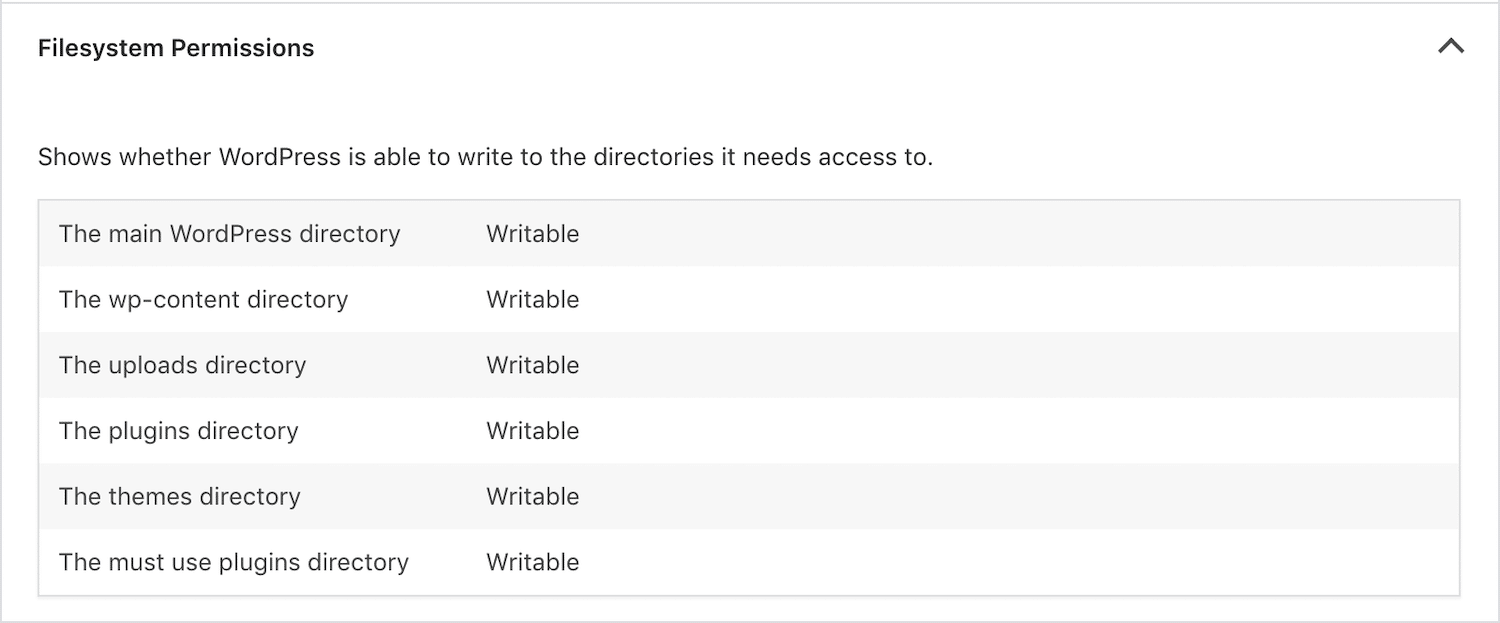
If your permissions are not configured correctly, you’ll see “Not writable” listed next to the problematic folders. If this is the case, you’ll know that you need to correct your file permissions.
2. Check Your Server’s Error Log
Another option is to check your server’s error log. This may be a more efficient method, as it will display any errors that have occurred, not just incorrect file permissions. You should be able to access your logs via your hosting account.
If you’re a Kinsta customer, you can log into your MyKinsta dashboard and click on Sites in the sidebar:
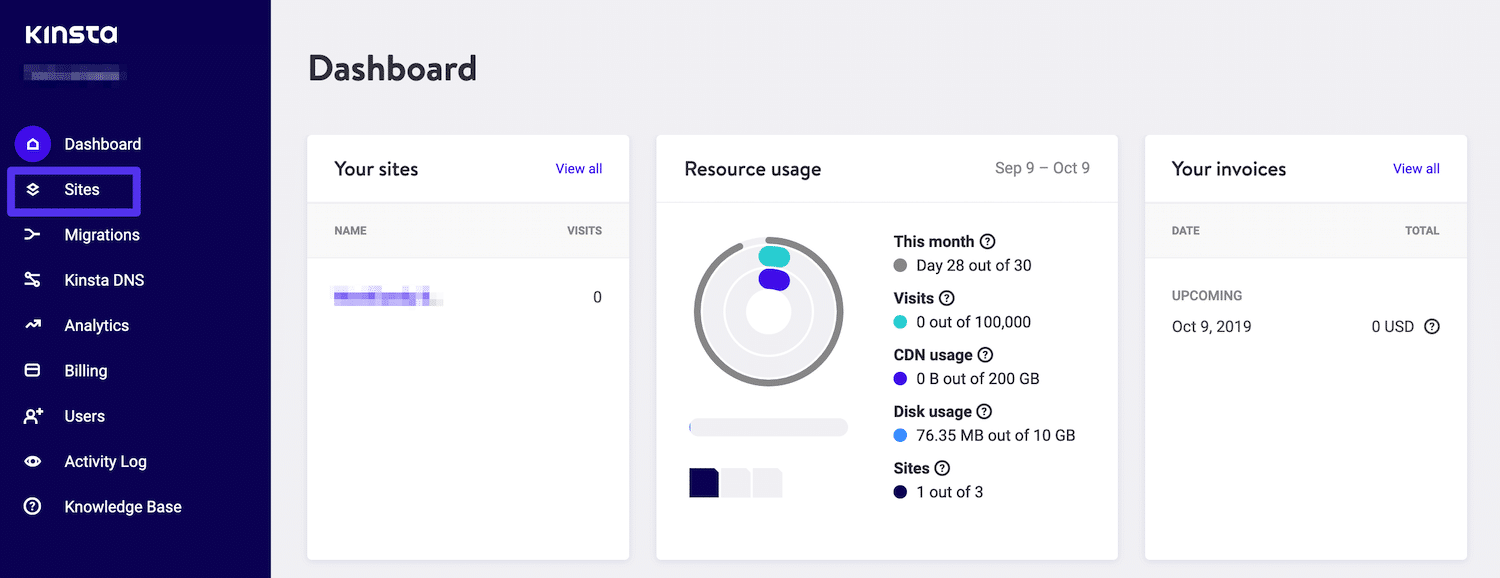
Select the site’s name that is experiencing the “Installation failed: could not create directory” error. Then, choose the Logs tab:

From the drop-down menu, make sure that error.log is selected. Here, you should be able to see any recent errors that have occurred on your server, including incorrect file permissions or insufficient storage, either of which may be causing the installation error.
If you see a relevant error listed, you can either correct your file permissions or consider upgrading your hosting plan as needed.
How to Fix the “Installation Failed: Could Not Create Directory.” Error in WordPress
If your site’s permissions settings are causing the “Installation failed: could not create directory error,” you can resolve it by resetting them. To do so, you’ll need to connect to your server via File Transfer Protocol (FTP), using an FTP client.
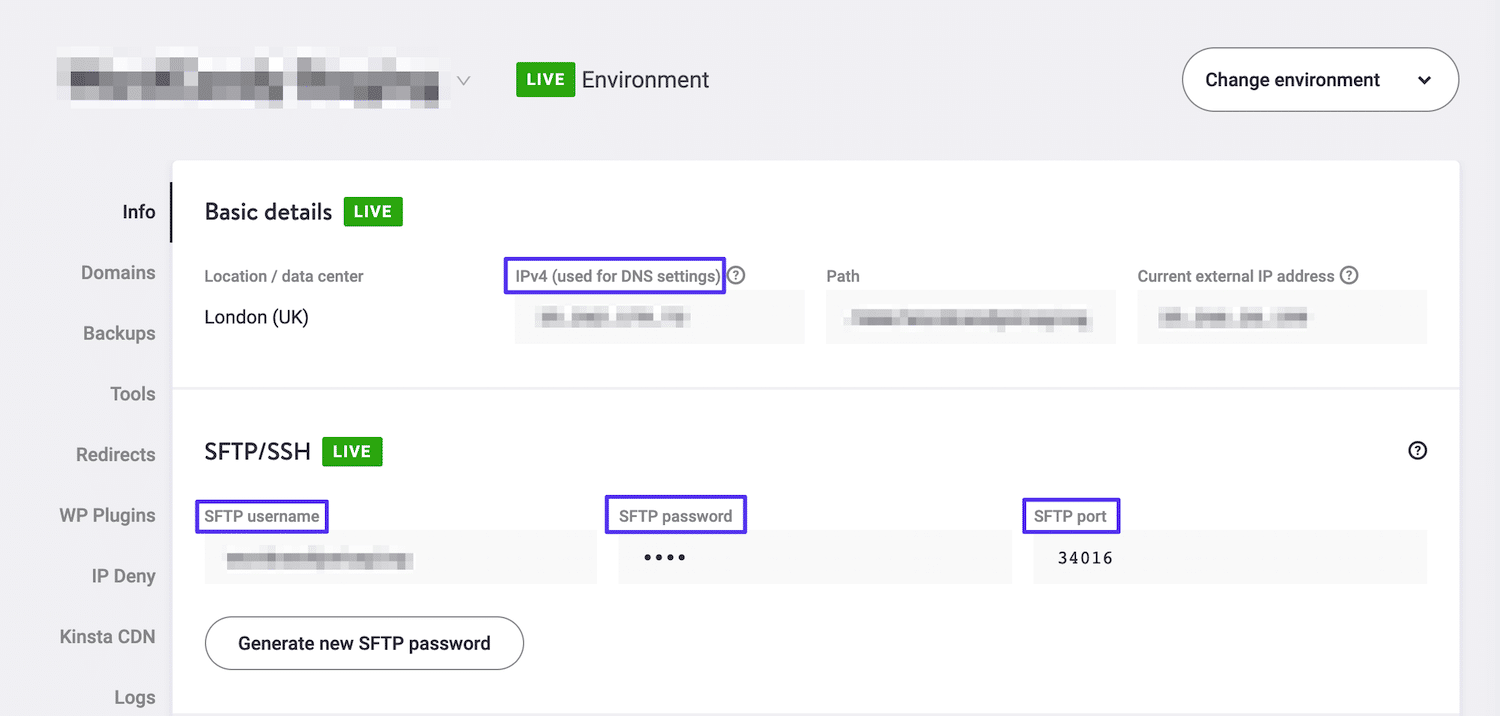
Any time you make changes to your site’s files, it’s wise to create a backup first, just in case something goes wrong and you need to restore your site. Then, collect your FTP credentials from your hosting account.
As a Kinsta customer, you can do this by accessing the Info tab for your site in the MyKinsta dashboard:
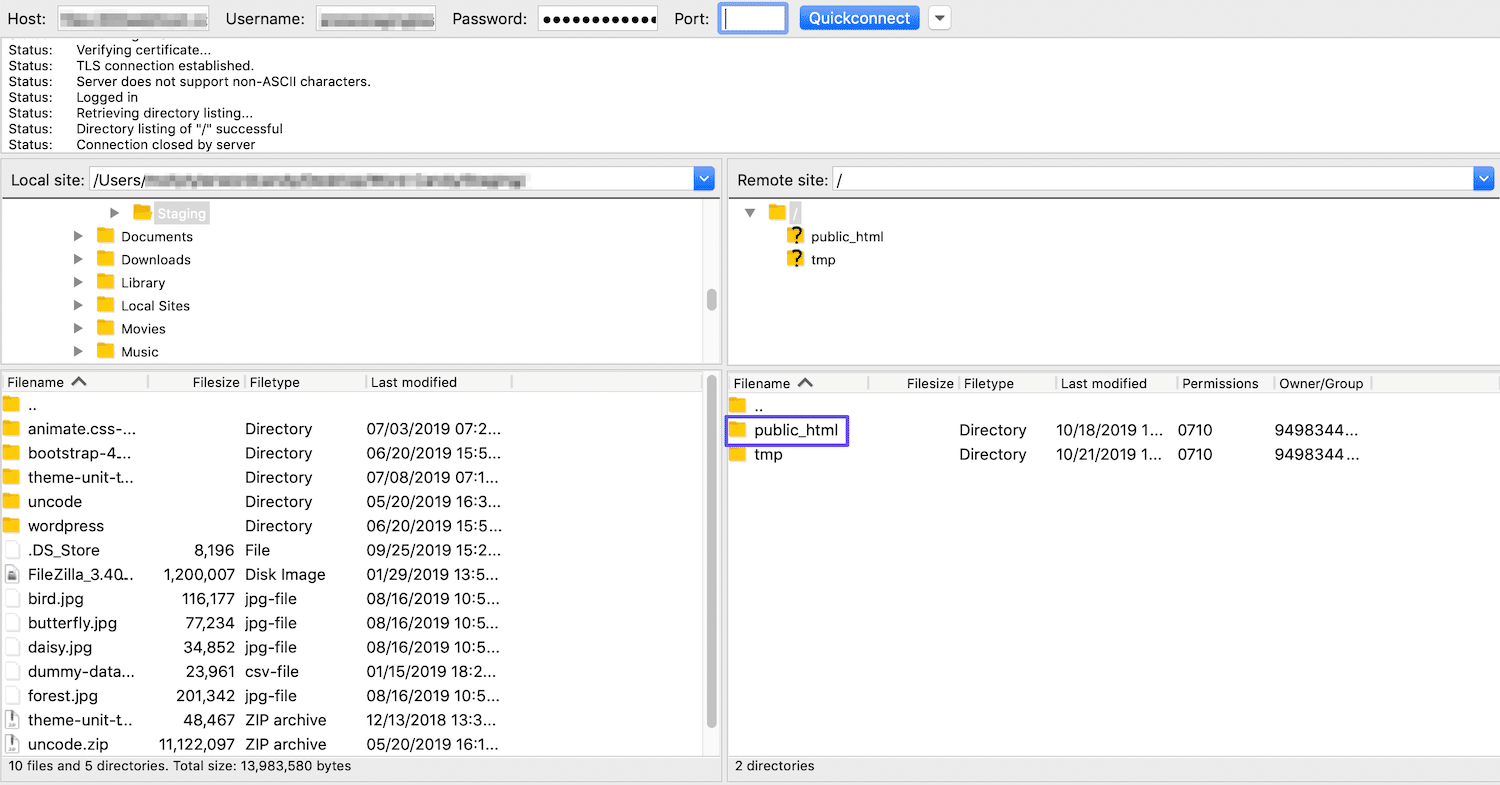
Then, open up FileZilla (or another client) and enter your information. You’ll be connected to your server, where you should see a folder called public_html. Double-click on it to view your WordPress files:
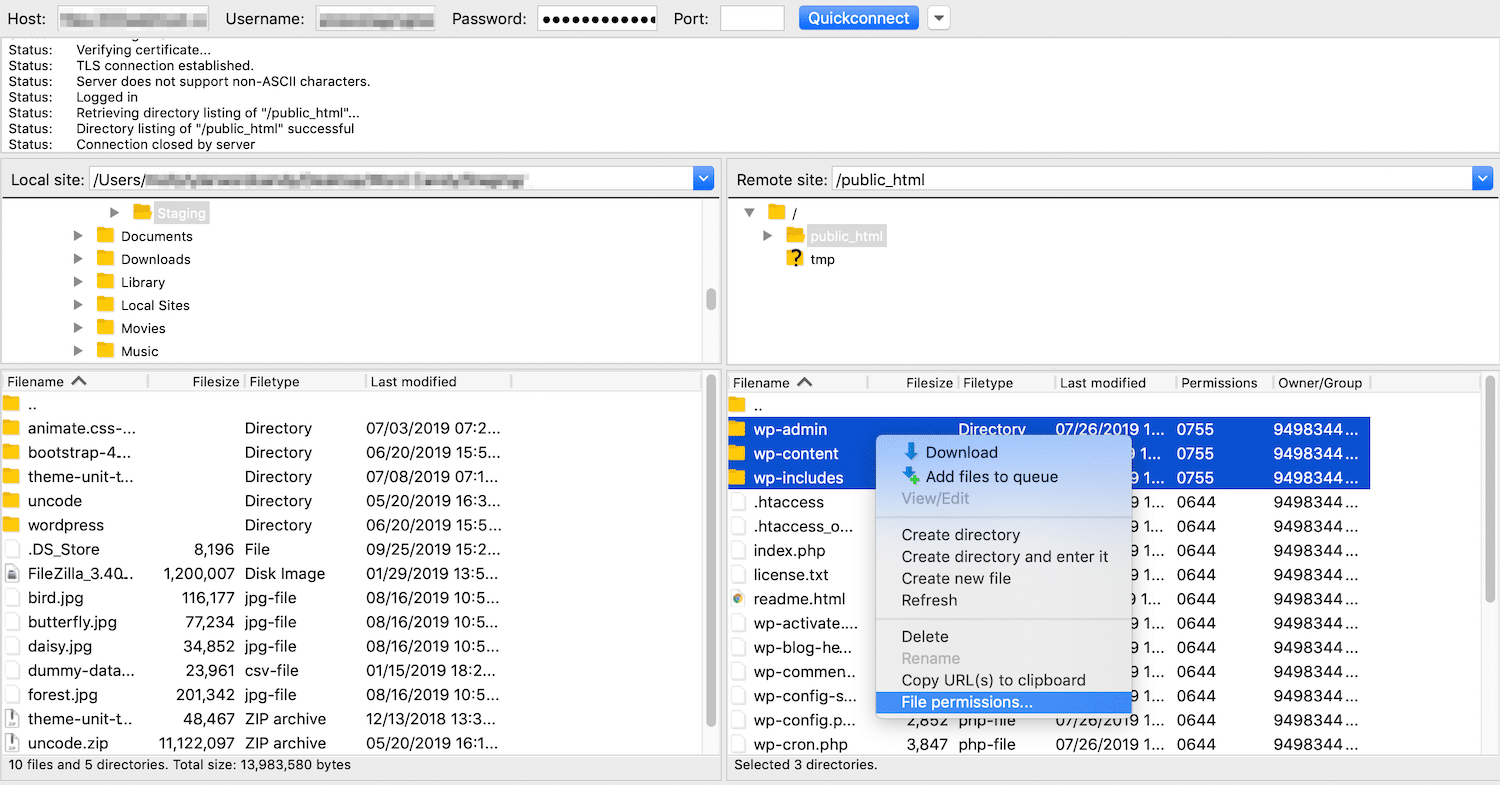
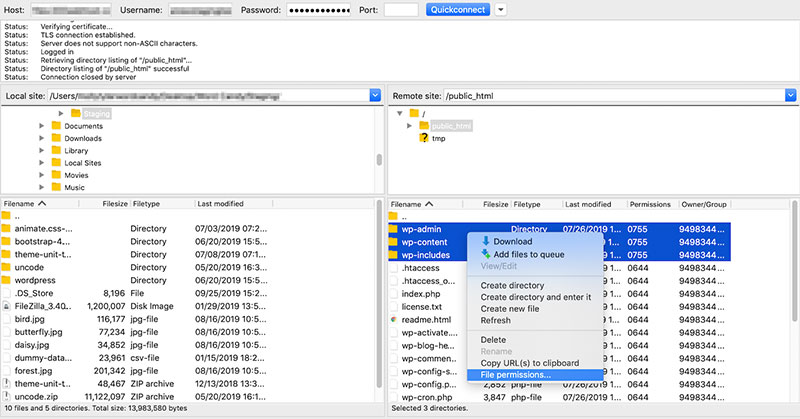
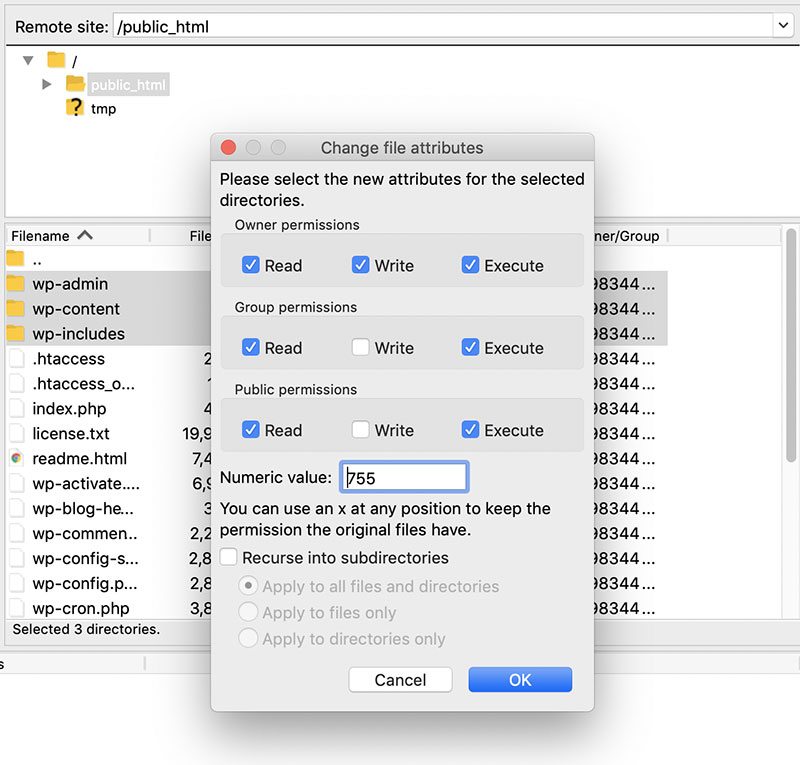
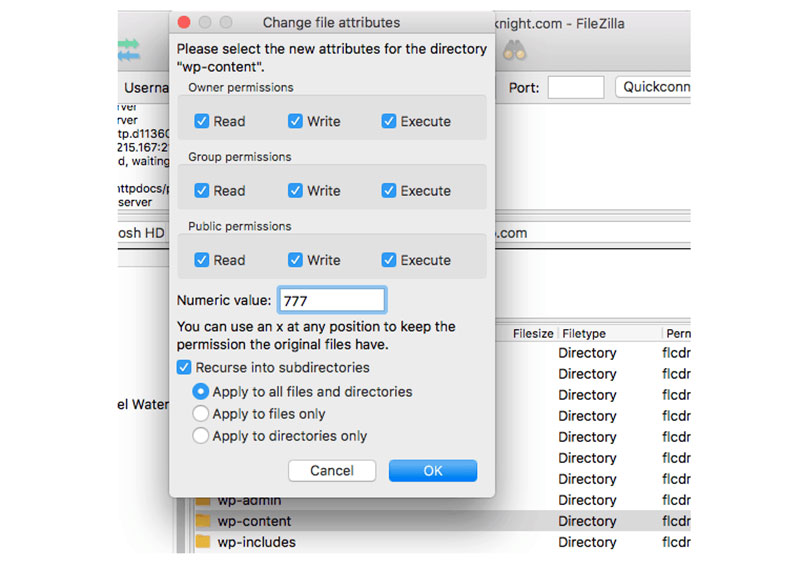
If you don’t see all the files, here is a guide on how to show hidden files in Filezilla. After that, select the folders labeled wp_content, wp_includes, and wp_admin. Right-click on them and choose File Permissions:
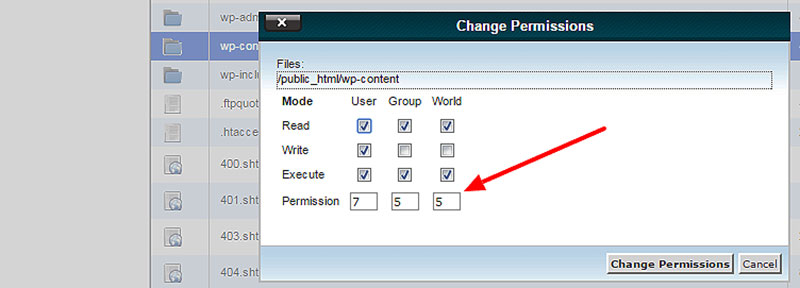
You should see a window that contains a handful of settings:

Check that the options here are set to the following values:
- Owner Permissions: Read, Write, Execute.
- Group Permissions: Read, Execute.
- Public Permissions: Read, Execute.
- Numeric value: 755.
- Recurse into subdirectories.
- Apply to directories only.
Click on the OK button to close the window. Now return to your site and attempt to install or update the plugin/theme again.
It’s worth noting that some hosting providers, including those that use cPanel, have their own tools you can use without bothering with FTP/SFTP. You can often find this tool by logging in to your hosting account, navigating to the site experiencing the error, and looking for a File Manager.
Are you getting the annoying ‘Installation Failed: Could Not Create Directory’ error? Get your WordPress site back again in just a few minutes following these steps 🔙🐾Click to Tweet
Summary
Your WordPress site’s plugins and themes provide important functionality for you and your users. Encountering an error when installing or updating one can throw a wrench in your plans and slow down your progress.
To determine if a file permissions issue is causing a plugin or theme installation error on your site, you can use the Site Health tool or check out your server’s error log. After that, resetting your permissions using FTP/SFTP should only take a few minutes.
CentOS7 or Ubuntu 16
1.
WordPress uses ftp to install themes and plugins.
So the ftpd should have been configured to create-directory
vim /etc/pure-ftpd.confg
and if it is no then should be yes
# Are anonymous users allowed to create new directories?
AnonymousCanCreateDirs       yes
lastly
sudo systemctl restart pure-ftpd
2.
Maybe there is an ownership issue with the parent directories.
Find the Web Server user name and group name if it is Apache Web Server
apachectl -S
it will print
...
...
User: name="apache" id=997
Group: name="apache" id=1000
on Ubuntu it is
User: name=»www-data» id=33 not_used
Group: name=»www-data» id=33 not_used
then
sudo chown -R apache:apache directory-name
3.
Sometimes it is because of directories permissions.
So try
sudo chmod -R 755 directory-name
in some cases 755 does not work. (It should & I do not no why) so try
sudo chmod -R 777 directory-name
4.
Maybe it is because of php safe mode.
So turn it off in the root of your domain
vim php.ini
then add
safe_mode = Off
NOTE:
For not entering FTP username and password each time installing a theme we can configure WordPress to use it directly by adding
define('FS_METHOD','direct');
to the wp-config.php file.
The “Installation failed, could not create directory.” error message is a relatively standard error message that many WordPress users get. It often occurs when users try to use a new version of WordPress, try to upgrade WordPress plugins, or add and update themes. Why does it happen and how do you fix it?
This happens due to an error during installation. The message tells us the installation was not successful due to WordPress being unable to create a new directory. Hence, we get the error message “Installation failed, could not create directory.”. It essentially means that the user might have missed a crucial step during installation.
Luckily, there are some things that you can do to fix the issue. You must know that when WordPress creates a new website, your files are stored in folders or directories, which the webserver creates. These folders can only be accessed if you give WordPress permission to do so; failure to do so might result in various error messages, such as the “Installation failed, could not create directory.”, or the “Failed to write to disk.” error message.
The error also happens if you exceed the quota limit of your server, or if the directory you are trying to reach is already full.
Learn below more about this topic in this article created by our team at wpDataTables.
The Web Server Must Own the Directories
The first step to getting rid of this error message is to ensure that your web server owns the directories where WordPress is installed.
To do this, you will have to enter some lines of code. The first line of code is used to access your username if you don’t know it.
# ps aux | egrep '(apache|httpd)'
This code will list all processes that are running, with the names of the user in the brackets. The next step would be to allow WordPress access(or ownership) of all the directories where WordPress is installed.
# chown -R apache /var/www/html/
Option 1: Update Folder Permissions With cPanel

The permissions for folder usage depends on the rights that each user has. Within the web hosting server, each server will have permission to read, write and execute. These will depend on the permission levels based on user permissions.
For this option to work for you, you will need cPanel access and internet connection. Here are the steps that you should follow.
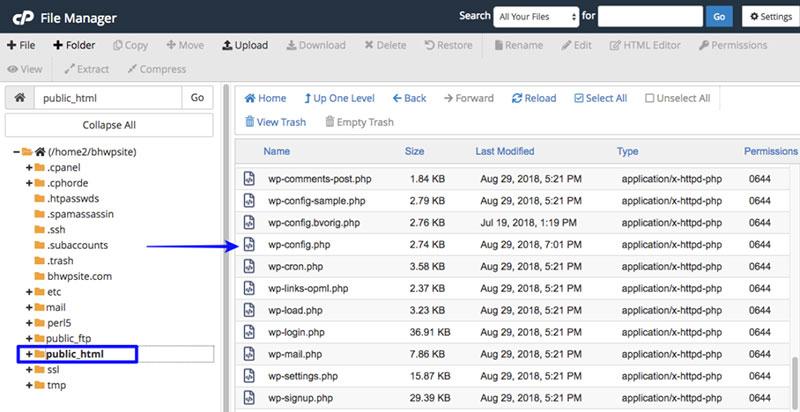
- Login to your cPanel account.
- Once logged in, search for “file manager” and open the first search option.
- To view files of your website, open “public.html.”
- Select all files under the root directory, right-click, and open “file permissions.”
- Under the “permissions” button at the top of the page, click on the “change permissions” option.
- Then, a dialog box will open. Under the numeric value field, enter the number “755”. Next, check the “Recurse into subdirectories.” checkbox and select the “Apply to directories only.” option. Click on OK and wait for the FTP client to finish the process. It might take some time.
NOTE: The 755 setting means the following things:
- Read, write and execute for the owner, which can be you or anyone who logs in with your name.
- Read and execute options for groups (mostly applicable to Linux, where users are organized in groups)
- Read and execute permissions for the rest of the users (for example, readers of your website).
- The next step after the process is done, is to select all files under the root directory again and right-click, select “File permissions.”, and a dialog box will pop up.
- This time you will have to enter the number “644” under the numeric value field. Click on “Recurse into subdirectories.”, and select “Apply to files only.”
- Confirm the changes.
- Clear browser cache and try to install a plugin or a theme. Now, the “Installation failed, could not create directory.” error message should not occur again, and you should be able to install plugins and themes going forward.
Option 2: Configure FTP Permissions In The “wp-config.php” File
Another way to get rid of this error message, if the first option was unsuccessful, is to try to change the FTP permissions by configuring the “wp-config.php” file.
This option can fix the error message, as your server might not have permission to write new files. This is why the operation fails each time, and you can change it by configuring the “wp-config.php” file.
This process is quite simple. Here are the steps to fix the “Installation failed, could not create directory.” error.
- From your web hosting account, open the “File Manager”.
- Within the root folder, locate the “wp-config.php” file and open it.
- In your “wp-config.php” file, enter the following passage of code.
NOTE: Replace the information in brackets with your information.
define(‘FS_METHOD’, ‘ftpext’);
define(‘FTP_BASE’, ‘/pathtorootofyourblog/’);
define(‘FTP_USER’, ‘ftpusername’);
define(‘FTP_PASS’, ‘ftppassword’);
define(‘FTP_HOST’, ‘yoursite.com’);
define(‘FTP_SSL’, false);
- Save the “wp-config.php” file.
- Return to your dashboard and try to install the plugin or upgrade once again. This time, it should be done without any problems.
Other Possible Fixes
Although it seems unlikely, the error “Installation failed, could not create directory.” might be caused by insufficient disk space in your server. It is a common issue if you are using shared hosting.
Ensure you have enough space for the new files to be installed. Also, you should not store your backups in the same folder as your server, as you are risking your reserves with this method. Instead, use a cloud backup service like Dropbox.
Having sufficient disk space is the first prerequisite for new files to be installed. Given that disk sizes are bigger nowadays, this issue is often ignored. It will be an issue if, however, your disk space is small. You can check it as another option if the previous ones haven’t worked.
More About File Permissions
As mentioned above, several file systems use file permissions, and they allow files and folders to read, write, and execute processes. In the same way, WordPress gains access to your data for the website, and it needs permission to moderate files within the “wp-content” folder.
Servers use software for accessing and managing files. This software can access data for your website, which may be stored locally on your computer if the site is self-hosted, or it may be on another computer.
If you have a local server installed, then the issue of folder permission will likely occur. Usually, the permissions are handled by the hosting company. However, if this is the case, you will have to configure the permissions settings on your own to ensure the security of your files. This is why the “Installation failed, could not create directory.” error message frequently occurs.
Usually, a set of numbers dictates who can use which directories. Earlier, with the first option, numbers like 755 and 644 were used for handling permissions. These numbers tell the server what licenses are in place for specific files and folders. When installing plugins with WordPress, the server will need access to your folders. For this, they will need permission from your part.
These digits are not just random numbers, but are, in fact, a set of “instructions” that give permissions to the server. The first digit tells the software what the user of the account can do with the files, the second specifies what the group can do, and the third tells us what everyone else can do.
Managing permissions is essential for fixing the “Installation failed, could not create directory.” error. Hopefully, you can fix the issue with these options.
Let us know if this worked for you.
Hey, did you know data can be beautiful too?
wpDataTables can make it that way. There’s a good reason why it’s the #1 WordPress plugin for creating responsive tables and charts.
And it’s really easy to do something like this:
- You provide the table data
- Configure and customize it
- Publish it in a post or page
And it’s not just pretty, but also practical. You can make large tables with up to millions of rows, or you can use advanced filters and search, or you can go wild and make it editable.
“Yeah, but I just like Excel too much and there’s nothing like that on websites”. Yeah, there is. You can use conditional formatting like in Excel or Google Sheets.
Did I tell you you can create charts too with your data? And that’s only a small part. There are lots of other features for you.
FAQs about the “installation failed could not create directory” error
1. Why am I getting an “installation failed could not create directory” error message?
When the installation procedure is unable to build a required directory on the system, the error message “installation failed could not create directory” frequently appears. This might be caused by a number of things, such as permission problems, disk space restrictions, or software conflicts.
2. How can I fix the “could not create directory” error during installation?
You can try altering the directory’s permissions or making the directory manually before beginning the installation to resolve the “could not create directory” problem. Also, you might need to make some disk space available or remove any incompatible software that might be preventing the installation.
3. What directory is the installation process trying to create, and why is it failing?
A temporary file directory, configuration options, or other system resources could be created during the installation process. The installation will not succeed if the directory cannot be established. Finding the error-causing directory and figuring out why something failed are both crucial.
4. Is there a specific permission or setting that needs to be changed to create the directory during installation?
It might be necessary to have administrator rights or use certain settings that aren’t turned on by default in order to create folders during installation. To make sure that the installation can construct the required directories, you can try running it as an administrator or changing the permissions on the target directory.
5. Can a lack of disk space or storage cause the “could not create directory” error during installation?
The “could not create directory” problem during installation can most probably be brought on by a shortage of storage or disk space. Before attempting to install any software or updates, make sure your hard disk has enough free space.
6. Are there any known conflicts with other software or applications that could cause the installation to fail?
Errors like “could not create directory” can occur during installation because of conflicts with other programs or software. To test if any firewalls or antivirus programs are obstructing the installation process, you can temporarily disable them.
7. Is the error related to a specific operating system or hardware configuration?
Including Windows, macOS, and Linux, the “could not create directory” problem can appear on any operating system. It might also be connected to particular hardware setups, including the presence of specific drivers or devices.
8. Can a corrupted installer file cause the “could not create directory” error during installation?
The “could not create directory” problem during installation is unquestionably caused by a damaged installer file. Make sure the installer file isn’t corrupted or damaged and that you downloaded it from a reliable source.
9. Is there a way to bypass the directory creation step during installation to avoid the error?
You might be able to skip the directory creation stage during installation in some circumstances to prevent the issue. However, since the installation procedure could fail or the software could malfunction without the required folders, it might not be advised to do this.
10. Are there any known workarounds or alternative installation methods for this error?
Depending on the particular software and system settings, there can be alternate installation techniques or remedies for the “could not create directory” problem. You can try getting in touch with the software creator or looking for solutions on internet forums.
If you enjoyed reading this article on how to fix the “installation failed, could not create a directory” error, you should check out this one about WordPress plugin update failure.
We also wrote about a few related subjects like WordPress links not working, how to fix “your connection is not private”, how to fix the site is experiencing technical difficulties, and how to fix sorry, this file type is not permitted for security reasons and the link you followed has expired.