Пользователи Windows 7/8/8.1 при обновлении до десятой версии ОС могут столкнуться с ошибкой 0x80240020 системы Windows Update, отвечающей за скачивание образа новой программной платформы и её развёртывание на компьютере. В таких случаях установка Windows 10 автоматически прерывается и для её возобновления можно (точнее — необходимо) воспользоваться приведёнными ниже способами устранения возникшей ошибки.
Способ первый:
- закрываем окно Windows Update и панели управления;
- открываем папку C:WindowsSoftwareDistributionDownload и очищаем её содержимое;
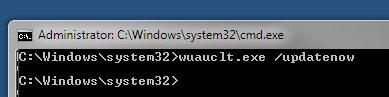
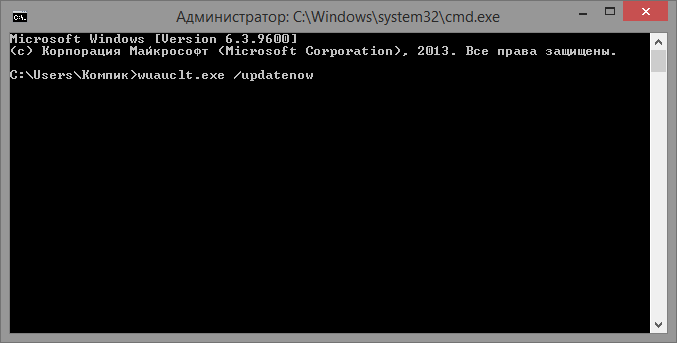
- переключаемся в окно консоли с правами администратора, в командной строке вводим wuauclt.exe /updatenow и нажимаем Enter;
- заново запускаем Windows Update и щёлкаем по клавише «Поиск обновлений» для активации процесса повторной инсталляции Windows 10.
Способ второй:
- закрываем окно Windows Update и панели управления;
- открываем консоль с правами администратора и в командной строке вводим regedit.exe для запуска редактора реестра Windows;
- находим ветку HKEY_LOCAL_MACHINESOFTWAREMicrosoftWindowsCurrent VersionWindows UpdateOSUpgrade (если раздела OSUpgrade не существует, то создаём его вручную);
- в правой части окна редактора реестра создаём новый DWORD-параметр (32 бита) с именем AllowOSUpgrade и значением 0x00000001;
- заново открываем Windows Update и повторно запускаем процесс установки Windows 10.

Многие пользователи Windows 7 и Windows 8.1 уже в первые часы после релиза Windows 10 при попытке выполнить обновление до Windows 10 через механизм Windows Update стали жаловаться на появление ошибки с кодом ошибки 80240020, которая не позволяет выполнить апгрейд системы. Ошибка появляется уже после того, как система скачает необходимые для обновления файлы и попытается запустить процесс обновления.
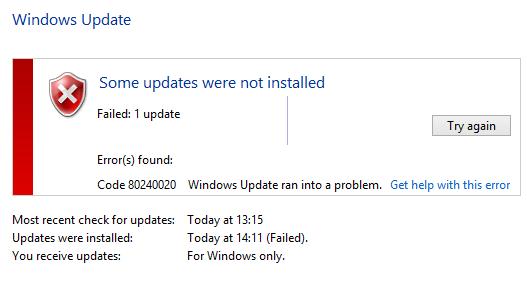
В центре обновления Windows ошибка выглядит так:
Some updates were not installed
Failed: 1 update
Error(s) found:
Code 80240020 Windows Update ran into a problem.
Upgrade to Windows 10 important update may failed to install.

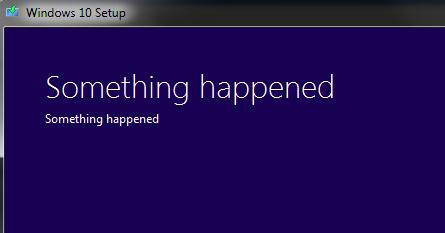
Проблема может выглядеть и так: мастер обновления Windows 10 останавливает работу с сообщением “Something happened” (Что-то случилось).
Примечание. Похоже это вершина мастерства Microsoft в создания бесполезных сообщений об ошибках. Что-то более крутое придумать просто невозможно.
 Если открыть журнал обновлений Windows можно найти в нем пункты Upgrade to Windows 10 Pro (или Upgrade to Windows 10 Home), статус установки которых указан как неудачный. А в подробном описании ошибок опять упоминается тот же самый код 80240020.
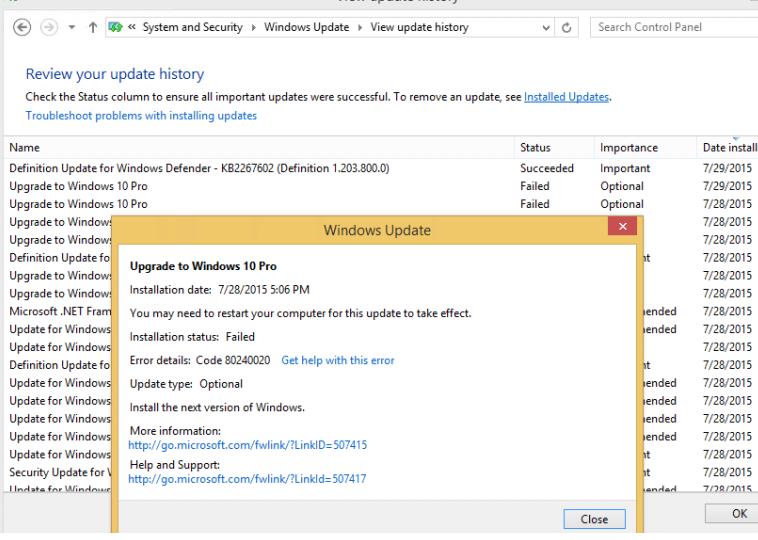
Состояние установки: Отказ
Сведения об ошибке: Код 80240020
Метод 1
Microsoft пока не предоставила официального исправления, устраняющего данную ошибку, однако есть решение по её самостоятельному преодолению. Вероятно, что причиной ошибки 80240020 являются поврежденные или недокачанные файлы установщика Windows 10, которые были сохранены на диск службой обновления.
Предлагается удалить кэш файлов обновлений и перекачать пакет обновления заново. Для этого нужно очистить содержимое двух каталогов:
- %WinDir%SoftwareDistributionDownload
- %SystemDrive%$Windows.~BT
После этого нужно перезагрузить систему и затем открыть командную строку с правами администратора, инициировав процедуру поиска и закачки обновлений:
wuauclt.exe /updatenow
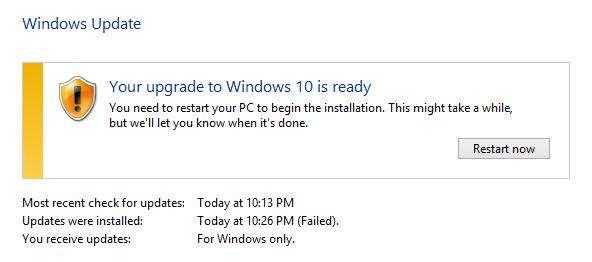
Через некоторое время (5-10 минут) еще раз зайдите в панель Windows Update и убедитесь что система начала заново закачивать установочные файлы Windows 10 на диск. По завершении закачки, будет предложено перезагрузиться для начала процесса установки.
UPDATE. Метод 2
На сайтах Microsoft появилась следующая инструкция для решения проблемы с ошибкой 80240020.
Предлагается:
- Открыть редактор реестра (regedit.exe)
- Перейти в ветку HKEY_LOCAL_MACHINESOFTWAREMicrosoftWindowsCurrentVersionWindowsUpdateOSUpgrade (если ветка отсутствует – создайте ее вручную)
- Создайте параметр типа DWORD (32-bit) с именем AllowOSUpgrade и значением 0x00000001
- Заново откройте панель центра обновлений Windows и попробуйте еще раз запустить процесс поиска обновлений.
Если обе описанные методики не помогли, попробуйте вручную запустить мастер бесплатного обновления до Windows 10, либо (самый простой и надежный вариант), создайте с помощью утилиты Media Creation Tool установочный ISO образ Windows 10 и выполните апгрейд непосредственно с него.
Подававшие заявку на обновление до Windows 10 пользователи уже начали массово переходить на новую версию операционной системы через стандартный Центр обновления. Но не у всех всё прошло гладко. Некоторые пользователи Windows 7 и 8.1 при попытке обновления столкнулись с ошибкой 80240020, появляющейся уже после того, как все необходимые файлы обновления были скачаны с сервера Microsoft.
При этом в Центре обновления появляется уведомление о проблеме без чёткого указания её причин. Никаких средств по устранению этой ошибки официально разработчики пока не представили.
Есть вероятность, что причина ошибки 80240020 заключается в повреждённых или не до конца загруженных файлах обновления. В этом случае можно попробовать очистить кэш файлов обновлений и загрузить пакет заново. Для этого вам нужно удалить содержимое вот этих двух системных папок:
• %WinDir%/SoftwareDistribution/Download
• %SystemDrive%/$Windows.~BT
Далее следует перезагрузить компьютер и, открыв командную строку от имени администратора, выполнить следующую команду:
wuauclt.exe /updаtenow
Через несколько минут после выполнения команды перейдите в Центр обновления и убедитесь, что процесс загрузки файлов обновления стартовал. По завершении загрузки система попросит вас перезагрузиться для начала установки пакета обновлений.
Инструкцию для устранения ошибки 80240020 также можно встретить на сайтах Microsoft. В частности, там предлагается выполнить небольшой твик реестра. Вам нужно будет запустить редактор Regedit, развернуть ветку HKEY_LOCAL_MACHINE/SOFTWAREMicrosoft/Windows/CurrentVersionWindowsUpdаte/OSUpgrаde и создать в последнем подразделе новый 32-битный параметр типа DWORD с названием AllowOSUpgrаde и значением 0x00000001.
Примечание: если указанных подразделов в ключе не существует, их потребуется создать вручную. Например, у вас может отсутствовать последний подраздел OSUpgrаde.
После выполнения твика зайдите в Центр обновления и попробуйте выполнить поиск обновлений в ручном режиме.
Что делать, если не помогло ни то, ни другое
Не исключено, что оба приведённых способа окажутся бесполезными. В этом случае самым разумным будет установка обновлений с ISO-образа Windows 10, созданного с помощью специализированной утилиты Media Creation Tool.
![]() Загрузка…
Загрузка…
15.01.2019
Не успели пройти и сутки с момента официального релиза Windows 10, как пользователи начали на чем свет стоит склонять инженеров компании Microsoft.
У многих пользователей возникла проблема с автоматическим обновлением текущей версии ОС до Windows 10. Проблема состоит в том, что в Центре обновления появляется сообщение, что доступные обновления отсутствуют, а при просмотре журнала обновлений появляется сообщение следующего вида:

Состояние установки: Отказ
Сведения об ошибке: Код 80240020
Microsoft активно работает над патчем, устраняющим данную ошибку, а всем желающим предлагает инструкцию по её самостоятельному устранению.
Итак, чтобы обновиться до Windows 10 при наличии ошибки 80240020, необходимо:
- Перейти в папку C:WindowsSoftwareDistributionDownload и полностью удалить все имеющиеся там файлы и папки
- Запустить командную строку (сочетание клавиш Windows+R) и ввести команду «wuauclt.exe /updatenow» (вводить без кавычек). Запускать с правами администратора.

Собственно и всё. Система начнет скачивание необходимых для обновления Windows 10 файлов, на этот раз без всяких глюков и затыков.
Видео по решению проблемы:
Друзья, удалось ли Вам устранить данную ошибку на своих компьютерах?
Похожие публикации:
- Как добавить любую ссылку или ярлык в меню Пуск Windows 10
- Как замазать или отредактировать часть текста в PDF онлайн
- Как быстро перенести все видео с канала YouTube в Vk
- Все отличия MacBook Air и MacBook Pro на чипе M1
- Как быстро и точно посчитать предметы на фото или видео
Понравилось? Поделитесь с друзьями!

Сергей Сандаков, 42 года.
С 2011 г. пишу обзоры полезных онлайн сервисов и сайтов, программ для ПК.
Интересуюсь всем, что происходит в Интернет, и с удовольствием рассказываю об этом своим читателям.
Windows Update is an essential part of keeping your computer functioning and secure. However, it may sometimes fail to install updates, resulting in error codes such as 0x80240020. This error number is often shown when there is an issue with the update file or the Windows Update service. Ignoring these errors might lead to security flaws and unreliable system performance.
Follow the instructions in this article to resolve Windows Update error 0x80240020 and get your PC’s latest fixes and features. We’ll discuss several solutions to help you fix this issue and roll out Windows updates correctly.
| Workable Solutions | Step-by-step Troubleshooting |
|---|---|
| Fix 1. Verify BITS Service | BITS (Background Intelligent Transfer Service) is a system component that controls background…Full steps |
| Fix 2. Use Sign-in Info | Using sign-in information to finish the Update may assist in resolving Windows…Full steps |
| Fix 3. Run Windows Troubleshooter | Running the Windows Troubleshooter may assist in resolving Windows Error Code…Full steps |
| Fix 4. Delete SoftwareDistribution | By removing the temporary update files and requiring Windows to download new…Full steps |
What Is Windows Error Code 0x80240020
When trying to update or install Windows Defender or other Windows updates, you may get the Windows problem Code 0x80240020. This is a typical problem that happens. There was an issue with the update file, and hence the process of updating could not be completed entirely. This error might have been caused by several things, including network connection problems, out-of-date versions of Windows Defender or other system components, damaged update files, or infections caused by malware.
Reasons that lead to the Windows Error Code 0x80240020:
- This might occur if your internet connection is down or the Windows Update server is unavailable.
- You may receive this error when updating Windows Defender or other outdated system components.
- The Windows update process may fail if the update files are damaged or corrupted, resulting in error code 0x80240020.
- Malware may disrupt Windows Defender updates and prevent them from properly installing.
- Various update failures, including error code 0x80240020, may be caused by issues with the Windows Update service or its components.
- Other security software you installed may clash with Windows Defender and create update problems.
How to Fix Windows Defender Error Code 0x80240020
Now that you know what the Windows Defender Error Code 0x80240020 is and the reasons for this error on Windows, it’s time to fix it. Thankfully, there are multiple solutions to help you with. In this section, we have provided only solutions we tried and tested. Let’s begin!
Fix 1. Verify BITS Service Is Turned On
BITS (Background Intelligent Transfer Service) is a system component that controls background file transfers, including Windows updates. Verifying that BITS is switched on may aid in resolving Windows Error Code 0x80240020 by confirming that the service is operational and capable of transferring data without error.
If BITS is not enabled or functioning correctly, the Windows Update procedure may fail, resulting in this error. By verifying and activating the BITS service, you can guarantee that updates are appropriately downloaded and installed, fixing the problem. Here’s how to ensure BITS is enabled:
Step 1. To access «Services», click «Search», then enter «Services. msc».
Step 2. Click the icon twice to launch «Background Intelligent Transfer Service».
Step 3. Verify that the service’s status is «Started» in the Service Status menu.
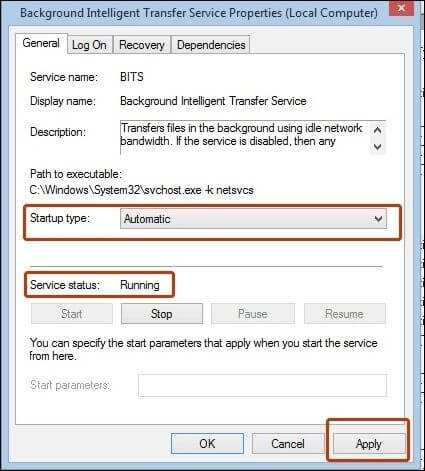
Step 4. If the status reads «Stopped,» choose «Start» and then «OK.»
Step 5. Re-attempt updating your system.
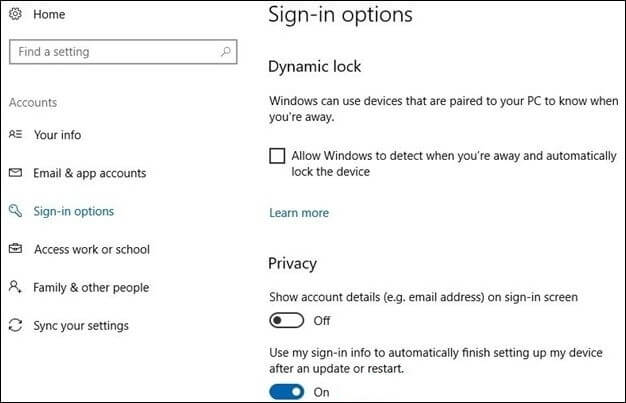
Fix 2. Use Sign-in Info to Complete the Update
Using sign-in information to finish the Update may assist in resolving Windows Error Code 0x80240020 by enabling Windows to authenticate the user account and complete the update procedure.
This approach is practical when an update needs administrator capabilities and the current user account lacks the necessary permissions to install the updates. The update procedure may raise the user’s permissions and finish the installation, fixing the problem by utilizing sign-in information. Here’s how to use sign-in info to complete the Update:
Step 1. Navigate to «Settings» to activate this function.
Step 2. Go to «Accounts» > «Sign-in Options» > and click the appropriate item.
Fix 3. Run Windows Troubleshooter
Running the Windows Troubleshooter may assist in resolving Windows Error Code 0x80240020 by automatically finding and correcting any issues preventing updates from installing correctly. The Windows Troubleshooter is a built-in program that can discover and resolve different Windows update difficulties, such as failures with the Windows Update service, corrupt update files, and network connectivity issues.
Downloading Windows Update Troubleshooter and launching it may save time and effort by allowing the application to diagnose and solve the problem automatically. Here’s how to run the Windows Troubleshooter:
Step 1. Use the Windows key + I to enter the Settings app.
Step 2. Select «Update & Security» > choose «Troubleshoot» > select «Windows Update».
Step 3. Click «Run the troubleshooter» under the «Get up and running» section.
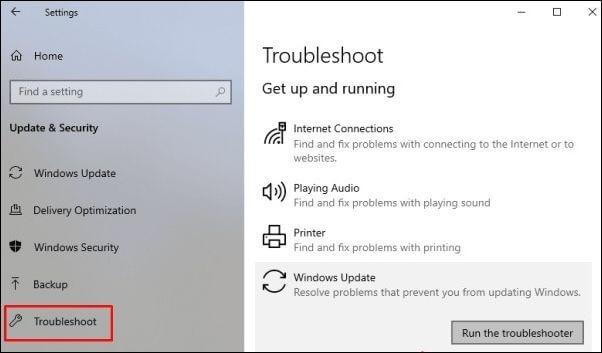
Note: Wait for the troubleshooter to complete its scan for issues. Follow the on-screen instructions to implement the suggested remedies if any problems are noted.
Step 4. After troubleshooting, reboot your computer to verify the modifications have taken effect.
Step 5. Check to see whether the problem has been fixed by upgrading Windows again.
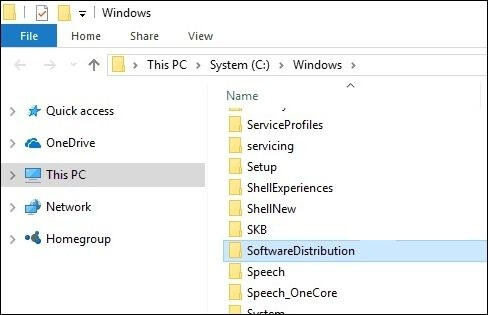
Fix 4. Delete the SoftwareDistribution Folder
By removing the temporary update files and requiring Windows to download new update files, deleting the SoftwareDistribution folder may help resolve Windows Error Code 0x80240020. Windows saves temporary files related to Windows updates in the SoftwareDistribution system folder. Deleting this folder may alleviate difficulties caused by damaged update files or other issues that prevent updates from installing correctly. After deleting the folder, Windows will build a new SoftwareDistribution folder and download new update files.
Here’s how to delete the SoftwareDistribution folder:
Step 1. Go to the following folder and remove everything from it: C: Windows/SoftwareDistribution/Download
Step 2. Right-click the «Start Menu» button, choose and boot «Command Prompt».
Step 3. Press Enter after typing the following line: /updateow wuauclt.exe
Step 4. Wait until the operation is completed before closing the Command Prompt.
Step 5. Now, go to the «Start Menu», open the «Settings» app, choose «Update», and attempt downloading updates again. Go to «Control Panel» and «Update» if you haven’t yet downloaded Windows 10.
If you find this article helpful, please share it with your friends or colleagues on multiple social media platforms like Twitter, Facebook, and Instagram.
How to Recover Data When Windows Error Occurs
Windows Error Code 0x80240020 may be inconvenient and sometimes result in data loss. Users may lose essential information, documents, or images when repairing the issue in certain situations. This may be a significant problem, mainly if the deleted data is not backed up. Fortunately, data recovery software is available to assist in recovering permanently deleted files quickly and effectively.
EaseUS Data Recovery Wizard is one such option. This program is intended to assist users in recovering data that has been lost due to several factors, such as file system failures, system crashes, unintentional deletion, and more. EaseUS Data Recovery Wizard is compatible with Windows 11/10/8/7 and has a user-friendly interface allowing inexperienced users to recover lost data. The program can recover a variety of file kinds, including documents, photographs, videos, and audio files. It also supports hard drive recovery and can recover data from SSDs, USB flash drives, and memory cards, among other storage media.
EaseUS Data Recovery Wizard
- Recover lost or deleted files, documents, photos, audio, music, and emails effectively
- Recover files from formatted hard drives, emptied Recycle Bin, memory cards, flash drives, digital cameras, and camcorders
- Support data recovery for sudden deletion, formatting, hard drive corruption, virus attack, and system crash under different situations
Key Features of EaseUS Data Recovery Wizard
- 📃Recovers various file types from different storage devices.
- 😊User-friendly interface for easy data recovery.
- ❎Recovers data lost due to system errors, crashes, or deletion.
- 🔢The free version offers 2GB of data recovery.
- 💻Compatible with Windows 11/10/8/7.
More importantly, EaseUS software is easy to operate. Here below are the exact steps:
Note: To guarantee a high data recovery chance, install EaseUS data recovery software on another disk instead of the original disk where you lost files.
Step 1. Launch EaseUS Data Recovery Wizard on your Windows 11, Windows 10, Windows 8, or Windows 7 computer. Select the disk partition or storage location where you lost data and click «Scan».

Step 2. This recovery software will start scanning the disk to find all lost and deleted files. When the scan process completes, click «Filter» > «Type» to specify lost file types.

Step 3. Preview and restore lost Windows files. You can double-click to preview the scanned files. Then, select the target data and click the «Recover» button to save them to another safe spot in the PC or an external storage device.

The Bottom Line
Fixing Windows Update problems may be a hassle, but luckily, you can take a few different approaches. Users may be able to resolve Windows error number 0x80240020 by checking the BITS service, utilizing sign-in info to finish updates, running the Windows Troubleshooter, or removing the SoftwareDistribution folder.
Furthermore, EaseUS Data Recovery Wizard is a trustworthy software for recovering lost files if data is lost throughout the procedure. EaseUS Data Recovery Wizard is a top choice for recovering deleted files because of its intuitive design, a wide variety of supported file types, and compatibility with a wide range of Windows versions.
Windows Error Code 0x80240020 FAQs
Here come other questions related to Windows Updates.
1. What is SCCM feature update error 0x80240020?
SCCM feature update error 0x80240020 might occur while installing feature updates using SCCM. Several things, including a corrupted or incomplete download, BITS service difficulties, or wrong settings, might cause it.
2. What is error code 0x80240022 in SCCM?
SCCM error number 0x80240022 is frequently encountered while downloading Windows Update or SCCM updates. Several circumstances, including a lack of disk space, wrong system settings, or program incompatibilities, may cause it.
3. How do I reset Windows Updates?
You may use the Windows Update Troubleshooter or manually reset the Windows Updates components to reset Windows Updates. The processes vary depending on the Windows version but typically include halting the Windows Update services, clearing the temporary update files, and resuming the services.
4. How do I fix Windows repair errors?
To repair Windows, utilize the built-in System File Checker (SFC) or Deployment Image Servicing and Management (DISM) utilities. SFC searches and fixes system files, while DISM may repair Windows images and resolve system issues. With administrator capabilities, you may launch these tools from the Command Prompt or by opening PowerShell.