Looks like you haven’t properly installed the header files and static libraries for python dev. Use your package manager to install them system-wide.
For apt (Ubuntu, Debian…):
sudo apt-get install python-dev   # for python2.x installs
sudo apt-get install python3-dev  # for python3.x installs
For yum (CentOS, RHEL…):
sudo yum install python-devel    # for python2.x installs
sudo yum install python3-devel   # for python3.x installs
For dnf (Fedora…):
sudo dnf install python2-devel  # for python2.x installs
sudo dnf install python3-devel  # for python3.x installs
For zypper (openSUSE…):
sudo zypper in python-devel   # for python2.x installs
sudo zypper in python3-devel  # for python3.x installs
For apk (Alpine…):
# This is a departure from the normal Alpine naming
# scheme, which uses py2- and py3- prefixes
sudo apk add python2-dev  # for python2.x installs
sudo apk add python3-dev  # for python3.x installs
For apt-cyg (Cygwin…):
apt-cyg install python-devel   # for python2.x installs
apt-cyg install python3-devel  # for python3.x installs
Note: python3-dev does not automatically cover all minor versions of python3, if you are using e.g. python 3.8 you may need to install python3.8-dev.
Donald Duck
8,29922 gold badges74 silver badges97 bronze badges
answered Feb 3, 2014 at 15:10
![]()
wimwim
334k99 gold badges605 silver badges740 bronze badges
7
On Ubuntu, I was running Python 3 and I had to install
sudo apt-get install python3-dev
If you want to use a version of Python that is not linked to python3, install the associated python3.x-dev package. For example:
sudo apt-get install python3.5-dev
answered Feb 27, 2014 at 18:54
FreshPowFreshPow
6,6921 gold badge15 silver badges17 bronze badges
2
For Python 3.7 and Ubuntu in particular, I needed
sudo apt install libpython3.7-dev
.
I think at some point names were changed from pythonm.n-dev to this.
for Python 3.6, 3.8 through 3.10 (and counting…) similarly:
sudo apt install libpython3.6-dev
sudo apt install libpython3.8-dev
sudo apt install libpython3.9-dev
sudo apt install libpython3.10-dev
sudo apt install libpython3.11-dev
![]()
andyw
3,4252 gold badges30 silver badges44 bronze badges
answered Aug 28, 2019 at 18:50
ijosephijoseph
6,3474 gold badges26 silver badges26 bronze badges
5
Two things you have to do.
Install development package for Python, in case of Debian/Ubuntu/Mint it’s done with command:
sudo apt-get install python-dev
Second thing is that include files are not by default in the include path, nor is Python library linked with executable by default. You need to add these flags (replace Python’s version accordingly):
-I/usr/include/python2.7 -lpython2.7
In other words your compile command ought to be:
gcc -Wall -I/usr/include/python2.7 -lpython2.7 utilsmodule.c -o Utilc
answered Feb 3, 2014 at 15:13
vartecvartec
131k36 gold badges217 silver badges244 bronze badges
2
on Fedora run this for Python 2:
sudo dnf install python2-devel
and for Python 3:
sudo dnf install python3-devel
answered Jun 5, 2015 at 21:48
ravi.zombieravi.zombie
1,4821 gold badge20 silver badges23 bronze badges
1
If you are using tox to run tests on multiple versions of Python, you may need to install the Python dev libraries for each version of Python you are testing on.
sudo apt-get install python2.6-dev
sudo apt-get install python2.7-dev
etc.
answered Apr 23, 2015 at 17:38
Christian LongChristian Long
10.2k5 gold badges60 silver badges57 bronze badges
0
Make sure that the Python dev files come with your OS.
You should not hard code the library and include paths. Instead, use pkg-config, which will output the correct options for your specific system:
$ pkg-config --cflags --libs python2
-I/usr/include/python2.7 -lpython2.7
You may add it to your gcc line:
gcc -Wall utilsmodule.c -o Utilc $(pkg-config --cflags --libs python2)
answered Feb 3, 2014 at 15:26
sleblancsleblanc
3,8111 gold badge34 silver badges42 bronze badges
2
For me, changing it to this worked:
#include <python2.7/Python.h>
I found the file /usr/include/python2.7/Python.h, and since /usr/include is already in the include path, then python2.7/Python.h should be sufficient.
You could also add the include path from command line instead — gcc -I/usr/lib/python2.7 (thanks @erm3nda).
answered Nov 14, 2015 at 17:14
sashoalmsashoalm
74.3k119 gold badges427 silver badges773 bronze badges
7
Solution for Cygwin
You need to install the package python2-devel or python3-devel, depending on the Python version you’re using.
You can quickly install it using the 32-bit or 64-bit setup.exe (depending on your installation) from Cygwin.com.
Example (modify setup.exe‘s filename and Python’s major version if you need):
$ setup.exe -q --packages=python3-devel
You can also check my other answer for a few more options to install Cygwin’s packages from the command-line.
answered Mar 23, 2017 at 17:50
In AWS API (centOS) its
yum install python27-devel
answered Jul 9, 2015 at 6:20
yespbsyespbs
4054 silver badges4 bronze badges
5
AWS EC2 install running python34:
sudo yum install python34-devel
answered Dec 12, 2016 at 22:57
![]()
parsethisparsethis
7,9483 gold badges29 silver badges31 bronze badges
1
If you use a virtualenv with a 3.6 python (edge right now), be sure to install the matching python 3.6 dev sudo apt-get install python3.6-dev, otherwise executing sudo python3-dev will install the python dev 3.3.3-1, which won’t solve the issue.
answered May 9, 2017 at 11:46
1
In my case, what fixed it in Ubuntu was to install the packages libpython-all-dev (or libpython3-all-dev if you use Python 3).
answered Feb 1, 2016 at 1:27
![]()
Oriol NietoOriol Nieto
5,3696 gold badges32 silver badges38 bronze badges
2
I managed to solve this issue and generate the .so file in one command
gcc -shared -o UtilcS.so
-fPIC -I/usr/include/python2.7 -lpython2.7  utilsmodule.c
![]()
Solomon Ucko
5,6203 gold badges23 silver badges45 bronze badges
answered Feb 4, 2014 at 9:32
![]()
Mohanad Y.Mohanad Y.
18k3 gold badges12 silver badges12 bronze badges
It’s not the same situation, but it also works for me and now I can use SWIG with Python3.5:
I was trying to compile:
gcc -fPIC -c existe.c existe_wrap.c -I /usr/include/python3.5m/
With Python 2.7 works fine, not with my version 3.5:
existe_wrap.c:147:21: fatal error: Python.h: No existe el archivo o el
directorio compilation terminated.
After run in my Ubuntu 16.04 installation:
sudo apt-get install python3-dev # for python3.x installs
Now I can compile without problems Python3.5:
gcc -fPIC -c existe.c existe_wrap.c -I /usr/include/python3.5m/
answered Jun 10, 2017 at 15:39
Hugo L.MHugo L.M
1,04317 silver badges30 bronze badges
0
This problem can also arrive when you have different Python versions installed and you use a pip that’s not the system’s one. In that case, the non-system pip won’t find the right version of Python headers.
It happened to me when trying to pip install a package for a Python bundled with an application. As it was not system’s python, apt install pythonXX-dev didn’t work.
In this case, the solution is to find the right python header:
find / -iname 'Python.h'
In the output, you will see system python headers, and hopefully the one you are looking for, for example:
/usr/include/python3.7m/Python.h
/usr/include/python3.6m/Python.h
/home/ubuntu/workspace/blender-git/lib/linux_centos7_x86_64/python/include/python3.7m/Python.h
/home/ubuntu/miniconda3/pkgs/python-3.8.5-h7579374_1/include/python3.8/Python.h
/home/ubuntu/miniconda3/pkgs/python-3.7.0-h6e4f718_3/include/python3.7m/Python.h
/home/ubuntu/miniconda3/include/python3.8/Python.h
/home/ubuntu/miniconda3/envs/sim/include/python3.7m/Python.h
/home/ubuntu/src/blender-deps/Python-3.7.7/Include/Python.h
/opt/lib/python-3.7.7/include/python3.7m/Python.h
Then, you can set a compiler flag that will get used by gcc when called by pip.
Mine was /home/ubuntu/workspace/blender-git/lib/linux_centos7_x86_64/python/include/python3.7m/Python.h, so I did:
export CPPFLAGS=-I/home/ubuntu/src/blender-deps/Python-3.7.7/Include
pip install <package>
answered Apr 8, 2021 at 8:23
![]()
MiloMilo
2,02216 silver badges38 bronze badges
5
I also encountered this error when I was installing coolprop in ubuntu.
For ubuntu 16.04 with python 3.6
sudo apt-get install python3.6-dev
If ever this doesn’t work try installing/updating gcc lib.
sudo apt-get install gcc
answered May 14, 2018 at 1:58
![]()
WreeecksWreeecks
2,1661 gold badge31 silver badges52 bronze badges
1
try apt-file. It is difficult to remember the package name where the missing file resides. It is generic and useful for any package files.
For example:
root@ubuntu234:~/auto# apt-file search --regexp '/Python.h$'
pypy-dev: /usr/lib/pypy/include/Python.h
python2.7-dbg: /usr/include/python2.7_d/Python.h
python2.7-dev: /usr/include/python2.7/Python.h
python3.2-dbg: /usr/include/python3.2dmu/Python.h
python3.2-dev: /usr/include/python3.2mu/Python.h
root@ubuntu234:~/auto#
Now you can make an expert guess as to which one to choose from.
![]()
Aleksandr M
24.2k12 gold badges69 silver badges143 bronze badges
answered Nov 3, 2015 at 12:25
Here is yet another solution, because none of these solutions worked for me. For reference, I was trying to pip install something on an Amazon Linux AMI base Docker image for Python 3.6.
Non-docker solution:
# Install python3-devel like everyone says
yum -y install python36-devel.x86_64

# Find the install directory of `Python.h`
rpm -ql python36-devel.x86_64 | grep -i "Python.h"

# Forcefully add it to your include path
C_INCLUDE_PATH='/usr/include/python3.6m'
export C_INCLUDE_PATH
Docker solution:
# Install python3-devel like everyone says
RUN yum -y install python36-devel.x86_64

# Find the install directory of `Python.h`, for me it was /usr/include/python3.6m
RUN rpm -ql python36-devel.x86_64 | grep -i "Python.h" && fake_command_so_docker_fails_and_shows_us_the_output

# Since the previous command contains a purposeful error, remove it before the next run

# Forcefully add it to your include path
ARG C_INCLUDE_PATH='/usr/include/python3.6m'
NOTE: If you’re getting the error when compiling C++, use CPLUS_INCLUDE_PATH.
Alternatively, you may prefer to use another Docker image. For example, I was trying to install asyncpg~=0.24.0 on python:3.9.4-slim, which generated the same error as you saw. However, when I updated the image to python:3, it worked fine.
William
5217 silver badges21 bronze badges
answered Jan 26, 2021 at 4:43
serg06serg06
1,9691 gold badge17 silver badges26 bronze badges
3
For the OpenSuse comrades out there:
sudo zypper install python3-devel
answered Mar 29, 2015 at 5:47
![]()
kmonsoorkmonsoor
7,5307 gold badges41 silver badges55 bronze badges
If you’re using Python 3.6 on Amazon Linux (based on RHEL, but the RHEL answers given here didn’t work):
sudo yum install python36-devel
answered Feb 13, 2018 at 13:56
EgalEgal
1,37412 silver badges22 bronze badges
0
-
You must install the Python development files on your operating system if the Python provided with your operating system does not come with them. The many answers on this question show the myriad ways this can be achieved on different systems.
-
When you have done so, the problem is telling the compiler where they’re located and how to compile against them. Python comes with a program called
python-config. For compilation, you need the--includesoutput and for linking a program against the Python library (embedding Python into your program) the--ldflagsoutput. Example:gcc -c mypythonprogram.c $(python3-config --includes) gcc -o program mypythonprogram.o $(python3-config --ldflags)
The python-config program can be named after the Python versions — on Debian, Ubuntu for example these can be named python3-config or python3.6-config.
![]()
answered Jun 8, 2019 at 16:25
![]()
Sure python-dev or libpython-all-dev are the first thing to (apt )install, but if that doesn’t help as was my case, I advice you to install the foreign Function Interface packages by sudo apt-get install libffi-dev and sudo pip install cffi.
This should help out especially if you see the error as/from c/_cffi_backend.c:2:20: fatal error: Python.h: No such file or directory.
answered Dec 7, 2016 at 13:45
HugeHuge
6617 silver badges14 bronze badges
1
try locate your Python.h:
gemfield@ThinkPad-X1C:~$ locate Python.h
/home/gemfield/anaconda3/include/python3.7m/Python.h
/home/gemfield/anaconda3/pkgs/python-3.7.6-h0371630_2/include/python3.7m/Python.h
/usr/include/python3.8/Python.h
if not found, then install python-dev or python3-dev; else include the correct header path for compiler:
g++ -I/usr/include/python3.8 ...
answered Aug 21, 2020 at 10:06
gemfieldgemfield
3,2087 gold badges27 silver badges27 bronze badges
2
I am on Ubuntu. I have installed all packages as was recommended in some answers.
sudo apt-get install python-dev   # for python2.x installs
sudo apt-get install python3-dev  # for python3.x installs
I still had this problem, the line:
#include "Python.h"
And some others, I can edit them manually, it is a bad practice.
I know the secret now, it comes from the cython source code. I have the file. It compiles without errors. That is the file.
Change PYTHON to python version you have, python/python3. Change FILE to your c-filename. The name of the makefile file should be Makefile. Run the the file with the command:
make all
Makefile for creating our standalone Cython program
    FILE := file.c
    PYTHON := python3
    PYVERSION := $(shell $(PYTHON) -c "import sys;
    print(sys.version[:3])")
    PYPREFIX := $(shell $(PYTHON) -c "import sys; print(sys.prefix)")

    INCDIR := $(shell $(PYTHON) -c "from distutils import sysconfig;
    print(sysconfig.get_python_inc())")
    PLATINCDIR := $(shell $(PYTHON) -c "from distutils import
    sysconfig; print(sysconfig.get_python_inc(plat_specific=True))")
    LIBDIR1 := $(shell $(PYTHON) -c "from distutils import sysconfig;
    print(sysconfig.get_config_var('LIBDIR'))")
    LIBDIR2 := $(shell $(PYTHON) -c "from distutils import sysconfig;
    print(sysconfig.get_config_var('LIBPL'))")
    PYLIB := $(shell $(PYTHON) -c "from distutils import sysconfig;
    print(sysconfig.get_config_var('LIBRARY')[3:-2])")

    CC := $(shell $(PYTHON) -c "import distutils.sysconfig;
    print(distutils.sysconfig.get_config_var('CC'))")
    LINKCC := $(shell $(PYTHON) -c "import distutils.sysconfig;
    print(distutils.sysconfig.get_config_var('LINKCC'))")
    LINKFORSHARED := $(shell $(PYTHON) -c "import distutils.sysconfig;
    print(distutils.sysconfig.get_config_var('LINKFORSHARED'))")
    LIBS := $(shell $(PYTHON) -c "import distutils.sysconfig;
    print(distutils.sysconfig.get_config_var('LIBS'))")
    SYSLIBS :=  $(shell $(PYTHON) -c "import distutils.sysconfig;
    print(distutils.sysconfig.get_config_var('SYSLIBS'))")

    .PHONY: paths all clean test

    paths:
        @echo "PYTHON=$(PYTHON)"
        @echo "PYVERSION=$(PYVERSION)"
        @echo "PYPREFIX=$(PYPREFIX)"
        @echo "INCDIR=$(INCDIR)"
        @echo "PLATINCDIR=$(PLATINCDIR)"
        @echo "LIBDIR1=$(LIBDIR1)"
        @echo "LIBDIR2=$(LIBDIR2)"
        @echo "PYLIB=$(PYLIB)"
        @echo "CC=$(CC)"
        @echo "LINKCC=$(LINKCC)"
        @echo "LINKFORSHARED=$(LINKFORSHARED)"
        @echo "LIBS=$(LIBS)"
        @echo "SYSLIBS=$(SYSLIBS)"

    $(FILE:.c=): $(FILE:.c=.o)
        $(LINKCC) -o $@ $^ -L$(LIBDIR1) -L$(LIBDIR2) -l$(PYLIB)
    $(LIBS) $(SYSLIBS) $(LINKFORSHARED)

    $(FILE:.c=.o): $(FILE)
        $(CC) -c $^ -I$(INCDIR) -I$(PLATINCDIR)

    all: $(FILE:.c=)
answered Dec 22, 2021 at 17:05
2
This error occurred when I attempted to install ctds on CentOS 7 with Python3.6. I did all the tricks mentioned here including yum install python34-devel. The problem was Python.h was found in /usr/include/python3.4m but not in /usr/include/python3.6m. I tried to use --global-option to point to include dir (pip3.6 install --global-option=build_ext --global-option="--include-dirs=/usr/include/python3.4m" ctds). This resulted in a lpython3.6m not found when linking ctds.
Finally what worked was fixing the development environment for Python3.6 needs to correct with the include and libs.
yum -y install https://dl.iuscommunity.org/pub/ius/stable/CentOS/7/x86_64/python36u-libs-3.6.3-1.ius.centos7.x86_64.rpm
Python.h needs to be in your include path for gcc. Whichever version of python is used, for example if it’s 3.6, then it should be in /usr/include/python3.6m/Python.h typically.
answered Nov 3, 2017 at 17:14
1
Sometimes even after installing python-dev the error persists,
Check for the error if it is ‘gcc’ missing.
First download as stated in https://stackoverflow.com/a/21530768/8687063, then install gcc
For apt (Ubuntu, Debian…):
sudo apt-get install gcc
For yum (CentOS, RHEL…):
sudo yum install gcc
For dnf (Fedora…):
sudo dnf install gcc
For zypper (openSUSE…):
sudo zypper in gcc
For apk (Alpine…):
sudo apk gcc
answered Jun 28, 2018 at 0:41
![]()
It often appear when you trying to remove python3.5 and install python3.6.
So when using python3 (which python3 -V => python3.6) to install some packages required python3.5 header will appear this error.
Resolve by install python3.6-dev module.
answered Apr 14, 2018 at 7:38
![]()
dphansdphans
1,49318 silver badges19 bronze badges
This means that Python.h isn’t in your compiler’s default include paths. Have you installed it system-wide or locally? What’s your OS?
You could use the -I<path> flag to specify an additional directory where your compiler should look for headers. You will probably have to follow up with -L<path> so that gcc can find the library you’ll be linking with using -l<name>.
answered Feb 3, 2014 at 15:12
KosKos
70.1k24 gold badges168 silver badges233 bronze badges
Время чтения 2 мин.
Что делать с фатальной ошибкой: «python.h: нет такого файла или каталога», если вы неправильно установили заголовочные файлы и статические библиотеки для python-dev? Если вы пытаетесь создать разделяемую библиотеку с помощью файла расширения C, вам необходимо установить разрабатываемую версию Python.
Чтобы исправить фатальную ошибку: «python.h: нет такой ошибки файла или каталога», установите python3-dev, который является правильной версией Python для разработки.
Фатальная ошибка также возникает, когда компилятор не может найти файл «python.h», заголовочный файл, необходимый для создания расширений для языка программирования Python. Фатальная ошибка приводит к завершению программы без предупреждения и без сохранения ее состояния.
Python.h используется GNU Compiler Collection(gcc) для создания приложений. Вы должны установить пакет python-dev для создания модулей Python, расширения интерпретатора Python или встраивания Python в приложения. Пакет python-dev включает файлы заголовков, статическую библиотеку и средства разработки.
Если вы неправильно установили файлы заголовков и статические библиотеки для python-dev, используйте одну из следующих команд для вашей операционной системы.
Содержание
- Для Ubuntu
- Для CentOS, RHE
- Для Fedora
- Заключение
Для Ubuntu
|
sudo apt—get install python—dev # for python2.x installs sudo apt—get install python3—dev # for python3.x installs |
Для Python 3.7 и Ubuntu вам потребуется следующая версия.
|
sudo apt install libpython3.7—dev |
Для Python 3.6 введите следующую команду.
|
sudo apt install libpython3.6—dev |
Для Python 3.8 введите следующую команду.
|
sudo apt install libpython3.8—dev |
Для Python 3.9 введите следующую команду.
|
sudo apt install libpython3.9—dev |
Для CentOS, RHE
|
sudo yum install python—devel # for python2.x installs sudo yum install python3—devel # for python3.x installs |
Для Fedora
|
sudo dnf install python2—devel # for python2.x installs sudo dnf install python3—devel # for python3.x installs |
Если вы хотите использовать версию Python, которая не связана с python3, установите соответствующий пакет python3.x-dev.
|
sudo apt—get install python3.5—dev |
Если вы используете другую операционную систему, вам может потребоваться использовать другой менеджер пакетов или загрузить файлы разработки непосредственно с веб-сайта Python.
Заключение
Простое исправление фатальной ошибки: «python.h: в Python нет такого файла или каталога» — установить python3-dev, который является правильной версией разработки. Используйте разные библиотеки для каждой из операционных систем.
When you compile C and C++ code using GCC, you might see the following error:
fatal error: Python.h: No such file or directory
This error usually occurs when you add the Python header file to your C code, but that file can’t be found on your system.
This tutorial shows examples that cause this error and how you can fix it.
How to reproduce this error
Suppose you have a file named main.c with the following content:
#include<Python.h>
#include<stdio.h>

int main()
{
    printf("Hello World!n");
    return 0;
}
You instructed the program to include the Python.h header file, then compile it using GCC:
When GCC can’t find the Python.h file in your system, it shows the following error:
main.c:1:9: fatal error: Python.h: No such file or directory
    1 | #include<Python.h>
      |         ^~~~~~~~~~
compilation terminated.
To fix this error, you need to make GCC able to find the Python header file.
How to fix this error
If you use Ubuntu OS, the Python.h file is included in the python-dev package.
You can use one of the following commands to install the python-dev package.
If you have Python 3, then install the python3-dev package:
#For apt (Ubuntu, Debian...):
sudo apt-get install python-dev
sudo apt-get install python3-dev

#For yum (CentOS, RHEL...):
sudo yum install python-devel
sudo yum install python3-devel

# For dnf (Fedora...):
sudo dnf install python2-devel
sudo dnf install python3-devel

#For zypper (openSUSE...):
sudo zypper in python-devel
sudo zypper in python3-devel

# For apk (Alpine...):
sudo apk add python2-dev
sudo apk add python3-dev

#For apt-cyg (Cygwin...):
apt-cyg install python-devel
apt-cyg install python3-devel
Once you install the Python-dev package, you could find the Python.h file in /usr/include/pythonx.xx with x.xx being the version of the Python you installed.
You can also use the locate command to find the file:
$ locate Python.h
/usr/include/python3.10/Python.h
Now that you have the location of Python.h, you need to include the path to that file by adding the -I flag when running GCC.
Here’s an example:
gcc main.c -I/usr/include/python3.10
Notice you no longer get the fatal error. You can run the output file a.out to run the compiled C program.
Fix for macOS
If you use macOS, then the header file should be included when you install Python on your computer.
If you use Homebrew to install Python, the header file should be somewhere in /opt/homebrew/Cellar/ for Apple Silicon Macs or in /usr/local/Cellar for Intel Macs.
I found my header file in /opt/homebrew/Cellar/[email protected]/3.10.10/Frameworks/Python.framework/Versions/3.10/include/python3.10.
You can use the Search bar in Finder to find the file. Find the location by right-clicking on the file and select Get Info.
You can highlight and copy the path shown in the Where info.
Next, you need to include the path when compiling your code with GCC like this:
gcc main.c -I/opt/homebrew/Cellar/[email protected]/3.10.10/Frameworks/Python.framework/Versions/3.10/include/python3.10
As an alternative, you can also use the python-config --includes command to generate the include option.
For example:
$ python3-config --include
-I/opt/homebrew/opt/[email protected]/Frameworks/Python.framework/Versions/3.11/include/python3.11
You can add the command when calling gcc to compile your C program as follows:
gcc main.c `python-config --include`
The compilation no longer gives a fatal error, and you can run the compiled program.
Conclusion
The fatal error: Python.h: No such file or directory occurs when GCC can’t find the Python.h file you included in your code.
You might not have the python-dev package installed on your system, or the path to Python.h file isn’t included in the PATH variable.
You can add the -I flag when compiling with GCC to include the path to the directory that holds the header file.
I hope this tutorial is helpful. Happy coding! 😉
While looking for a solution for the Hungarian problem, I found this GitHub link.
I went through the readme.md file and I performed everything described there. After copying hungarian.so into my working directory, when I tried to compile hungarian.cpp using make hungarian, I got this output:
anupam@JAZZ:~/Python/hungarian-master$ make hungarian
g++     hungarian.cpp   -o hungarian
hungarian.cpp:7:20: fatal error: Python.h: No such file or directory
 #include "Python.h"
                    ^
compilation terminated.
make: *** [hungarian] Error 1
I found this related question on Stack Overflow, but the answer didn’t work for me.
I am very new to GitHub I don’t know how to add modules on g++. Can someone help me with that, and what to do next?
![]()
Zanna♦
69k56 gold badges215 silver badges327 bronze badges
asked Sep 21, 2014 at 14:17
![]()
2
For Python 3:
sudo apt-get install python-dev python3-dev
You can also install it for specific versions of Python (if available for your version of Ubuntu, or from a PPA):
sudo apt-get install python3.4-dev
sudo apt-get install python3.5-dev
The python3-dev package depends on a python3.x-dev package, (where 3.x is the system version of Python) and on the libpython3-dev package, which in turn depends on a corresponding libpython3.x-dev package.
![]()
muru
192k53 gold badges468 silver badges719 bronze badges
answered Nov 14, 2015 at 23:15
![]()
Martin ThomaMartin Thoma
18.6k25 gold badges70 silver badges96 bronze badges
This is python code extending with C. No need to use make. Python itself will take care of the cpp code compilation with proper flags.
First you need to have header files and a static library. Install those as,
sudo apt-get install python-dev
Now follow these commands to execute example.py in your code.
python setup.py build
cp  build/lib.linux-i686-2.7/hungarian.so .
python example.py
Note: I am using
python2.7, you should take care of your version of python when execute the above commands. It is worth mentioning that you need to installpython-numpyif you not have it as python script need it.
![]()
answered Sep 21, 2014 at 14:47
sourav c.sourav c.
43.8k20 gold badges101 silver badges127 bronze badges
2
- Causes of
'Python.h': No such file or directoryError in C++ - Python Installation That Allows Embedding Its Code in C++
- Steps to Add Python Path to IDE’s
Includeand Linker - Add Python Path to
Includeand Linker - Write Python Codes in C++ and Compile Them
- Conclusion

This article will explain how to solve the error 'Python.h': No such file or directory. This usually happens when we try to embed Python code in C++, but the compiler cannot find a reference to Python inside the system.
Causes of 'Python.h': No such file or directory Error in C++
Below is a C++ program that uses Python codes.
#include <stdio.h>
#include <conio.h>
#include <Python.h>

int main()
{
	PyObject* pInt;

	Py_Initialize();

	PyRun_SimpleString("print('Hello World from Embedded Python!!!')");

	Py_Finalize();

	printf("nPress any key to exit...n");
	if (!_getch()) _getch();
	return 0;
}
When this program is compiled, it gives the error 'Python.h': No such file or directory.
Build started...
1>------ Build started: Project: Python into Cpp, Configuration: Debug x64 ------
1>1.cpp
1>C:UsersWin 10sourcereposPython into Cpp1.cpp(3,10): fatal error C1083: Cannot open include file: 'Python.h': No such file or directory
1>Done building project "Python into Cpp.vcxproj" -- FAILED.
========== Build: 0 succeeded, 1 failed, 0 up-to-date, 0 skipped ==========
Various reasons cause the 'Python.h': No such file or directory issue.
-
Python is not installed inside the system.
Python is third-party enterprise software that does not come with standard Windows and C++ compilers installation. It must be installed with correct settings and linked to the C++ compiler.
-
C++ compiler cannot find Python.
If the compiler is run through an IDE or mingw4, it can only detect that standard C++ includes packages that come with a standard installation.
Third-party libraries are needed to be added to the IDE
includeand linker files.Three steps need to be executed to solve the above issues.
- Custom installing Python that allows it to be embedded in IDEs.
- Adding Python path to IDE
includeand linker paths. - Writing Python codes inside C++ codes and compiling them.
Python Installation That Allows Embedding Its Code in C++
If there is no Python inside the system, or if it is installed and linked but still the error 'Python.h': No such file or directory occurs, it’s because the Python installation did not download the debug binaries with it.
It is recommended that Python be uninstalled and then reinstalled correctly to solve the error 'Python.h': No such file or directory.
Head to the Python website and download the latest Python version. If a certain version is required, head to the All Releases download section.
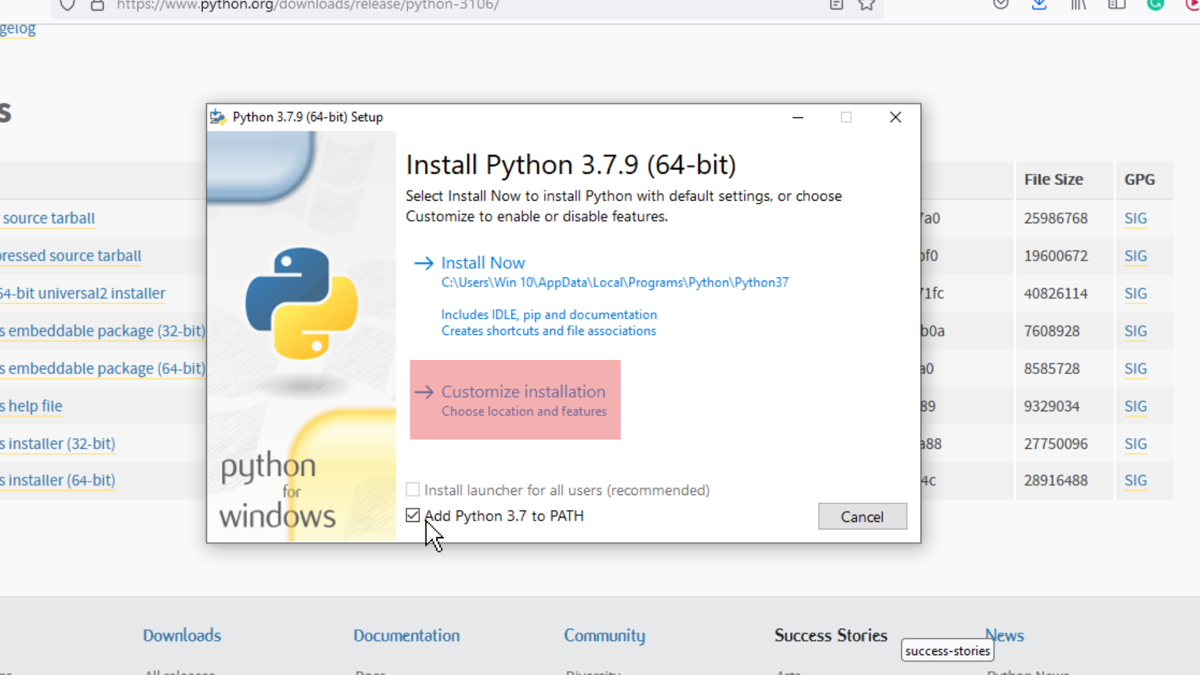
This article demonstrates the steps in Windows OS, so the suitable option is to go with the Windows installer(64bit or 32bit). It is recommended to use the 64-bit version if a modern PC is used.
After the download is complete, run the installer, and choose Customize Installation. The Install now option will install Python with default settings but leave the debug binaries out that allows embedding it into IDEs.
Tick the box that asks to Add Python X.X(version) to PATH and then click on Customize Installation.
On the next page, mark all the boxes and then click next.

In the third menu, tick the box Download debug binaries and click on Install. Python will be installed inside the selected directory.

Steps to Add Python Path to IDE’s Include and Linker
Any third-party library that does not come with C++ in its standard installation must be referenced to the IDE. IDEs cannot automatically search and detect third-party libraries inside the system.
This is the reason that causes the error 'Python.h': No such file or directory.
Though IDE can search for files when the package library is stored in the same directory where the C++ script is located, its path should be mentioned inside the program’s #include<> header.
But storing dependencies this way is a bad practice.
What needs to be done is that the path of the library should be linked to the IDE so that it can be included the way standard header files are included, removing the need to provide a file path with the source code.
Any third-party library that does not come with C++ in its standard installation must be referenced to the IDE. IDEs cannot automatically search and detect third-party libraries inside the system.
This is the reason that causes the error 'Python.h': No such file or directory.
At first, an IDE is needed. It is recommended to go with Visual Studio (2017 or later), and this article will cover the same.
Any other IDE can also be used, the steps are identical in most of them, but Visual Studio makes it simple.
Install Visual Studio in the System
The installer of Visual Studio can be downloaded from here. After downloading the 64-bit Community version, install the software, including the C++ development option.
After installation is completed, create a new project.
The window can look intimidating for readers who have never used Visual Studio before, but there’s no need to worry. Most of the features that will be needed are in front, and this article will guide the rest.
Create a project, and give it a name like ‘Python in cpp’. After the project is created, the main window would look something like this:

If there is just a black screen, press Ctrl+Alt+l, and the solution explorer will open. The solution explorer shows all the files and dependencies available for the project.
Add Python Path to Include and Linker
In this step, the Python path will be included and linked to Visual Studio so that the IDE knows where to look when #include <python.h> is written.
A prerequisite for this step is to know the directory where Python is installed and keep it open in another window. Now head down to Debug > Project Name > Properties (Instead of Project name, it will display the project’s name).

Inside the project properties window, go to C/C++ > General > Additional Include Directories, click on the tiny drop button on the extreme right, and then click on <Edit...>.
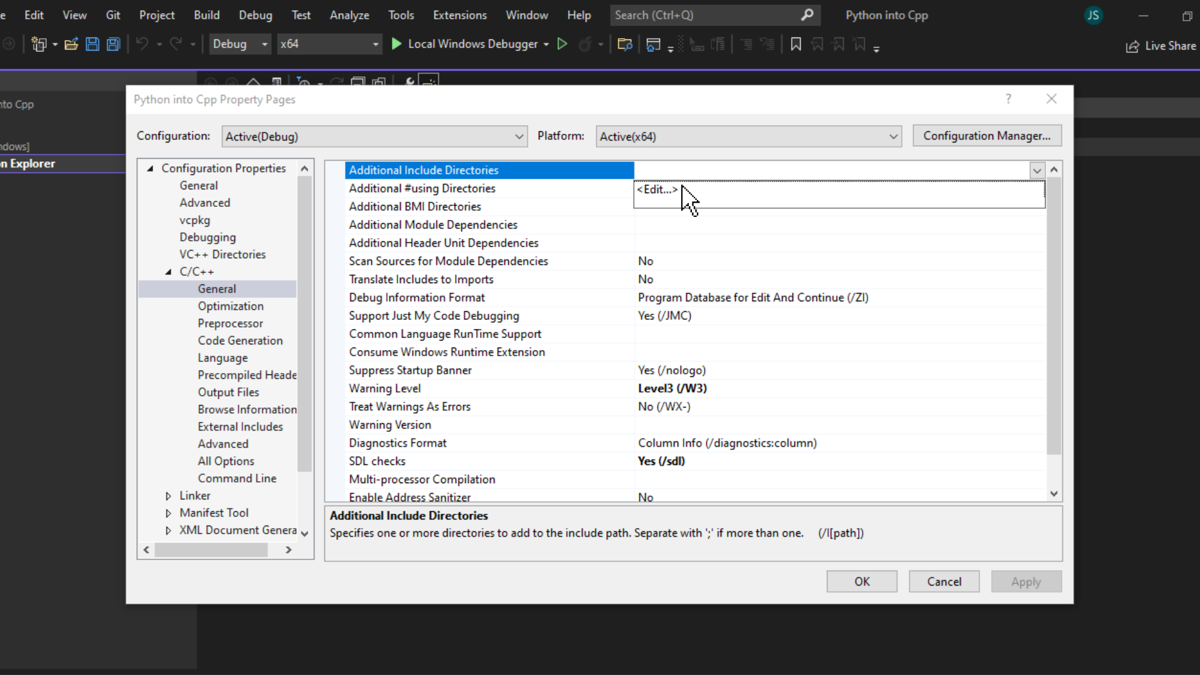
The Additional Include Directories dialog box will open. Here, double-click on the first blank space and paste the path of the include folder from the directory where Python is installed inside the system, then click OK.

After the path of include directory is added, head down to Linker > General > Additional Library Directories. Like the previous step, click on <Edit...>.

Now, the libs folder should be added to the linker. This folder is also found inside the Python directory, where the include folder is located.
After it is added, click on OK and then click on Apply.

Write Python Codes in C++ and Compile Them
Once the include and linker paths are added, a sample program must be compiled to check whether the above steps have been executed correctly, and the 'Python.h': No such file or directory error is not encountered again.
Go to the solution explorer and right-click on source files. Click on add > new item, give the file a name and click add.
This new file will contain the code that will be compiled.
Below is the C++ program used at the start of the article that threw errors.
#include <stdio.h>
#include <conio.h>
#include <Python.h>

int main()
{
	PyObject* pInt;

	Py_Initialize();

	PyRun_SimpleString("print('Hello World from Embedded Python!!!')");

	Py_Finalize();

	printf("nPress any key to exit...n");
	if (!_getch()) _getch();
	return 0;
}
Now, when the file is compiled by clicking on the green play button on the top, we get the output:
Hello World from Embedded Python!!!

Press any key to exit...
Conclusion
This article explains the steps to solve the error 'Python.h': No such file or directory. After reading this article, the reader can install Python and Visual Studio and link them to the Python library.