You may encounter the Xbox system error e102 during the startup or the OS update installation process. Well, MiniTool summarizes some similar cases and several available troubleshooting methods in this post.
About Xbox One System Error e102
Though system updates can be done without any issues in most time, some users still suffer from issues like Xbox system error e102 in this process. Some even receive the error at startup. The error code varies from person to person.
Some commonly received error codes and similar types of Xbox One system error e102 are listed as follows.
- Xbox One system error e106
- Xbox system error e208
- Xbox One error e207
- Xbox One system error e101
- System error e102 10030c02 8007045d
- Xbox One offline update
What Causes Xbox System Error e102
The reasons for the Xbox One X system error e102 are complicated. It may occur in different cases. For instance, some people claim that network issues cause the error, while others state that bad system updates trigger the issue. To be short, there are multiple factors that could result in the Xbox system error e102.
Here, some possible causes of the Xbox One system error e102 are summarized. You can take them as your reference while executing Xbox One system error e102 fixes.
- Bad network
- Bad system updates
- Corrupted files
- Previous system files interference
Based on the above possibilities, several solutions to Xbox system error e102 are provided.
Solution 1: Re-Sign the Xbox One
Re-signing the Xbox One account is a simple Xbox One system error e102 fix. You just need to sign out and then sign back. Through this operation, your customisations will be restored to the default factory settings and you will be allowed to properly use the console again.
Besides, it can help you identify if the Xbox One system error e102 happens because of corrupted files. If the issue still persists after signing back, try other solutions immediately.
Solution 2: Restart the Xbox Console
A restart will erase glitches with the console. Restarting the console also has been proven to be useful for fixing the Xbox system error e102. To restart the console, simply hold down the Xbox button and click on Restart this Xbox. Then check if the discussed error is resolved.
Tip: In addition to Xbox system error e102, this method also works for error codes including E100/E200/E204/E206/E207.
Read also: Fix Xbox Sync Button Not Working with Top 5 Fixes
Solution 3: Perform an Offline Update
If your onboard console flash has a newer OS version than what you have on the HDD/SSD or the recovery flash drive, you will receive the Xbox system error e102 as well. In this case, you need to get a flash drive with the latest OSU 1 version and then install it to your console.
This whole process is divided into 3 parts. To successfully perform an offline update, you should check the parts one by one and follow the given steps.
Tip: This Xbox One system error e102 fix is also available for the error e101 and e205.
Part 1: Prepare a USB Drive with NTFS Format
Firstly, get a USB flash drive with 8GB free space at least. Then format it to the NTFS file system. You have multiple options to format the USB drive to NTFS. Before starting the format process, connect the USB drive to your computer.
Option 1: Use File Explorer
Step 1: Press Windows and E keys to open File Explorer.
Step 2: In the File Explorer window, click on This PC in the left panel and then move to the right side of the window to find the connected USB drive.
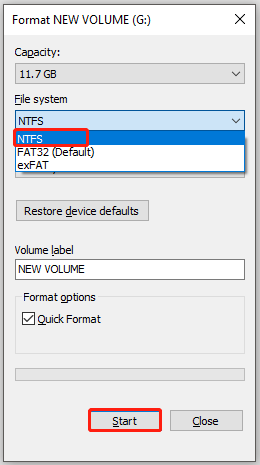
Step 3: Right-click on the USB device and click the Format option in the pop-up menu.
Step 4: In the Format window, choose NTFS from the drop-down menu of File System and tick the Quick Format checkbox.
Tip: To learn the difference between Quick Format and Full Format, please refer to Quick Format vs Full Format.
Step 5: After that, click the Start button to execute the operation. If you are prompted with a warning window, click OK to confirm the operation.
Option 2: Use Disk Management
Windows built-in Disk Management utility can also format a drive to NTFS quickly. For doing that, follow these steps.
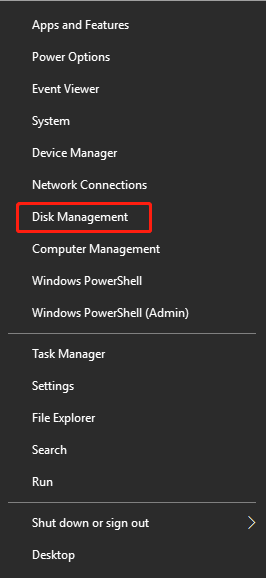
Step 1: Right-click on the Windows icon on the desktop and click Disk Management.
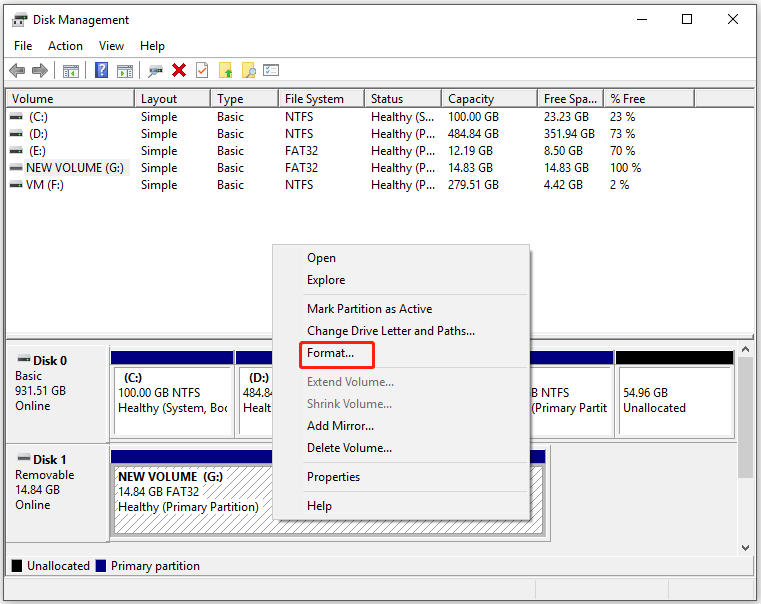
Step 2: Right-click on the USB drive and click Format.
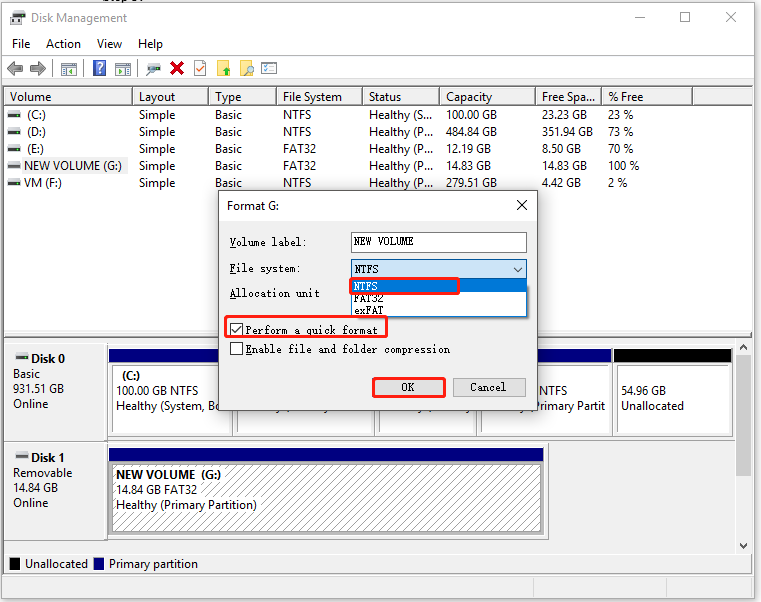
Step 3: In the elevated window, choose NTFS file system and tick the Perform a quick format checkbox. After that, click OK to carry out the operation. If a warning window pops up, allow the operation by clicking OK.
Option 3: Use MiniTool Partition Wizard
Though File Explorer and Disk Management can format the USB drive to NTFS easily, they sometimes won’t work. For instance, you may encounter issues like “Disk Management Format option grey out” and “Windows was unable to complete the format” while using the two utilities.
At this time, MiniTool Partition Wizard works. As a partition management expert, it enables you to format a disk or partition within a few clicks. Actually, it is used as an SD card formatter and USB formatter.
More importantly, if the current file system of your USB drive is FAT32, MiniTool Partition Wizard allows you to convert FAT32 to NTFS without losing data. Then you can directly convert the file system instead of formatting the USB device. By doing so, you won’t lose your data.
Tip: To convert FAT32 to NTFS, you just need the MiniTool Partition Wizard Free Edition. If you want to convert NTFS to FAT32, you are required to get the Pro or higher editions.
Free Download
Format the USB Drive to NTFS
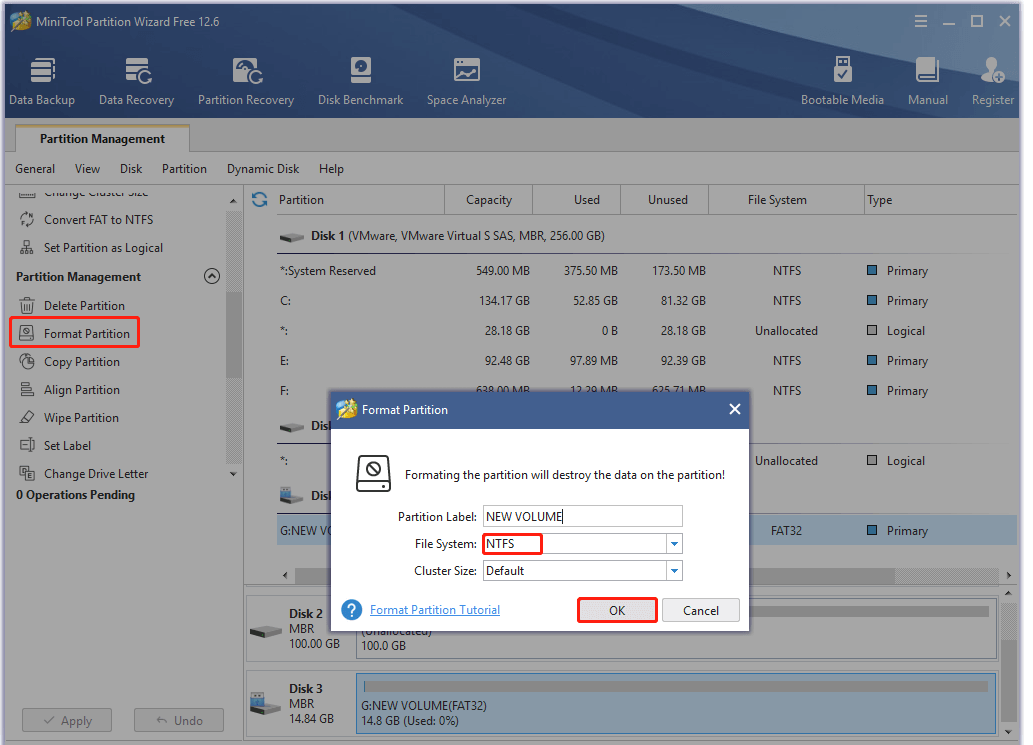
Step 1: Launch MiniTool Partition Wizard to enter its main interface.
Step 2: Click on the USB drive and click the Format Partition feature.
Step 3: In the prompted Format Partition window, set parameters including partition label, file system, and cluster size. NTFS is selected by default. Hence, if you don’t have other demands, just follow the default settings and click OK to continue.
Step 4: Tap Apply to carry out the operation.
Also read: What Does Formatting a Hard Drive Do? Here Are Answers
Convert FAT32 to NTFS
If your present USB drive’s file system is FAT32, simply convert it to NTFS with MiniTool Partition Wizard. The advantage of this operation is that it won’t cause data loss.
Step 1: After entering the main interface of MiniTool Partition Wizard, right-click on the USB drive and click Convert FAT to NTFS.
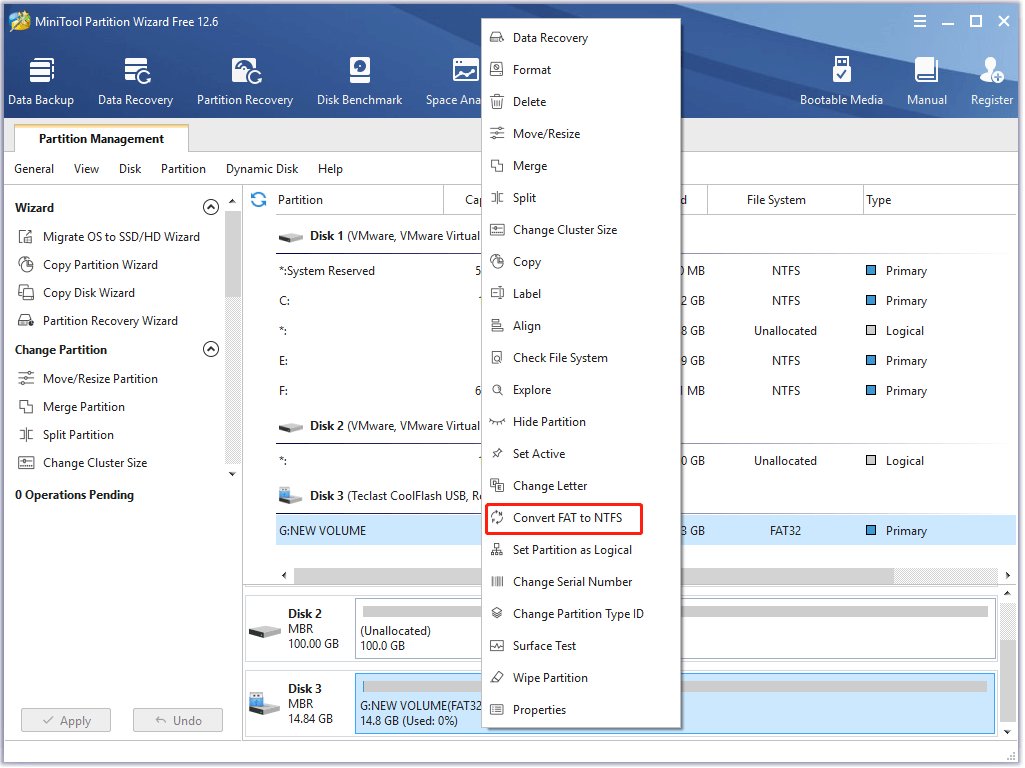
Step 2: Click Start to begin the conversion. After a while, the conversion will be completed.

Part 2: Get the OSU 1 File
After preparing a USB drive with NTFS format, it’s time to get the OSU 1 file on your USB device. For that, please refer to these steps.
Step 1: Click here to download the latest version of the Xbox One console’s OS. The download process may take you some time, so you need to wait patiently.
Step 2: After the download ends, extract the files to your USB drive.
Tip: Make sure that the $SystemUpdate is located on the root folder of the flash drive.
Part 3: Insert the USB into the Xbox Console
Step 1: Turn off the Xbox One console and then connect the USB drive with the OSU 1 file included to the console.
Step 2: Hold down the Bind and Eject buttons, and then press the Xbox button.
Step 3: Release these buttons when you hear 2 power-up tones.
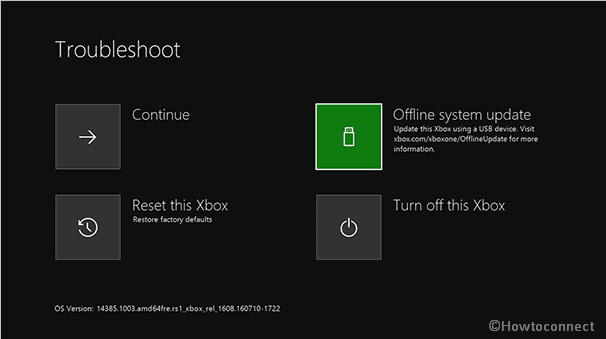
Step 4: Then you will see the Offline system update option in the pop-up Startup Troubleshooter screen. Choose this option by pressing X on your controller.
Step 5: Then the screen prompts you with the “Preparing console…” message. The time taken by the process depends on the read/write speed of your USB flash drive ranging from 15 minutes to 45 minutes.
Step 6: After the process finishes, your Xbox One console will restart automatically. Wait until the console is ready to boot up.
Tip: Sometimes, you may find that your console keeps booting up during the update process. This is normal because your system is ensuring everything falling into place.
Solution 4: Reset the Console via the Xbox One Troubleshooter
Resetting the Xbox console is one of the available Xbox One system error e102 fixes. You can reset the console via the Xbox One Troubleshooter with the following steps.
Tip: As this method will remove data stored on the console, you need to transfer it to other storage devices before starting the operation. This Xbox One system error e102 fix is applicable for e105, e106, and e203 too.
Step 1: Turn off your Xbox console and then disconnect the power cords.
Step 2: Wait for 30-60 seconds.
Step 3: Hold the Bind and Eject buttons at the same time. During that, keep pressing on the Power button until you hear two power-up tones. Then you can release the Bind and Eject buttons and you will see the Xbox Startup Troubleshooter on the screen.
Step 4: Choose Reset this Xbox > Remove Everything to execute the operation.
Step 5: Wait for the finish of the process.
Are you still bothered by the Xbox system error e102? Here is a full Xbox One system error e102 fix guide. Pick one method to fix the error now! Click to Tweet
Bottom Line
If you receive Xbox One system error e102 or other similar error codes, you can use the given solutions to fix them. As all the detailed steps are provided, you don’t have to worry about the operation.
Do you have any thoughts about this error? Do you encounter any difficulties while using these solutions? You can leave your words in the following comment area. If you meet any issues with MiniTool Partition Wizard, directly contact us via [email protected].
You may encounter the Xbox system error e102 during the startup or the OS update installation process. Well, MiniTool summarizes some similar cases and several available troubleshooting methods in this post.
About Xbox One System Error e102
Though system updates can be done without any issues in most time, some users still suffer from issues like Xbox system error e102 in this process. Some even receive the error at startup. The error code varies from person to person.
Some commonly received error codes and similar types of Xbox One system error e102 are listed as follows.
- Xbox One system error e106
- Xbox system error e208
- Xbox One error e207
- Xbox One system error e101
- System error e102 10030c02 8007045d
- Xbox One offline update
What Causes Xbox System Error e102
The reasons for the Xbox One X system error e102 are complicated. It may occur in different cases. For instance, some people claim that network issues cause the error, while others state that bad system updates trigger the issue. To be short, there are multiple factors that could result in the Xbox system error e102.
Here, some possible causes of the Xbox One system error e102 are summarized. You can take them as your reference while executing Xbox One system error e102 fixes.
- Bad network
- Bad system updates
- Corrupted files
- Previous system files interference
Based on the above possibilities, several solutions to Xbox system error e102 are provided.
Solution 1: Re-Sign the Xbox One
Re-signing the Xbox One account is a simple Xbox One system error e102 fix. You just need to sign out and then sign back. Through this operation, your customisations will be restored to the default factory settings and you will be allowed to properly use the console again.
Besides, it can help you identify if the Xbox One system error e102 happens because of corrupted files. If the issue still persists after signing back, try other solutions immediately.
Solution 2: Restart the Xbox Console
A restart will erase glitches with the console. Restarting the console also has been proven to be useful for fixing the Xbox system error e102. To restart the console, simply hold down the Xbox button and click on Restart this Xbox. Then check if the discussed error is resolved.
Tip: In addition to Xbox system error e102, this method also works for error codes including E100/E200/E204/E206/E207.
Read also: Fix Xbox Sync Button Not Working with Top 5 Fixes
Solution 3: Perform an Offline Update
If your onboard console flash has a newer OS version than what you have on the HDD/SSD or the recovery flash drive, you will receive the Xbox system error e102 as well. In this case, you need to get a flash drive with the latest OSU 1 version and then install it to your console.
This whole process is divided into 3 parts. To successfully perform an offline update, you should check the parts one by one and follow the given steps.
Tip: This Xbox One system error e102 fix is also available for the error e101 and e205.
Part 1: Prepare a USB Drive with NTFS Format
Firstly, get a USB flash drive with 8GB free space at least. Then format it to the NTFS file system. You have multiple options to format the USB drive to NTFS. Before starting the format process, connect the USB drive to your computer.
Option 1: Use File Explorer
Step 1: Press Windows and E keys to open File Explorer.
Step 2: In the File Explorer window, click on This PC in the left panel and then move to the right side of the window to find the connected USB drive.
Step 3: Right-click on the USB device and click the Format option in the pop-up menu.
Step 4: In the Format window, choose NTFS from the drop-down menu of File System and tick the Quick Format checkbox.
Tip: To learn the difference between Quick Format and Full Format, please refer to Quick Format vs Full Format.
Step 5: After that, click the Start button to execute the operation. If you are prompted with a warning window, click OK to confirm the operation.
Option 2: Use Disk Management
Windows built-in Disk Management utility can also format a drive to NTFS quickly. For doing that, follow these steps.
Step 1: Right-click on the Windows icon on the desktop and click Disk Management.
Step 2: Right-click on the USB drive and click Format.
Step 3: In the elevated window, choose NTFS file system and tick the Perform a quick format checkbox. After that, click OK to carry out the operation. If a warning window pops up, allow the operation by clicking OK.
Option 3: Use MiniTool Partition Wizard
Though File Explorer and Disk Management can format the USB drive to NTFS easily, they sometimes won’t work. For instance, you may encounter issues like “Disk Management Format option grey out” and “Windows was unable to complete the format” while using the two utilities.
At this time, MiniTool Partition Wizard works. As a partition management expert, it enables you to format a disk or partition within a few clicks. Actually, it is used as an SD card formatter and USB formatter.
More importantly, if the current file system of your USB drive is FAT32, MiniTool Partition Wizard allows you to convert FAT32 to NTFS without losing data. Then you can directly convert the file system instead of formatting the USB device. By doing so, you won’t lose your data.
Tip: To convert FAT32 to NTFS, you just need the MiniTool Partition Wizard Free Edition. If you want to convert NTFS to FAT32, you are required to get the Pro or higher editions.
Free Download
Format the USB Drive to NTFS
Step 1: Launch MiniTool Partition Wizard to enter its main interface.
Step 2: Click on the USB drive and click the Format Partition feature.
Step 3: In the prompted Format Partition window, set parameters including partition label, file system, and cluster size. NTFS is selected by default. Hence, if you don’t have other demands, just follow the default settings and click OK to continue.
Step 4: Tap Apply to carry out the operation.
Also read: What Does Formatting a Hard Drive Do? Here Are Answers
Convert FAT32 to NTFS
If your present USB drive’s file system is FAT32, simply convert it to NTFS with MiniTool Partition Wizard. The advantage of this operation is that it won’t cause data loss.
Step 1: After entering the main interface of MiniTool Partition Wizard, right-click on the USB drive and click Convert FAT to NTFS.
Step 2: Click Start to begin the conversion. After a while, the conversion will be completed.
Part 2: Get the OSU 1 File
After preparing a USB drive with NTFS format, it’s time to get the OSU 1 file on your USB device. For that, please refer to these steps.
Step 1: Click here to download the latest version of the Xbox One console’s OS. The download process may take you some time, so you need to wait patiently.
Step 2: After the download ends, extract the files to your USB drive.
Tip: Make sure that the $SystemUpdate is located on the root folder of the flash drive.
Part 3: Insert the USB into the Xbox Console
Step 1: Turn off the Xbox One console and then connect the USB drive with the OSU 1 file included to the console.
Step 2: Hold down the Bind and Eject buttons, and then press the Xbox button.
Step 3: Release these buttons when you hear 2 power-up tones.
Step 4: Then you will see the Offline system update option in the pop-up Startup Troubleshooter screen. Choose this option by pressing X on your controller.
Step 5: Then the screen prompts you with the “Preparing console…” message. The time taken by the process depends on the read/write speed of your USB flash drive ranging from 15 minutes to 45 minutes.
Step 6: After the process finishes, your Xbox One console will restart automatically. Wait until the console is ready to boot up.
Tip: Sometimes, you may find that your console keeps booting up during the update process. This is normal because your system is ensuring everything falling into place.
Solution 4: Reset the Console via the Xbox One Troubleshooter
Resetting the Xbox console is one of the available Xbox One system error e102 fixes. You can reset the console via the Xbox One Troubleshooter with the following steps.
Tip: As this method will remove data stored on the console, you need to transfer it to other storage devices before starting the operation. This Xbox One system error e102 fix is applicable for e105, e106, and e203 too.
Step 1: Turn off your Xbox console and then disconnect the power cords.
Step 2: Wait for 30-60 seconds.
Step 3: Hold the Bind and Eject buttons at the same time. During that, keep pressing on the Power button until you hear two power-up tones. Then you can release the Bind and Eject buttons and you will see the Xbox Startup Troubleshooter on the screen.
Step 4: Choose Reset this Xbox > Remove Everything to execute the operation.
Step 5: Wait for the finish of the process.
Are you still bothered by the Xbox system error e102? Here is a full Xbox One system error e102 fix guide. Pick one method to fix the error now! Click to Tweet
Bottom Line
If you receive Xbox One system error e102 or other similar error codes, you can use the given solutions to fix them. As all the detailed steps are provided, you don’t have to worry about the operation.
Do you have any thoughts about this error? Do you encounter any difficulties while using these solutions? You can leave your words in the following comment area. If you meet any issues with MiniTool Partition Wizard, directly contact us via [email protected].
Некоторые пользователи Xbox One внезапно сталкиваются с ошибкой System Xbox One System Error E102 during во время запуска или во время установки обновления ОС. Этот конкретный код ошибки указывает на основную проблему с процессом обновления.
Системная ошибка Xbox One E102
В большинстве случаев этой проблеме способствуют некоторые виды поврежденных данных, которые в конечном итоге мешают запуску последовательности. Если этот сценарий применим, вы сможете исправить проблему, выполнив сброс в автономном режиме из меню устранения неполадок при запуске.
Однако, если встроенная флэш-память консоли содержит более новую версию, чем та, которая у вас установлена на жестком диске или твердотельном накопителе, вы сможете исправить проблему, создав флэш-диск, загрузив последнюю версию OSU1, а затем установив ее на консоль.
Сброс консоли через средство устранения неполадок при запуске
Как выясняется, Xbox One уже оснащен для устранения системной ошибки E101, поскольку Microsoft включила стратегию исправления в программу устранения неполадок при запуске, которую многие пользователи успешно использовали для устранения проблемы.
В подавляющем большинстве случаев этой проблеме способствуют некоторые виды поврежденных данных, которые ломались во время прерывания обновления, вызванного скачком напряжения или другим фактором, который привел к неожиданному отключению компьютера.
Вполне вероятно, что эта конкретная системная ошибка E102 происходит из-за какого-либо типа поврежденных файлов ОС, которые каким-то образом нарушают последовательность запуска. Некоторые пользователи, столкнувшиеся с той же проблемой, подтвердили, что единственное, что им помогало, — это сброс к заводским настройкам.
Теперь, прежде чем приступить к этому, имейте в виду, что эта операция приведет к удалению всех установленных игр и приложений, подключенных учетных записей и связанных данных, сохранению игр и всего остального. Однако, если вы уже синхронизированы с Xbox Live, ваши важные данные в безопасности.
Если вы понимаете последствия и готовы начать автономный сброс настроек к заводским настройкам на Xbox One, следуйте приведенным ниже инструкциям:
- Если ваша консоль включена, полностью выключите ее и отсоедините кабель питания, чтобы разрядить конденсаторы питания.
- Подождите не менее 30 секунд, прежде чем снова подключить кабель питания.
- Вместо того, чтобы нормально запускать консоль, одновременно нажмите и удерживайте кнопку «Привязать» и «Извлечь», затем коротко нажмите кнопку Xbox на консоли.Воспроизведение Xbox One устранения неполадокПримечание. Если вы столкнулись с проблемой в версии Xbox One S All-Digital, этот метод не будет применяться, поскольку у вас не будет кнопки «Извлечь». Если этот сценарий применим, вы можете вызвать средство устранения неполадок при запуске Xbox, просто удерживая кнопку «Связать» и нажимая кнопку «Xbox» на консоли.
- Продолжайте удерживать кнопку BIND и кнопку извлечения не менее 15 секунд или пока не услышите два звуковых сигнала при включении (они разнесены на несколько секунд). Как только вы услышите оба тона, вы можете безопасно отпустить кнопки BIND и EJECT.
- Если процесс будет успешным, ваша консоль перенесет вас прямо в средство устранения неполадок при запуске Xbox.
- Оказавшись внутри, выберите «Сбросить этот Xbox», а затем нажмите «Удалить все», как только появится окно подтверждения.Сброс Xbox one через средство устранения неполадок при запускеПримечание: имейте в виду, что эта процедура удалит каждый бит пользовательских данных — это включает в себя все установленные приложения и игры, но ваши сохраненные файлы останутся без изменений.
- Подождите терпеливо, пока этот процесс не завершится. В конце этого процесса, если все пойдет хорошо, вы вернетесь на домашний экран.
Однако, если вы по-прежнему видите системную ошибку E101 при следующем запуске, перейдите к следующему потенциальному исправлению.
Выполнение автономного обновления
Если первое потенциальное исправление не помогло, вполне вероятно, что вы столкнулись с этой проблемой из-за того, что встроенная флэш-память консоли обновлена до версии ОС, более новой, чем та, которая у вас установлена на жестком диске или SSD и / или флешка восстановления. Имейте в виду, что если версия флэш-памяти хотя бы на один день новее версии на диске, система выдаст эту ошибку и оставит вас с бесконечной петлей системной ошибки E101 без видимых средств ее избежать.
Однако есть одно исправление для этого конкретного сценария: вам нужно будет посетить веб-сайт поддержки Xbox и загрузить новейшие файлы OSU1 и использовать их для переформатирования жесткого диска. Но для того, чтобы это работало, вам нужно поместить новую папку $ SystemUpdate на флешку восстановления, чтобы ОС могла с нее загрузиться. После этого вы сможете выполнять автономное обновление системы, и это должно решить проблему.
Если вы ищете пошаговые инструкции о том, как это сделать, вот руководство по всему этому:
- Сначала вам нужно подготовить флэш-диск, который вы будете использовать для автономного обновления. Для этого вставьте в компьютер USB-накопитель емкостью не менее 7 ГБ и убедитесь, что он отформатирован как NTFS. Чтобы убедиться, что он имеет правильный формат, щелкните правой кнопкой мыши на диске в проводнике и выберите «Формат» в контекстном меню. Затем установите файловую систему как NTFS и установите флажок, связанный с Quick Format, прежде чем нажимать на Start.src =
- После того, как вы правильно настроили флешку, перейдите по этой ссылке (Вот) загрузить последнюю версию операционной системы консоли Xbox One.
- Дождитесь завершения загрузки, затем извлеките содержимое архива на предварительно подготовленную вами флэш-диск и убедитесь, что $ SystemUpdate находится в корневой папке флэш-диска.
- Перейдите к консоли и убедитесь, что она полностью выключена. Затем одновременно нажмите и удерживайте кнопку «Привязать» и «Извлечь», затем коротко нажмите кнопку Xbox на консоли.Открытие средства устранения неполадок при запуске Xbox One
- После достижения двух последовательных сигналов включения питания отпустите кнопки «Привязать» и «Извлечь» и дождитесь появления экрана «Устранение неполадок при запуске».
- Вставьте флэш-диск, который вы ранее создали на шаге 1, и дождитесь появления окна Обновление автономной системы. Как только он станет доступным, выберите его с помощью контроллера и нажмите X, чтобы получить к нему доступ.Доступ к опции автономного обновления системы
- Подождите, пока процесс не будет завершен. В зависимости от скорости чтения / записи на флешке, это может занять более 20 минут.Установка последней версии ОС Xbox One вручную
- После завершения операции ваша консоль автоматически перезагрузится, и система попытается загрузиться в обычном режиме.
Do you get E102 10030c02 8007045d Xbox Error when starting the gaming console? Mostly, this fatal code turns up into the display after a system update. As a result, you become unable to start your console and enjoy your favorite game. Usually, the system update goes smoothly but if you view error like E102 then be careful as it signifies trouble. Fortunately, it’s not a big problem that can not be solved. The Xbox issue needs to restart the console, reinstall the system update offline or run the troubleshooter to be solved.
Commonly, E102 10030c02 8007045d Xbox Error occurs at the time of startup or OS update. The messages start with “E” codes such as E102, E105, E106, E200 and other which indicate the problem in your Xbox upgrade process. Here are a few easy solutions to fix E102 10030c02 8007045d.
Related – Fix: Xbox System Error E200 in Windows 10
Here is how to fix E102 10030c02 8007045d Xbox Error –
Sign out from the application and sign in
A few lucky users report that Xbox Error 0x87e105dc was resolved when the Sign out and then sign in into Xbox. This method wipes out the customizations and restores the console to the default Factory settings.
Step-1: Go to the Taskbar search and type Xbox and press Enter.
Step-2: Once the application appears, right click on your Profile pic from the top left and select Sign out.
Step-3: On the next screen, click on Sign in.
Step-4: The application will identify you and ask you as – Welcome back, Let’s Play. Click on this.
Run Xbox Startup Troubleshooter
Xbox Startup Troubleshooter resolves almost all the issues associated with the gaming console. So try to run this tool to fix E102 10030c02 8007045d Xbox Error.
- At first, Unplug the power cord of Xbox and ensure that the console is completely turned off.
- Now wait for 30 to 60 seconds and then plug in the power cord into the Xbox.
- Hold down the “BIND” button continuously from the left side and “EJECT” one from the face of the console, together for 10-15 seconds.
Note – Even if the Xbox Starts, you must hold Bind and Eject buttons jointly for 10-15 seconds.
- Wait until you hear two Power-up tunes. As you heard the second one, release the buttons.
- Press the Xbox button to get direct access to the Startup Troubleshooter.
- Now, follow the onscreen instructions to proceed ahead.
Perform an offline system update
Before proceeding to update, make sure that you fulfill the following conditions –
- You are running a good Internet Connection on your Windows Device
- The Device must have at least one USB port.
- You occupy a flash drive formatted as NTFS having minimum 4 GB storage.
Note – Insert the Flash drive into the port, right click on the USB and select Format from the context menu. This will open up the Format Window. Here select NTFS option from the drop-down menu of File System option.
Now as you have met the minimum requirements for this fix, follow the steps mentioned below –
- Download the Offline System Update file.
- Once completed, Go to Downloads folder and locate the file. Do right click on it and select Extract all option from the context menu.
- Now, copy the $SystemUpdate file and paste it into your Flash Drive.
- Hereafter, unplug the USB Drive from the system.
- Now Plug it in the console and go to Run Xbox Startup Troubleshooter section above.
- When the Troubleshoot page opens,, select Offline System update.
Restore your console to factory defaults
If the above methods don’t work to Fix E102 10030c02 8007045d Xbox Error, the last option is to restore the console. This will remove all the things such as saved game and settings from your XBox and bring back to the default state. Therefore, it’s necessary to backup the important data before proceeding forward. Once you have saved your games and settings to an external device, follow the steps –
- Launch the Troubleshoot page like we explained in the first method.
- Use D-Pad to choose Reset this Xbox, and then press A button on your controller to confirm.
- On the subsequent page, Select Remove Everything.
That’s all. Hope the different fixes mentioned above have resolved E102 10030c02 8007045d<.
Repair any Windows problems such as Blue/Black Screen, DLL, Exe, application, Regisrty error and quickly recover system from issues using Reimage.
Some Xbox One players see the dreaded ‘Xbox System Error E102‘ when starting up or installing an operating system update. Whenever this error code is produced, there’s an error with the upgrade process.
Due to faulty data interfering with a startup sequence, most of these issues are caused. There should be no issues if you use the Startup Troubleshooter to perform an Offline Reset.
For those who have a newer version of OSU1 on their onboard console flash, You can solve the problem by generating a flash drive and installing the latest OSU1 version on their console.
Although system updates are often trouble-free, some customers still encounter errors like Xbox Error Code E102 throughout the installation process. At startup, some people get the error message. For each user, the error code may be different.
Xbox System Error E102 are frequently encountered and are listed below.
- error e106 occurred on Xbox One
- Error e208 on Xbox One
- Error e207 on the Xbox One
- Error e101 in the Xbox One system console
- System error e102 10030c02 8007045d
- An offline update for Xbox One.
Causes For Xbox System Error E102
It’s critical that we first examine the underlying causes of the problem because only then can we begin to address the numerous approaches to resolving it.
When we know what’s causing the problem, we can better treat it, but we can also use our resources and time more wisely.
Consequently, the following are a few possibilities for the Xbox Error Code E102:
- Problems with the Network (Weak Network)
- Updated with a bug
- Files that have been corrupted.
- Files from previous versions interrupting the updating process
From the factors mentioned above, you can easily see that “updates” and “upgrades” of the system are the most common culprits.
If an error like this appears on your screen, something went wrong during or after an update for your Xbox system in particular.
Read Also: How to Fix PS4 Error SU-41350-3?
How to Fix Xbox System Error E102 (Different Ways)

The most recent Offline System Update File or an offline reset via Startup troubleshooter options can fix Xbox Error Code E102. Here’s a step-by-step guide to resolving Xbox One system issues like e102 and other remedies.
Check the Stability of Your Network
You’ll need a stable internet connection to check-in and get all the updates reflected. Check your internet speed at fast.com or speedtest.net to get an idea of how fast you are. After they’ve been tested and approved, look at the following changes.
Offline Factory Reset
Attempting an offline factory reset is the next step if the methods listed above fail. Also, if you couldn’t get your hands on the Troubleshooter tool, this applies to you. Follow these steps to accomplish this goal:
- Prepare your USB drive first. To restore your console to factory settings using a USB flash drive, you’ll need:
- A computer running Windows and equipped with a USB port and internet access
- An NTFS-formatted USB flash drive with at least 4 GB of storage space. Follow this link for step-by-step instructions on correctly formatting your hard disk.
Once the flash drive has been successfully formatted:
- Then, connect a USB drive to the computer.
- Download the reset file to your computer by clicking on the following link. You can find the files required to restore your Xbox to its factory settings in this zip file. Revert to the original settings.
- If the console update. Postcode file does not download automatically; click Save to store it on your computer.
- Right-click on the compressed file and select Extract All from the pop-up menu to unzip it.
- Add the $SystemUpdate file to your USB flash drive from the—postcode file.
Once you’ve completed step one, you’re ready to move on to step two:
- If you have a wired network connection, disconnect the cable.
- For 30 seconds, disconnect the mains cable from your console and turn it back on. Reconnect the power cord and turn the device back on.
- Connect the USB flash drive to your console’s USB port.
- You’ll need to hold down the Pair and Eject buttons on your Xbox One console while pressing the Xbox button.
- Hold down both the Eject and the Pair buttons for around fifteen seconds.
- The “power-up” tones should be about two seconds apart.
- Eject, and you may release pair buttons after the second power-up tone.
- Remove the flash drive when the console restarts.
- Digital setup instructions will appear after the console restarts, so you may easily reset your console using these instructions.
If everything goes smoothly, you’ll be redirected to the Main Screen again. If this doesn’t work, your only recourse is to have your console repaired. The service page on the Xbox website is the place to begin this procedure.
Read Also: How to Fix PS4 Error NP-34981-5
Turning Off and On Your Xbox
Restarting your Xbox Console system is one of the simplest methods to attempt initially. Of course, this primary method can repair most temporary screen issues from simple sources.
However, restarting your computer may not be enough for more significant problems. Start with this simple approach of troubleshooting and see if that helps.
Restarting your Xbox is as simple as pressing the Restart Button for a few seconds (ideally 5 to 10), then pressing it again and letting it go.
Run the Xbox Startup Troubleshooter
Follow these steps to use the Xbox One Startup troubleshooter to fix the Xbox System Error E102.
- Switch off your Xbox One.
- Remove the wires from the computer.
- Wait a few seconds before continuing.
- To make things even more complicated, hold both the binding and eject buttons simultaneously.
- Press the power button while still holding on to the controls.
- If the startup tone is heard twice, you’re good to go.
- On-screen instructions for running the troubleshooter should appear at this point.
- Eject and bind buttons must be released.
- The troubleshooter will also ask for your assistance in diagnosing and solving the error e102.
- All of your data on your Xbox One will be erased during this procedure.
- You should be able to fix your Xbox One’s system error e102 by following these instructions.
- Even if this doesn’t solve your problem, it’s still a sign that the updates have some problem while executing or parsing online.
- When updates are available, you can download and even install them on your own time.
Using the Factory Reset (E102/ E105 / E106 / E203)
Factory testing is your only option if you’re experiencing Xbox System Error E102 and all preceding methods have failed. The complete procedure for performing a factory reset is outlined in the following paragraphs.
- The first step is to shut down your Xbox and unplug all its cords.
- Reconnect the wires after a few minutes.
- Hold down the bind and eject buttons while pressing the Xbox Button simultaneously.
- Keep the buttons pressed for around 10-15 seconds after the Xbox starts until you hear the power-up sound twice.
- After hearing a beep, release all buttons.
- The starting troubleshooter is now visible.
- The “Reset this box” option is located in this Trobulershooter section.
Read also: How to Fix Error SU-30625-6 PS4
FAQs – Xbox System Error E102
What is error E102 on Xbox?
There is a problem with your Xbox One S system upgrade, and this error message is a good indicator of that. It would help if you did an offline console update to resolve the E102 error.
How do I fix error E102 00000c01 8007045d?
1) This particular error number can only be fixed by performing a factory reset on the Xbox.
2) If the Xbox Startup Troubleshooter fails to recover your console, you can try an offline option.
How do I fix my Xbox system error?
Select Reset this Xbox from the Xbox Startup Troubleshooter to reset your console. As soon as you’re prompted, choose to keep games and apps when prompted.
You will reset the OS and delete all possibly corrupted data; however, you will not delete your apps & games if you choose this option. Upon completing the Reset, you should be redirected to the console’s Home screen.
How do I factory reset my Xbox One without turning it on?
If this is the case, a factory reset is a simple procedure. You only need to press the Xbox button, go to Profile & System > Settings > System and select Reset console from the System info menu to perform a hard console reset. You now can retain your data and apps or erase them all.
What is the bind button on Xbox?
The Xbox One S’s Bind button sits beneath the console’s power button, on the left side of the original Xbox One. In front of the console, the Eject button is located next to the disc drive. You’re done if you hear the system power-up sound twice in succession while holding the Eject & Bind buttons for 10 to 15 seconds.
Conclusion
The Xbox One System Error E102 troubleshooting guide has concluded. You should be able to eliminate this issue by utilizing the solutions listed above. All of the possible causes of the error are discussed in this article.
Follow us for more tutorials and tips. That’s very kind of you.
Xbox One error codes can be very tiresome and worrying. As a gamer, the last thing you ever want to see is an error code to either delay you from gaming, or putting you off entirely.
One of the most common error codes is the the XboxOone X Error E102 or E102 10030c02 8007045D which can look like a fatal code that turns up on your display after a system update. This error code will stop you from being able to start up your console and enjoy your latest game.

In this guide
Add a header to begin generating the table of contents
Let’s be honest; normally a system update will go smoothly however the Xbox X Error Code E102 error code can signify trouble. However don’t worry; as with many Xbox One error codes it can be fixed with some patience; and if not then be sure to get in touch with us and check out our repair services here.
Sometimes a simple restart of your console, a re-installation of the update offline or running the troubleshooter can be a great place to start.
Normally, the E102 10030c02 8007045d Xbox One error code occurs at the time of the start up or the operating system update.
As a clue for you, any message with the system error E code indicate a problem with the Xbox upgrade process. This will include the E102, E105, E106 or E200 Xbox One error codes. In terms of fixing the E201 error code, lets look at some simple solutions:
So, how do we fix an Xbox Error Code E102?
Sign out and in again
There have been reports over the years that by signing out and then back into the Xbox one can help to solve error code 0x87e105dc. By doing so, your customisations will be restored to the default factory settings and will allow you to use the console again as normal.
Run the Xbox One Startup Troubleshooter
As the name would suggest, the troubleshooter can resolve almost all of the issues that are associated with the gaming console. This is a great tool to fix the Xbox One X Error E102 10030C02 9007045d Xbox error code.
Firstly, unplug the power cord of the Xbox; you will need to make sure your console is completely turned off – and then wait for 30 to 60 seconds.
Hold down the bind and eject buttons, then tap the power button while still holding the bind and eject buttons. Upon hearing two power up tones, you will then see the start up trouble shooter on your screen. Now you can release the bind and eject buttons.
Then simply follow the instructions on the screen to proceed.
Conduct an Offline System Update
Now remember, if you are ever unsure about how to repair your Xbox and you require assistance rapidly, don’t forget the team here at consoletherapy.com are here to help and support you.
Console Therapy provide fast, efficient games console repairs. We believe we are the fastest and most transparent games console repair service in the UK and EU.
Let us prove it to you. Get your instant repair quote now.
Further Reading
Looking to repair your console yourself? Our most recent support guides are below to help you
Since most of the time, the system updates can be done without any errors, but there is a fair share of users facing any issue while updating their Xbox OS. Users have reported that while updating, they are getting Xbox one system error e102. While some of the users are getting this after the successful completion of the update. Now the main concern here is how to fix this issue. This troubleshooting guide aims to provide you with some important information along with some methods to fix this issue.

Causes of Xbox One System Error E102
Now before we get to the solutions, we will first go through the causes of this strange error. Some users claim that network issues or bad system updates cause this error. The chances are previous system files are interfering with the new update files. Furthermore, corrupted data is also one of the major causes of this Xbox One System Error E102 issue.
- Bad Network
- Previous System Files Interfering
- Bad Update
- Corrupted Files
Similar Types of Xbox One System Error E102
- Xbox one offline update
- Xbox one system error e106
- Xbox system error e208
- Xbox one error e102 Reddit
- Xbox one startup error
- system error e102 10030c02 8007045d
- Xbox one system error e101
- Xbox one error e207
This section will go through all possible ways to fix Xbox one system error e102. The following are the methods demonstrated using step by step.
1. Restart Xbox (E100 / E200 / E204 / E206/ E207)
If you are getting any of these error codes, E100 / E200 / E204 / E206/ E207. Then don’t worry; it is a temporary error. Users have reported that a simple restart will easily fix the Xbox One System Error E102 Xbox one x issue. To do this,
- Simply click on Restart this Xbox
- Hold the Xbox button for a few seconds
2. Using Offline System Update (E101 / E205)
If you are getting an E101 / E205 error code, that means that the update hasn’t been done completely, or the files have been corrupted. Also, if the above two methods fail to work, use this Xbox One System Error E102 fix method.
- STEP 1. So firstly, you need a USB flash drive of at least 4GB
- STEP 2. Head on to the Computer System, and it’s important to format it with NTFS

- STEP 3. Once done, head onto the Xbox and Follow steps 1-6 from Method 3
- STEP 4. Now once you are in the Troubleshooting Menu, keep it remain there

- STEP 5. Get to the Computer System, and download this updated package
- STEP 6. Once the .zip file is downloaded, Right-click and extract all the files
- STEP 7. From the extracted files, copy $SystemUpdate to your flash drive
**NOTE: There are two things you need to make sure,
keep $SystemUpdate on the root directory and except this, there should be no other files

- STEP 8. Once the file has been copied completely, Plug it into the console
- STEP 9. While you are on the Troubleshoot screen, choose Offline System Update
- STEP 10. Now browse the update on the drive
- STEP 11. Once the process is done, check if the error occurs
3. Using the Factory Reset (E102/ E105 / E106 / E203)
If you are getting E102/ E105 / E106 / E203 codes and all of the above methods fails to work, the only way to get out of this Xbox One System Error E102 Xbox issue is by factory testing. Below are all the steps to factory reset.
- STEP 1. Firstly turn your Xbox off. also, remove all the connecting wires
- STEP 2. Now after a few minutes, reconnect the wires
- STEP 3. Now, press the bind button and the eject button. Keep them pressed, now press the Xbox Button
**NOTE: Bind button is located on the left side of the console
while the eject button is located on the front of the console
- STEP 4. Once the Xbox starts up, don’t loosen the hold; keep the buttons holding for around 10-15 seconds until you hear a powerup sound twice
- STEP 5. Once you hear the sound, release the buttons
- STEP 6. Now you can see the startup troubleshooter
- STEP 7. Here you can select Reset this box

Conclusion:
With this is the end of this troubleshooting guide on Xbox One System Error E102. We conclude that you can eliminate this error by following the above methods. In this article, we have briefly talked about the error and all of its possible causes.
For more guides and tips, follow us. Thank you!
Хотя в большинстве случаев обновления системы для консоли проходят гладко, но если вы видите «E» код ошибки , когда консоль Xbox One перезапускается после обновления системы, это простая проблема. Хорошей новостью является то, что в большинстве случаев ее можно решить путем переустановки обновления системы в автономном режиме или для ее устранения необходимо использовать средство устранения неполадок при запуске Xbox. В зависимости от кода ошибки давайте посмотрим, как устранить ошибки запуска Xbox One или коды ошибок E.

Запустите средство устранения неполадок при запуске Xbox
В некоторых кодах ошибок вам потребуется запустить средство устранения неполадок при запуске Xbox, если у вас нет к нему доступа. Хотя он обычно доступен, но в случае, если вы не можете получить к нему доступ, помогут следующие шаги.
Это средство устранения неполадок позволяет выполнить сброс для обновления Xbox One.
- Выключите консоль и удалите шнуры. Это позволит убедиться, что Xbox полностью выключен.
- Подождите минуту, а затем снова подключите шнур питания.
- Затем нажмите и удерживайте кнопку привязки и кнопку извлечения, а затем нажмите кнопку Xbox.
- Кнопка привязки находится на левой стороне консоли. Раньше для сопряжения нового контроллера с Xbox.
- кнопка извлечения расположена на передней панели консоли
- Даже если Xbox запускается, продолжайте удерживать кнопки Bind и Eject в течение 10-15 секунд.
- Вы должны услышать сигналы включения дважды. Отпустите после того, как услышите второй
- Это запустит средство устранения неполадок при запуске Xbox.
Исправьте ошибки запуска Xbox One или коды ошибок E
E100/E200/E204/E206/E207: перезагрузите консоль
Решить это очень просто. Вы можете либо перезагрузить компьютер с опции, которую вы видите на экране «Перезапустить Xbox», либо нажать и удерживать кнопку Xbox в течение почти 10 секунд, чтобы выключить консоль.
E101/E205: обновите Xbox в автономном режиме
Эти два кода ошибки означают, что обновление имело некоторую проблему во время установки, и единственный выход – это обновить его в автономном режиме. Вам понадобится компьютер под управлением Windows с подключением к Интернету. Для копирования установочного файла требуется флэш-накопитель USB с минимум 4 ГБ свободного места. Обязательно отформатируйте его в формате NTFS.
Предупреждение. Обязательно сделайте резервную копию всех ваших данных на USB-накопителе, иначе они будут потеряны при форматировании.

- Подключите флэш-накопитель USB к порту USB на вашем компьютере.
- Загрузите обновление автономной системы – OSU1. Это 4 ГБ файл, доступный в виде файла ZIP.
- Щелкните правой кнопкой мыши по файлу и распакуйте его. Ищите извлечь все параметры, когда вы щелкните правой кнопкой мыши на нем.
- Скопируйте файл $ SystemUpdate из файла .zip на флэш-диск.
- Обязательно скопируйте файл в корневой каталог.
- Там не должно быть никаких других файлов, кроме этого.
- Отключите USB-накопитель от компьютера.
- Подключите его к консоли и выберите «Автономное обновление системы».
- Выберите источник обновления, а затем обновите.
E102/E105/E106/E203. Восстановите заводские настройки консоли по умолчанию
Это последнее средство, если ничего не работает. Сброс консоли полностью восстановит вашу консоль до заводских настроек. Однако вы потеряете все сохраненные игры, настройки и т. Д. Если какой-либо прогресс вашей игры не был синхронизирован обратно в облако, он будет потерян.
- Воспользуйтесь средством устранения неполадок при запуске Xbox, которое я объяснил в начале.
- Затем, используя D-Pad, выберите Reset this Xbox, а затем нажмите A на вашем контроллере для подтверждения.
- Выберите Удалить все.
Наконец, если вы фактически потеряли установку игры, лучше установить или переместить игры Xbox One на внешний диск, когда ваша консоль запущена и работает. После сброса Xbox One автоматически распознает те игры, которые связаны с вашей учетной записью. Это сэкономит вам много времени.
You may encounter the Xbox system error e102 during the startup or the OS update installation process. Well, MiniTool summarizes some similar cases and several available troubleshooting methods in this post.
About Xbox One System Error e102
Though system updates can be done without any issues in most time, some users still suffer from issues like Xbox system error e102 in this process. Some even receive the error at startup. The error code varies from person to person.
Some commonly received error codes and similar types of Xbox One system error e102 are listed as follows.
- Xbox One system error e106
- Xbox system error e208
- Xbox One error e207
- Xbox One system error e101
- System error e102 10030c02 8007045d
- Xbox One offline update
What Causes Xbox System Error e102
The reasons for the Xbox One X system error e102 are complicated. It may occur in different cases. For instance, some people claim that network issues cause the error, while others state that bad system updates trigger the issue. To be short, there are multiple factors that could result in the Xbox system error e102.
Here, some possible causes of the Xbox One system error e102 are summarized. You can take them as your reference while executing Xbox One system error e102 fixes.
- Bad network
- Bad system updates
- Corrupted files
- Previous system files interference
Based on the above possibilities, several solutions to Xbox system error e102 are provided.
Solution 1: Re-Sign the Xbox One
Re-signing the Xbox One account is a simple Xbox One system error e102 fix. You just need to sign out and then sign back. Through this operation, your customisations will be restored to the default factory settings and you will be allowed to properly use the console again.
Besides, it can help you identify if the Xbox One system error e102 happens because of corrupted files. If the issue still persists after signing back, try other solutions immediately.
Solution 2: Restart the Xbox Console
A restart will erase glitches with the console. Restarting the console also has been proven to be useful for fixing the Xbox system error e102. To restart the console, simply hold down the Xbox button and click on Restart this Xbox. Then check if the discussed error is resolved.
Tip: In addition to Xbox system error e102, this method also works for error codes including E100/E200/E204/E206/E207.
Read also: Fix Xbox Sync Button Not Working with Top 5 Fixes
Solution 3: Perform an Offline Update
If your onboard console flash has a newer OS version than what you have on the HDD/SSD or the recovery flash drive, you will receive the Xbox system error e102 as well. In this case, you need to get a flash drive with the latest OSU 1 version and then install it to your console.
This whole process is divided into 3 parts. To successfully perform an offline update, you should check the parts one by one and follow the given steps.
Tip: This Xbox One system error e102 fix is also available for the error e101 and e205.
Part 1: Prepare a USB Drive with NTFS Format
Firstly, get a USB flash drive with 8GB free space at least. Then format it to the NTFS file system. You have multiple options to format the USB drive to NTFS. Before starting the format process, connect the USB drive to your computer.
Option 1: Use File Explorer
Step 1: Press Windows and E keys to open File Explorer.
Step 2: In the File Explorer window, click on This PC in the left panel and then move to the right side of the window to find the connected USB drive.
Step 3: Right-click on the USB device and click the Format option in the pop-up menu.
Step 4: In the Format window, choose NTFS from the drop-down menu of File System and tick the Quick Format checkbox.
Tip: To learn the difference between Quick Format and Full Format, please refer to Quick Format vs Full Format.
Step 5: After that, click the Start button to execute the operation. If you are prompted with a warning window, click OK to confirm the operation.
Option 2: Use Disk Management
Windows built-in Disk Management utility can also format a drive to NTFS quickly. For doing that, follow these steps.
Step 1: Right-click on the Windows icon on the desktop and click Disk Management.
Step 2: Right-click on the USB drive and click Format.
Step 3: In the elevated window, choose NTFS file system and tick the Perform a quick format checkbox. After that, click OK to carry out the operation. If a warning window pops up, allow the operation by clicking OK.
Option 3: Use MiniTool Partition Wizard
Though File Explorer and Disk Management can format the USB drive to NTFS easily, they sometimes won’t work. For instance, you may encounter issues like “Disk Management Format option grey out” and “Windows was unable to complete the format” while using the two utilities.
At this time, MiniTool Partition Wizard works. As a partition management expert, it enables you to format a disk or partition within a few clicks. Actually, it is used as an SD card formatter and USB formatter.
More importantly, if the current file system of your USB drive is FAT32, MiniTool Partition Wizard allows you to convert FAT32 to NTFS without losing data. Then you can directly convert the file system instead of formatting the USB device. By doing so, you won’t lose your data.
Tip: To convert FAT32 to NTFS, you just need the MiniTool Partition Wizard Free Edition. If you want to convert NTFS to FAT32, you are required to get the Pro or higher editions.
Free Download
Format the USB Drive to NTFS
Step 1: Launch MiniTool Partition Wizard to enter its main interface.
Step 2: Click on the USB drive and click the Format Partition feature.
Step 3: In the prompted Format Partition window, set parameters including partition label, file system, and cluster size. NTFS is selected by default. Hence, if you don’t have other demands, just follow the default settings and click OK to continue.
Step 4: Tap Apply to carry out the operation.
Also read: What Does Formatting a Hard Drive Do? Here Are Answers
Convert FAT32 to NTFS
If your present USB drive’s file system is FAT32, simply convert it to NTFS with MiniTool Partition Wizard. The advantage of this operation is that it won’t cause data loss.
Step 1: After entering the main interface of MiniTool Partition Wizard, right-click on the USB drive and click Convert FAT to NTFS.
Step 2: Click Start to begin the conversion. After a while, the conversion will be completed.
Part 2: Get the OSU 1 File
After preparing a USB drive with NTFS format, it’s time to get the OSU 1 file on your USB device. For that, please refer to these steps.
Step 1: Click here to download the latest version of the Xbox One console’s OS. The download process may take you some time, so you need to wait patiently.
Step 2: After the download ends, extract the files to your USB drive.
Tip: Make sure that the $SystemUpdate is located on the root folder of the flash drive.
Part 3: Insert the USB into the Xbox Console
Step 1: Turn off the Xbox One console and then connect the USB drive with the OSU 1 file included to the console.
Step 2: Hold down the Bind and Eject buttons, and then press the Xbox button.
Step 3: Release these buttons when you hear 2 power-up tones.
Step 4: Then you will see the Offline system update option in the pop-up Startup Troubleshooter screen. Choose this option by pressing X on your controller.
Step 5: Then the screen prompts you with the “Preparing console…” message. The time taken by the process depends on the read/write speed of your USB flash drive ranging from 15 minutes to 45 minutes.
Step 6: After the process finishes, your Xbox One console will restart automatically. Wait until the console is ready to boot up.
Tip: Sometimes, you may find that your console keeps booting up during the update process. This is normal because your system is ensuring everything falling into place.
Solution 4: Reset the Console via the Xbox One Troubleshooter
Resetting the Xbox console is one of the available Xbox One system error e102 fixes. You can reset the console via the Xbox One Troubleshooter with the following steps.
Tip: As this method will remove data stored on the console, you need to transfer it to other storage devices before starting the operation. This Xbox One system error e102 fix is applicable for e105, e106, and e203 too.
Step 1: Turn off your Xbox console and then disconnect the power cords.
Step 2: Wait for 30-60 seconds.
Step 3: Hold the Bind and Eject buttons at the same time. During that, keep pressing on the Power button until you hear two power-up tones. Then you can release the Bind and Eject buttons and you will see the Xbox Startup Troubleshooter on the screen.
Step 4: Choose Reset this Xbox > Remove Everything to execute the operation.
Step 5: Wait for the finish of the process.
Are you still bothered by the Xbox system error e102? Here is a full Xbox One system error e102 fix guide. Pick one method to fix the error now! Click to Tweet
Bottom Line
If you receive Xbox One system error e102 or other similar error codes, you can use the given solutions to fix them. As all the detailed steps are provided, you don’t have to worry about the operation.
Do you have any thoughts about this error? Do you encounter any difficulties while using these solutions? You can leave your words in the following comment area. If you meet any issues with MiniTool Partition Wizard, directly contact us via [email protected].
Do you get E102 10030c02 8007045d Xbox Error when starting the gaming console? Mostly, this fatal code turns up into the display after a system update. As a result, you become unable to start your console and enjoy your favorite game. Usually, the system update goes smoothly but if you view error like E102 then be careful as it signifies trouble. Fortunately, it’s not a big problem that can not be solved. The Xbox issue needs to restart the console, reinstall the system update offline or run the troubleshooter to be solved.
Commonly, E102 10030c02 8007045d Xbox Error occurs at the time of startup or OS update. The messages start with “E” codes such as E102, E105, E106, E200 and other which indicate the problem in your Xbox upgrade process. Here are a few easy solutions to fix E102 10030c02 8007045d.
Related – Fix: Xbox System Error E200 in Windows 10
Here is how to fix E102 10030c02 8007045d Xbox Error –
Sign out from the application and sign in
A few lucky users report that Xbox Error 0x87e105dc was resolved when the Sign out and then sign in into Xbox. This method wipes out the customizations and restores the console to the default Factory settings.
Step-1: Go to the Taskbar search and type Xbox and press Enter.
Step-2: Once the application appears, right click on your Profile pic from the top left and select Sign out.
Step-3: On the next screen, click on Sign in.
Step-4: The application will identify you and ask you as – Welcome back, Let’s Play. Click on this.
Run Xbox Startup Troubleshooter
Xbox Startup Troubleshooter resolves almost all the issues associated with the gaming console. So try to run this tool to fix E102 10030c02 8007045d Xbox Error.
- At first, Unplug the power cord of Xbox and ensure that the console is completely turned off.
- Now wait for 30 to 60 seconds and then plug in the power cord into the Xbox.
- Hold down the “BIND” button continuously from the left side and “EJECT” one from the face of the console, together for 10-15 seconds.
Note – Even if the Xbox Starts, you must hold Bind and Eject buttons jointly for 10-15 seconds.
- Wait until you hear two Power-up tunes. As you heard the second one, release the buttons.
- Press the Xbox button to get direct access to the Startup Troubleshooter.
- Now, follow the onscreen instructions to proceed ahead.
Perform an offline system update
Before proceeding to update, make sure that you fulfill the following conditions –
- You are running a good Internet Connection on your Windows Device
- The Device must have at least one USB port.
- You occupy a flash drive formatted as NTFS having minimum 4 GB storage.
Note – Insert the Flash drive into the port, right click on the USB and select Format from the context menu. This will open up the Format Window. Here select NTFS option from the drop-down menu of File System option.
Now as you have met the minimum requirements for this fix, follow the steps mentioned below –
- Download the Offline System Update file.
- Once completed, Go to Downloads folder and locate the file. Do right click on it and select Extract all option from the context menu.
- Now, copy the $SystemUpdate file and paste it into your Flash Drive.
- Hereafter, unplug the USB Drive from the system.
- Now Plug it in the console and go to Run Xbox Startup Troubleshooter section above.
- When the Troubleshoot page opens,, select Offline System update.
Restore your console to factory defaults
If the above methods don’t work to Fix E102 10030c02 8007045d Xbox Error, the last option is to restore the console. This will remove all the things such as saved game and settings from your XBox and bring back to the default state. Therefore, it’s necessary to backup the important data before proceeding forward. Once you have saved your games and settings to an external device, follow the steps –
- Launch the Troubleshoot page like we explained in the first method.
- Use D-Pad to choose Reset this Xbox, and then press A button on your controller to confirm.
- On the subsequent page, Select Remove Everything.
That’s all. Hope the different fixes mentioned above have resolved E102 10030c02 8007045d<.
Repair any Windows problems such as Blue/Black Screen, DLL, Exe, application, Regisrty error and quickly recover system from issues using Reimage.
Since most of the time, the system updates can be done without any errors, but there is a fair share of users facing any issue while updating their Xbox OS. Users have reported that while updating, they are getting Xbox one system error e102. While some of the users are getting this after the successful completion of the update. Now the main concern here is how to fix this issue. This troubleshooting guide aims to provide you with some important information along with some methods to fix this issue.

Causes of Xbox One System Error E102
Now before we get to the solutions, we will first go through the causes of this strange error. Some users claim that network issues or bad system updates cause this error. The chances are previous system files are interfering with the new update files. Furthermore, corrupted data is also one of the major causes of this Xbox One System Error E102 issue.
- Bad Network
- Previous System Files Interfering
- Bad Update
- Corrupted Files
Similar Types of Xbox One System Error E102
- Xbox one offline update
- Xbox one system error e106
- Xbox system error e208
- Xbox one error e102 Reddit
- Xbox one startup error
- system error e102 10030c02 8007045d
- Xbox one system error e101
- Xbox one error e207
This section will go through all possible ways to fix Xbox one system error e102. The following are the methods demonstrated using step by step.
1. Restart Xbox (E100 / E200 / E204 / E206/ E207)
If you are getting any of these error codes, E100 / E200 / E204 / E206/ E207. Then don’t worry; it is a temporary error. Users have reported that a simple restart will easily fix the Xbox One System Error E102 Xbox one x issue. To do this,
- Simply click on Restart this Xbox
- Hold the Xbox button for a few seconds
2. Using Offline System Update (E101 / E205)
If you are getting an E101 / E205 error code, that means that the update hasn’t been done completely, or the files have been corrupted. Also, if the above two methods fail to work, use this Xbox One System Error E102 fix method.
- STEP 1. So firstly, you need a USB flash drive of at least 4GB
- STEP 2. Head on to the Computer System, and it’s important to format it with NTFS

- STEP 3. Once done, head onto the Xbox and Follow steps 1-6 from Method 3
- STEP 4. Now once you are in the Troubleshooting Menu, keep it remain there

- STEP 5. Get to the Computer System, and download this updated package
- STEP 6. Once the .zip file is downloaded, Right-click and extract all the files
- STEP 7. From the extracted files, copy $SystemUpdate to your flash drive
**NOTE: There are two things you need to make sure,
keep $SystemUpdate on the root directory and except this, there should be no other files

- STEP 8. Once the file has been copied completely, Plug it into the console
- STEP 9. While you are on the Troubleshoot screen, choose Offline System Update
- STEP 10. Now browse the update on the drive
- STEP 11. Once the process is done, check if the error occurs
3. Using the Factory Reset (E102/ E105 / E106 / E203)
If you are getting E102/ E105 / E106 / E203 codes and all of the above methods fails to work, the only way to get out of this Xbox One System Error E102 Xbox issue is by factory testing. Below are all the steps to factory reset.
- STEP 1. Firstly turn your Xbox off. also, remove all the connecting wires
- STEP 2. Now after a few minutes, reconnect the wires
- STEP 3. Now, press the bind button and the eject button. Keep them pressed, now press the Xbox Button
**NOTE: Bind button is located on the left side of the console
while the eject button is located on the front of the console
- STEP 4. Once the Xbox starts up, don’t loosen the hold; keep the buttons holding for around 10-15 seconds until you hear a powerup sound twice
- STEP 5. Once you hear the sound, release the buttons
- STEP 6. Now you can see the startup troubleshooter
- STEP 7. Here you can select Reset this box

Conclusion:
With this is the end of this troubleshooting guide on Xbox One System Error E102. We conclude that you can eliminate this error by following the above methods. In this article, we have briefly talked about the error and all of its possible causes.
For more guides and tips, follow us. Thank you!
Some Xbox One players see the dreaded ‘Xbox System Error E102‘ when starting up or installing an operating system update. Whenever this error code is produced, there’s an error with the upgrade process.
Due to faulty data interfering with a startup sequence, most of these issues are caused. There should be no issues if you use the Startup Troubleshooter to perform an Offline Reset.
For those who have a newer version of OSU1 on their onboard console flash, You can solve the problem by generating a flash drive and installing the latest OSU1 version on their console.
Although system updates are often trouble-free, some customers still encounter errors like Xbox Error Code E102 throughout the installation process. At startup, some people get the error message. For each user, the error code may be different.
Xbox System Error E102 are frequently encountered and are listed below.
- error e106 occurred on Xbox One
- Error e208 on Xbox One
- Error e207 on the Xbox One
- Error e101 in the Xbox One system console
- System error e102 10030c02 8007045d
- An offline update for Xbox One.
Causes For Xbox System Error E102
It’s critical that we first examine the underlying causes of the problem because only then can we begin to address the numerous approaches to resolving it.
When we know what’s causing the problem, we can better treat it, but we can also use our resources and time more wisely.
Consequently, the following are a few possibilities for the Xbox Error Code E102:
- Problems with the Network (Weak Network)
- Updated with a bug
- Files that have been corrupted.
- Files from previous versions interrupting the updating process
From the factors mentioned above, you can easily see that “updates” and “upgrades” of the system are the most common culprits.
If an error like this appears on your screen, something went wrong during or after an update for your Xbox system in particular.
Read Also: How to Fix PS4 Error SU-41350-3?
How to Fix Xbox System Error E102 (Different Ways)

The most recent Offline System Update File or an offline reset via Startup troubleshooter options can fix Xbox Error Code E102. Here’s a step-by-step guide to resolving Xbox One system issues like e102 and other remedies.
Check the Stability of Your Network
You’ll need a stable internet connection to check-in and get all the updates reflected. Check your internet speed at fast.com or speedtest.net to get an idea of how fast you are. After they’ve been tested and approved, look at the following changes.
Offline Factory Reset
Attempting an offline factory reset is the next step if the methods listed above fail. Also, if you couldn’t get your hands on the Troubleshooter tool, this applies to you. Follow these steps to accomplish this goal:
- Prepare your USB drive first. To restore your console to factory settings using a USB flash drive, you’ll need:
- A computer running Windows and equipped with a USB port and internet access
- An NTFS-formatted USB flash drive with at least 4 GB of storage space. Follow this link for step-by-step instructions on correctly formatting your hard disk.
Once the flash drive has been successfully formatted:
- Then, connect a USB drive to the computer.
- Download the reset file to your computer by clicking on the following link. You can find the files required to restore your Xbox to its factory settings in this zip file. Revert to the original settings.
- If the console update. Postcode file does not download automatically; click Save to store it on your computer.
- Right-click on the compressed file and select Extract All from the pop-up menu to unzip it.
- Add the $SystemUpdate file to your USB flash drive from the—postcode file.
Once you’ve completed step one, you’re ready to move on to step two:
- If you have a wired network connection, disconnect the cable.
- For 30 seconds, disconnect the mains cable from your console and turn it back on. Reconnect the power cord and turn the device back on.
- Connect the USB flash drive to your console’s USB port.
- You’ll need to hold down the Pair and Eject buttons on your Xbox One console while pressing the Xbox button.
- Hold down both the Eject and the Pair buttons for around fifteen seconds.
- The “power-up” tones should be about two seconds apart.
- Eject, and you may release pair buttons after the second power-up tone.
- Remove the flash drive when the console restarts.
- Digital setup instructions will appear after the console restarts, so you may easily reset your console using these instructions.
If everything goes smoothly, you’ll be redirected to the Main Screen again. If this doesn’t work, your only recourse is to have your console repaired. The service page on the Xbox website is the place to begin this procedure.
Read Also: How to Fix PS4 Error NP-34981-5
Turning Off and On Your Xbox
Restarting your Xbox Console system is one of the simplest methods to attempt initially. Of course, this primary method can repair most temporary screen issues from simple sources.
However, restarting your computer may not be enough for more significant problems. Start with this simple approach of troubleshooting and see if that helps.
Restarting your Xbox is as simple as pressing the Restart Button for a few seconds (ideally 5 to 10), then pressing it again and letting it go.
Run the Xbox Startup Troubleshooter
Follow these steps to use the Xbox One Startup troubleshooter to fix the Xbox System Error E102.
- Switch off your Xbox One.
- Remove the wires from the computer.
- Wait a few seconds before continuing.
- To make things even more complicated, hold both the binding and eject buttons simultaneously.
- Press the power button while still holding on to the controls.
- If the startup tone is heard twice, you’re good to go.
- On-screen instructions for running the troubleshooter should appear at this point.
- Eject and bind buttons must be released.
- The troubleshooter will also ask for your assistance in diagnosing and solving the error e102.
- All of your data on your Xbox One will be erased during this procedure.
- You should be able to fix your Xbox One’s system error e102 by following these instructions.
- Even if this doesn’t solve your problem, it’s still a sign that the updates have some problem while executing or parsing online.
- When updates are available, you can download and even install them on your own time.
Using the Factory Reset (E102/ E105 / E106 / E203)
Factory testing is your only option if you’re experiencing Xbox System Error E102 and all preceding methods have failed. The complete procedure for performing a factory reset is outlined in the following paragraphs.
- The first step is to shut down your Xbox and unplug all its cords.
- Reconnect the wires after a few minutes.
- Hold down the bind and eject buttons while pressing the Xbox Button simultaneously.
- Keep the buttons pressed for around 10-15 seconds after the Xbox starts until you hear the power-up sound twice.
- After hearing a beep, release all buttons.
- The starting troubleshooter is now visible.
- The “Reset this box” option is located in this Trobulershooter section.
Read also: How to Fix Error SU-30625-6 PS4
FAQs – Xbox System Error E102
What is error E102 on Xbox?
There is a problem with your Xbox One S system upgrade, and this error message is a good indicator of that. It would help if you did an offline console update to resolve the E102 error.
How do I fix error E102 00000c01 8007045d?
1) This particular error number can only be fixed by performing a factory reset on the Xbox.
2) If the Xbox Startup Troubleshooter fails to recover your console, you can try an offline option.
How do I fix my Xbox system error?
Select Reset this Xbox from the Xbox Startup Troubleshooter to reset your console. As soon as you’re prompted, choose to keep games and apps when prompted.
You will reset the OS and delete all possibly corrupted data; however, you will not delete your apps & games if you choose this option. Upon completing the Reset, you should be redirected to the console’s Home screen.
How do I factory reset my Xbox One without turning it on?
If this is the case, a factory reset is a simple procedure. You only need to press the Xbox button, go to Profile & System > Settings > System and select Reset console from the System info menu to perform a hard console reset. You now can retain your data and apps or erase them all.
What is the bind button on Xbox?
The Xbox One S’s Bind button sits beneath the console’s power button, on the left side of the original Xbox One. In front of the console, the Eject button is located next to the disc drive. You’re done if you hear the system power-up sound twice in succession while holding the Eject & Bind buttons for 10 to 15 seconds.
Conclusion
The Xbox One System Error E102 troubleshooting guide has concluded. You should be able to eliminate this issue by utilizing the solutions listed above. All of the possible causes of the error are discussed in this article.
Follow us for more tutorials and tips. That’s very kind of you.