For Digital Ocean, we should enable password authentication first.
The complete instruction is here: https://docs.digitalocean.com/support/i-lost-the-ssh-key-for-my-droplet/#enable-password-authentication
Log in to the Droplet via the Recovery Console
Even though you have a root password for the Droplet, if you try to log in via SSH using that password immediately, you’ll receive a Permission denied (publickey) error. This is because password authentication is still disabled on the Droplet. To fix this, you need to log in via the Recovery Console and update its SSH configuration.There are detailed instructions on how to connect to Droplets with the
Recovery Console for a more explicit walkthrough, but here’s a brief
summary:On the Droplet’s detail page, in the same Access tab, click the Launch
Console button.At the login prompt, enter root as the username.
At the subsequent password prompt, enter the root password you were
sent via email. Most distributions prompt you to enter the password
twice, but some (like Fedora 27) do not.Enter a new root password to replace the one that was emailed to you,
then enter that same new password again.You will now be logged in as root in the Recovery Console, which gives
you access to the Droplet’s SSH configuration.Enable Password Authentication To enable password authentication on
your Droplet, you need to modify a line in its SSH config file, which
is /etc/ssh/sshd_config.Open /etc/ssh/sshd_config using your preferred text editor, like nano
or vim. Find the line that reads PasswordAuthentication no line and
change it to PasswordAuthentication yes, then save and exit the file.Because the SSH daemon only reads its configuration files when it’s
first starting, you need to restart it for these changes to take
effect. The command to do this depends on your operating system:Operating System SSH Restart Command
Ubuntu 14.x service ssh restart
Ubuntu 15.4 and up systemctl restart ssh
Debian systemctl restart ssh
CentOS 6 service sshd restart
CentOS 7 systemctl restart sshd
Fedora systemctl restart sshd
I have a 12.10 server setup in a virtual machine with its network set to bridged (essentially will be seen as a computer connected to my switch).
I installed opensshd via apt-get and was able to connect to the server using putty with my username and password.
I then set about trying to get it to use public/private key authentication. I did the following:
- Generated the keys using PuttyGen.
- Moved the public key to
/etc/ssh/myusername/authorized_keys(I am using encrypted home directories). -
Set up
sshd_configlike so:PubkeyAuthentication yes AuthorizedKeysFile /etc/ssh/%u/authorized_keys StrictModes no PasswordAuthentication no UsePAM yes
When I connect using putty or WinSCP, I get an error saying No supported authentication methods available (server sent public key).
If I run sshd in debug mode, I see:
PAM: initializing for "username"
PAM: setting PAM_RHOST to "192.168.1.7"
PAM: setting PAM_TTY to "ssh"
userauth-request for user username service ssh-connection method publickey [preauth]
attempt 1 failures 0 [preauth]
test whether pkalg/pkblob are acceptable [preauth[
Checking blacklist file /usr/share/ssh/blacklist.RSA-1023
Checking blacklist file /etc/ssh/blacklist.RSA-1023
temporarily_use_uid: 1000/1000 (e=0/0)
trying public key file /etc/ssh/username/authorized_keys
fd4 clearing O_NONBLOCK
restore_uid: 0/0
Failed publickey for username from 192.168.1.7 port 14343 ssh2
Received disconnect from 192.168.1.7: 14: No supported authentication methods available [preauth]
do_cleanup [preauth]
monitor_read_log: child log fd closed
do_cleanup
PAM: cleanup
Why is this happening and how can I fix this?
![]()
Eric Carvalho
53.4k102 gold badges136 silver badges162 bronze badges
asked Oct 22, 2012 at 1:10
2
Problem solved:
Looks like there was a problem with my public key file. PuttyGen will create a public key file that looks like:
---- BEGIN SSH2 PUBLIC KEY ----
Comment: "rsa-key-20121022"
AAAAB3NzaC1yc2EAAAABJQAAAIEAhGF6GIuMY8FJ1+CNApnSY1N2YSlkYz72Yvwu
a6N1nFpBklz1+dsIMg4rcTLcF34M/tW5Yz+NUDAw2AEbxQ32FPgw7sAOIXktkYOH
tr7mmimiTjkoSCrJh1kqalPSpi8rglT/Bp67Ql2SZwvUFfMzHISryR0EZC4rXP/u
vObrJe8=
---- END SSH2 PUBLIC KEY ----
However, this will not work, so what you need to do is to open the key in PuttyGen, and then copy it from there (this results in the key being in the right format and in 1 line):
ssh-rsa AAAAB3NzaC1yc2EAAAABJQAAAIEAhGF6GIuMY8FJ1+CNApnSY1N2YSlkYz72Yvwua6N1nFpBklz1+dsIMg4rcTLcF34M/tW5Yz+NUDAw2AEbxQ32FPgw7sAOIXktkYOHtr7mmimiTjkoSCrJh1kqalPSpi8rglT/Bp67Ql2SZwvUFfMzHISryR0EZC4rXP/uvObrJe8= rsa-key-20121022
Paste this into authorized_keys then it should work.
answered Oct 22, 2012 at 1:47
F21F21
4,2595 gold badges24 silver badges23 bronze badges
9
- Edit the
/etc/ssh/sshd_configfile. - Change
PasswordAuthenticationandChallengeResponseAuthenticationtoyes.
3a. Restart ssh /etc/init.d/ssh restart.
OR
3b. better you use service sshd restart
answered Aug 19, 2015 at 12:35
HunterHunter
5294 silver badges2 bronze badges
8
Just a tip I hope may help someone else with the headaches I had. F21 is right that you need to copy the key out of the PuTTYGen window instead of saving the file, but after copying, the way you paste may have significant impact on whether your key will work or not. Some editors will alter the text as you paste, or do something with newlines or something that makes the authorized_keys file invalid.
What I have found to be the least likely to break is to echo the full string and redirect the output to the file. Right-clicking in PuTTY to paste the key string to the commandline, it works out like this (with the example given above):
echo [right-click-to-paste-here] > /etc/ssh/username/authorized_keys
You’ll end up with this:
echo ssh-rsa AAAAB3NzaC1yc2EAAAABJQAAAIEAhGF6GIuMY8FJ1+CNApnSY1N2YSlkYz72Yvwua6N1nFpBklz1+dsIMg4rcTLcF34M/tW5Yz+NUDAw2AEbxQ32FPgw7sAOIXktkYOHtr7mmimiTjkoSCrJh1kqalPSpi8rglT/Bp67Ql2SZwvUFfMzHISryR0EZC4rXP/uvObrJe8= rsa-key-20121022 > /etc/ssh/username/authorized_keys
Another advantage of this method is that you can add multiple keys this way by using >> to append instead of > to overwrite, eg:
echo ssh-rsa AAAAB3<...snip...>rJe8= rsa-key-20121022 >> /etc/ssh/username
Hope that helps someone.
answered Feb 27, 2013 at 1:04
DaveDave
1411 silver badge2 bronze badges
4
We were already using the right type of key (ppk instead of pem).
In our case, it was a problem with the file permissions for authorized_keys on the server user folder. It has to be -rw-r--r-- … It was -rw-rw-r--.
SSH is very finicky about file perms.
Check file permissions using:
ls -l authorized_keys
You can fix them if necessary with:
chmod 644 authorized_keys
matigo
19.7k7 gold badges39 silver badges64 bronze badges
answered Mar 13, 2015 at 18:50
SharadSharad
1411 silver badge2 bronze badges
6
SOLVED:
- You need to download the puttyGEN and generate a public and a private key.
- I’ve assigned a password to my private key.
- then configure the private key in putty. Putty->SSH->Auth->Browse to your private.
- You need to configure the public key on the server. (In my case I’ve talked with the server guy and asked if he could add my public key to the server). You need the public key in the other side (server) the connection.
answered Apr 17, 2013 at 9:38
1
In my case the reason was that private key file (.ppk) had been removed in Putty authentication agent i.e. Pageant. I just updated it again to Pageant there and connection worked perfectly after that.
answered Jan 17, 2014 at 17:58
Marko HMarko H
811 silver badge1 bronze badge
No supported authentication methods available server sent publickey is an error message commonly encountered when trying to access a remote server through SSH. This complete guide gives detailed information on why this error message occurs and how you can resolve it, so let’s start!
Contents
- Why Does the No Supported Publickey Error Message Occur?
- – Incorrect Public and Private Keys
- – Incorrect Username
- – Public Key Authentication Is Disabled
- – Incorrect Permissions
- – Firewall or Network Issues
- How To Resolve the No Supported Publickey Error Message?
- – Verify the Public Key
- – Check the File Permissions
- – Check SSH Agent
- – Verify the Server Settings
- Conclusion
Why Does the No Supported Publickey Error Message Occur?
The “no supported publickey” error message occurs when a user tries to authenticate with a remote server using SSH, but the server cannot verify the user’s identity. It indicates that the server rejected the authentication request because it could not find a valid private key.
– Incorrect Public and Private Keys
An incorrect public key error can occur when the public key used for authentication is invalid or corrupted. A private key and a public key are required for public key authentication. The public key is used for encrypting the data, while the private key is used for decrypting it.
When you connect to an SSH server, you must provide the public key to authenticate yourself. The server then checks this public key against the corresponding private key that is stored on the server. If the server cannot find the correct matching private key for your public key, or if the public key is malformed or invalid, you will receive an incorrect public key error.
– Incorrect Username
An “Incorrect username” error can occur when you are using a different username to connect to the server than the one associated with your public key. When you connect to an SSH server, you must provide your username along with your public key to authenticate yourself.
– Public Key Authentication Is Disabled
A “Public key authentication disabled” error can occur when the SSH server does not allow public key authentication. SSH servers typically support multiple authentication-methods, including password authentication and public key authentication. However, some servers may disable certain authentication-methods for security reasons.
Let’s see an example below:
AuthorizedKeysFile .ssh/authorized_keys
The settings are set to “no,” so you will receive the Public key authentication disabled error when trying to connect to the server using public key authentication.
– Incorrect Permissions
An “Incorrect permissions” error can occur when the permissions on the files or directories associated with your SSH public keys or private keys are not set correctly. SSH requires specific permissions on the files and directories that store the public and private keys to ensure the usage of authorized users only.
Let’s look at the example below.
chmod 777 ~/.ssh/authorized_keys
chmod 777 ~/.ssh/id_rsa
chmod 777 ~/.ssh/id_rsa.pub
This sets the permissions to 777, which allows anyone to read, write, and execute the files and directories. This is not recommended for SSH keys as it poses a significant security risk.
– Firewall or Network Issues
A “Firewall or network issues” error can occur when there are network connectivity issues between your computer and the SSH server. Various factors, such as firewalls, network congestion, or routing problems, can cause this.
Firewalls are often used to restrict network traffic and can sometimes block SSH connections. If you try to connect to an SSH server through a firewall, you may need to configure the firewall to allow SSH traffic.
Network congestion can also cause SSH connection problems. When the network is congested, packets may be dropped, and the SSH connection may be interrupted.
How To Resolve the No Supported Publickey Error Message?
To resolve the “no supported publickey” error message, you can check that the correct public key is associated with the user’s account, make sure that the user’s permissions are set correctly on the server, and verify that the SSH configuration is correct.
– Verify the Public Key
The first thing to verify is whether the public key is correct and matches the private key stored on the local machine. Ensuring the correct public key is uploaded to the remote server is important.
Let’s see its examples.
# Replace ‘public_key_file_path’ with the path to the public key file
public_key_file_path = ‘/path/to/public/key’
# Load the public key from the file
with open(public_key_file_path, ‘rb’) as key_file:
public_key = paramiko.RSAKey.from_private_key(key_file)
# Verify that the key is loaded correctly
if not public_key:
print(‘Error: Unable to load public key’)
else:
print(‘Public key loaded successfully’)
– Check the File Permissions
Ensure that the file permissions for the public key on the local machine are set to 600 (-rw——-). Moreover, ensure that the ~/.ssh/authorized_keys file on the remote machine is set to 644 (-rw-r–r–).
Let’s check its example.
public_key_file_path=’/path/to/public/key’
# Check the file permissions for the public key file
perms=$(stat -c “%a %n” “${public_key_file_path}”)
# Verify that the file permissions are correct
if [[ $perms == “600 ${public_key_file_path}” ]]; then
echo “Public key file permissions are set correctly”
else
echo “Error: Incorrect file permissions for public key file”
fi
– Check SSH Agent
When using SSH to authenticate with a remote server using public-key authentication, an SSH agent can be used to manage the private key(s) required for authentication. The SSH agent is a program that runs in the background and holds decrypted private keys in memory. The SSH client can then use the keys from the agent without prompting the user for the passphrase.
Here’s how to check whether the SSH agent is running and whether the required keys have been added to the agent:
- Check whether the SSH agent is running: To check whether the SSH agent is running, enter this command in a terminal window: $ ps -e | grep ssh-agent. If the SSH agent is running, you should see an output that includes “ssh-agent” and the agent’s process ID (PID).
- Check whether the required keys have been added to the agent: To check whether the required keys have been added to the SSH agent, enter the following command in a terminal window: $ ssh-add -l. If the required keys have been added to the SSH agent, you should see a list of the key fingerprints.
- If the SSH agent is not running, you can start it by entering this command: $ eval “$(ssh-agent -s)”.
- Once the SSH agent is running, you can add the required keys to the agent by entering the following command: $ ssh-add /path/to/private/key. This command will prompt you to enter the passphrase for the private key. After entering the passphrase, the key will be added to the SSH agent and can be used for authentication without further prompting.
– Verify the Server Settings
Check the server’s SSH settings and make sure that public key authentication is allowed. It’s also important to check that the SSH daemon is running on the remote machine. Let’s see an example below.
server_ip=’192.168.1.100’
# Verify the server settings
ssh -v “$server_ip”
This code uses the ssh command with the -v option to establish a verbose SSH connection to the server with the IP address specified in the server_ip variable. The verbose output will provide information about the server settings, such as the authentication-methods and key exchange algorithms that are supported by the server.
Conclusion
When you are trying to connect to a remote server via SSH (Secure Shell), you may encounter an error message that says something similar to the error message. Here are some key takeaways.
- This error happens if the server is set up to only allow certain types of authentication and your SSH client doesn’t have a valid key or credential that matches what the server expects.
- One common cause of this error is when you’re using SSH key-based authentication, but your private key isn’t recognized by the server. This can happen if the server doesn’t have your public key on file or if you’re using the wrong key file or passphrase.
- Another cause of this error is if the server is configured to use a different authentication method, such as password-based authentication or a different type of public key.
- In this case, you may need to adjust your SSH client settings or ask the server administrator to change the authentication method.
Thank you for reading!
- Author
- Recent Posts

Your Go-To Resource for Learn & Build: CSS,JavaScript,HTML,PHP,C++ and MYSQL. Meet The Team
I have the same exact problem described in this thread, but the answer accepted there is not the right one for me, because the user’s home directory is local.
I think that I configured everything properly on the client side (Windows 7, PuTTY’s PAGEANT, PUTTYGEN and PLINK), yet I don’t seem to make the public key mechanism work (password based ssh login works). I followed all the steps, cues and hints in:
- How To Configure SSH Keys Authentication With PuTTY And Linux Server
In 5 Quick Steps - SSH Public Key Authentication
I now suspect that I may be missing something on the server side (Linux, sshd), so I am posting the current /etc/ssh/sshd_config content:
Protocol 2
SyslogFacility AUTHPRIV
RSAAuthentication yes
PubkeyAuthentication yes
AuthorizedKeysFile      .ssh/authorized_keys
PasswordAuthentication no
PermitEmptyPasswords yes
ChallengeResponseAuthentication no
UsePAM yes
X11Forwarding yes
Subsystem       sftp    /usr/libexec/openssh/sftp-server
Any idea what I am doing wrong?
UPDATE: I found a tip for running sshd in debug mode, and here is the output:
/home/winwin> /usr/sbin/sshd -d
debug1: sshd version OpenSSH_4.2p1
debug1: read PEM private key done: type RSA
debug1: private host key: #0 type 1 RSA
debug1: read PEM private key done: type DSA
debug1: private host key: #1 type 2 DSA
debug1: rexec_argv[0]='/usr/sbin/sshd'
debug1: rexec_argv[1]='-d'
debug1: Bind to port 22 on ::.
Server listening on :: port 22.
debug1: Bind to port 22 on 0.0.0.0.
Bind to port 22 on 0.0.0.0 failed: Address already in use.
debug1: Server will not fork when running in debugging mode.
debug1: rexec start in 4 out 4 newsock 4 pipe -1 sock 7
debug1: inetd sockets after dupping: 3, 3
Connection from 192.168.1.8 port 49828
debug1: Client protocol version 2.0; client software version PuTTY_Release_0.60
debug1: no match: PuTTY_Release_0.60
debug1: Enabling compatibility mode for protocol 2.0
debug1: Local version string SSH-2.0-OpenSSH_4.2
debug1: permanently_set_uid: 74/74
debug1: list_hostkey_types: ssh-rsa,ssh-dss
debug1: SSH2_MSG_KEXINIT sent
debug1: SSH2_MSG_KEXINIT received
debug1: kex: client->server aes256-ctr hmac-sha1 none
debug1: kex: server->client aes256-ctr hmac-sha1 none
debug1: SSH2_MSG_KEX_DH_GEX_REQUEST_OLD received
debug1: SSH2_MSG_KEX_DH_GEX_GROUP sent
debug1: expecting SSH2_MSG_KEX_DH_GEX_INIT
debug1: SSH2_MSG_KEX_DH_GEX_REPLY sent
debug1: SSH2_MSG_NEWKEYS sent
debug1: expecting SSH2_MSG_NEWKEYS
debug1: SSH2_MSG_NEWKEYS received
debug1: KEX done

debug1: userauth-request for user winwin service ssh-connection method none
debug1: attempt 0 failures 0
debug1: PAM: initializing for "winwin"
debug1: PAM: setting PAM_RHOST to "win7client"
debug1: PAM: setting PAM_TTY to "ssh"
Failed none for winwin from 192.168.1.8 port 49828 ssh2
debug1: userauth-request for user winwin service ssh-connection method publickey
debug1: attempt 1 failures 1
debug1: test whether pkalg/pkblob are acceptable
debug1: temporarily_use_uid: 513/513 (e=0/0)
debug1: trying public key file /home/winwin/.ssh/authorized_keys
Authentication refused: bad ownership or modes for directory /home/winwin
debug1: restore_uid: 0/0
debug1: temporarily_use_uid: 513/513 (e=0/0)
debug1: trying public key file /home/winwin/.ssh/authorized_keys
Authentication refused: bad ownership or modes for directory /home/winwin
debug1: restore_uid: 0/0
Failed publickey for winwin from 192.168.1.8 port 49828 ssh2
Received disconnect from 192.168.1.8: 14: No supported authentication methods available
debug1: do_cleanup
debug1: PAM: cleanup
debug1: do_cleanup
debug1: PAM: cleanup
Now, I do notice the two bad ownership or modes for directory /home/winwin messages but I checked the ownership or modes for directory /home/winwin and AFAICT they’re OK:
/home> ls -lad winwin
drwxrwxr-x  21 winwin winwin 4096 Jul 13 21:24 winwin
And:
/home/winwin> ls -lad .ssh
drwxr-xr-x  2 winwin winwin 4096 Jul 14 12:06 .ssh
And:
/home/winwin/.ssh> ls -lad *
-rw-r--r--  1 winwin winwin 210 Jul 14 12:06 authorized_keys
-rw-r--r--  1 winwin winwin 210 Jul 14 01:58 authorized_keys.pub
-rw-r--r--  1 winwin winwin 394 Jul 14 01:57 authorized_keys.pub.orig
What could possibly be wrong?
UPDATE II: I tried chmod 600 as suggested in the answer below:
/home/winwin> ls -lad .ssh
drw-------  2 winwin winwin 4096 Jul 14 13:13 .ssh
And:
/home/winwin/.ssh> ls -lad *
-rw-------  1 winwin winwin 210 Jul 14 12:06 authorized_keys
But it still doesn’t work. Why am I still getting the Authentication refused: bad ownership or modes for directory /home/winwin error?
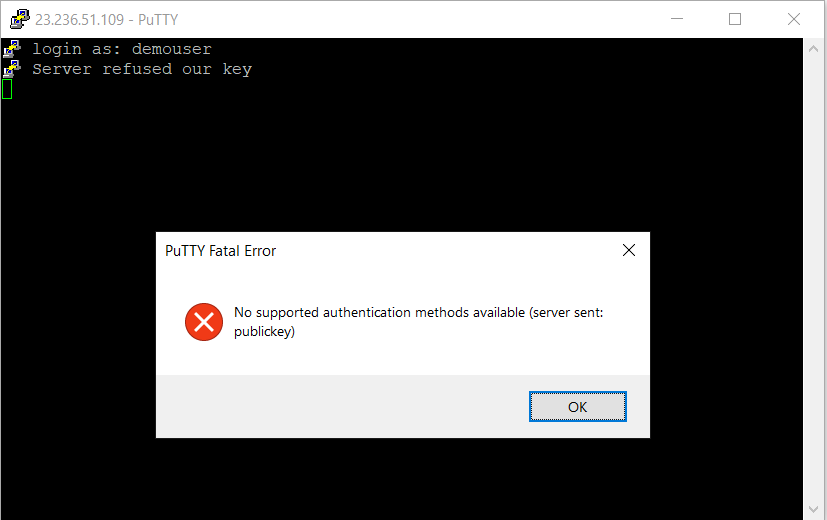
This tutorial guides you on how to fix Putty Fatal Error No supported authentication methods available (server sent: public key) while trying to SSH in to VM instance.
Putty Fatal Error No supported authentication methods available
When I was trying to connect to my f1-micro VM instance using linux user “demouser” on Google Cloud Platform through Putty, I got the following error as shown in the screenshot.
Are you also facing the above error “No supported authentication methods available (server sent: public key)” after adding Linux user and SSH keys to you instance ? then follow the below solution.
Solution
I will assume that, you had setup SSH keys correctly using the tutorial Managing SSH keys in metadata. Basically, you need to use Putty to generate public and private keys. Then use the public key and set up for the SSH user in the metadata.
Then you need to follow the below steps to turn on Password Authentication for SSH login using Putty.
- Use vim editor to open the sshd_config file under directory /etc/ssh/sshd_config.
- Set the value for PasswordAuthentication as “yes” instead of “no“.
- Finally, restart SSH server using the following command /etc/init.d/ssh restart
Also, you can follow How to provide access to specific folders , after creating non-root SSH user. Basically restricting access to specific folders only for users other then root user.
That’s it. And the error should have disappeared now and you should be able to connect to VM instance on the Google Cloud using Putty.
Hope it helped 🙂
- How to set or change root password in Ubuntu Linux ?
- Docker: Error response from daemon: OCI runtime create failed: container_linux.go:349
- How to find which users belongs to a specific group in linux
- Give write permissions for specific user or group for specific folder in linux
- How to unzip a zip file from Terminal (Google Cloud Shell)
- Build a Docker Image with a Dockerfile and Cloud Build in GCP?
- How to create GCP project on Google Cloud Platform
- GCP Virtual Private Cloud (VPC) Networks Fundamentals
- How to create GCP project on Google Cloud Platform
- Is it possible to change Google Cloud Platform Project ID ?
- Create non-root SSH user account and provide access to specific folders
- MariaDB – How to set max_connections permanently ?
References
- Unix commands wikipedia
- Google Cloud VM, SSH